Lucy Neatby - Tradewind Knitwear Designs -free mp3 bag pattern

|
Tradewind Knitwear Designs
|
|
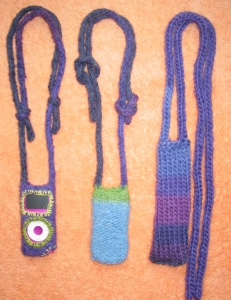
Free Pattern:
Felted Double-Knit MP3 Bag
Designed by Lucy Neatby
For very intimate double-knitting details, see the
Double Knitting Delight DVD.
|
Regular readers of my newsletter will know of my affection for my I-pod.
This Christmas I was lucky enough to receive a Nano, and I like to hang it around
my neck. I find this little bag with an adjustable-length strap works very well
and, incidentally, makes a great introduction to double knitting and/or
felting.
Directions for larger bags are given at the end.
Yarn: 20g Needful Yarns JOY, 100% merino wool (50g =78m). This yarn felts like a dream and seems to give fairly predictable results.
(Naturally with any felted article there are variables beyond our control; be
prepared to experiment with your first bag.)
OR
Experiment with other feltable wool yarns (the number of stitches / needle
size may easily be altered to suit your yarn).
Needles:
A set of 6mm (US #10) dpns will cover all eventualities.
Straights or a circular needle will do (but a couple of spare dpns might also
be useful).
Abbreviations:
K1 Knit one stitch.
Yf Yarn forward (towards the knitter)
S1 Slip one stitch purlwise (as if to purl)
RS Right side
M1 Make one stitch, (knit under the bar between the
stitches).
Dimensions:
Pre-felting: 2 inches Wide x 7 inches Deep, Cords 24 inches.
Apres-felting: 2" W x 4" D, Cords 21"
Method 1: Double-knitted in Stocking stitch
Cast on 14sts by Long-tail method.
(Or, if preferred, use tubular cast-on, beginning with a knit stitch.)
Row 1 (K1, yf, s1) repeat to end of row.
Every alternate stitch has been worked, and the intervening ones have been
slipped with the yarn in front.
Repeat Row 1.
This row will work the stitches previously slipped and complete one round of
knitting.
Repeat Row 1 until the desired pre-felting length is reached.
(Approximately 58 times more; 60 rows / 30 rounds total)
Periodically puff up the bottom of the bag to check that the sides are separate.
If you have accidentally purled one of the stitches meant to be slipped, the two
layers will become connected. If this occurs, don't despair!
Opening Double-Knitting and Fixing Snags
**Take two empty needles and hold them together and parallel in the right
hand, with tips pointing left. Hold the work in your left hand with its needle
tip pointed at the two empty ones.
Now start slipping the stitches from the work
alternately to the two empty needles: Slip the first stitch onto the empty
needle nearest you and the second stitch onto empty needle behind.
Repeat with
each pair of stitches. This will divide the two sides of the bag onto separate
needles.**
Now you can ladder back the column of stitches you suspect to have been
inadvertently purled; take a look inside for clues. From the RS you might also
be able to see a column of stitches with an extra row in the snagged area, this
is the column to release.
It can be tricky to determine which side needs to
laddered back: if you try one side and it doesn't work, re-create the stitches
and try again on the other side. The extra yarn released from the purled stitch
can be allowed to hang around and then later shared with its adjacent stitches.
To remount the stitches on your single working needle, reverse the process
and hold the two needles with the stitches in the right hand: take a stitch
first from the back needle, then from the front needle alternately until they are
all back where they belong.
Alternatively, be very careful and treat purl as a four-letter word whilst
knitting this fabric!
|
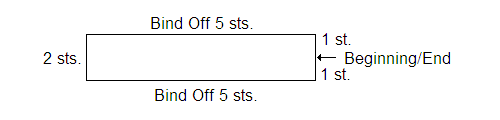
When your bag is of sufficient length (it's going to look crazily long)
complete the bag as follows:
Divide the bag onto two needles as described above, ** to **.
Now treat these stitches as regular circular knitting (add additional needles
as desired).
Knit the first stitch of the round, and bind off the next 5 sts,
knit one additional stitch (making a total of two stitches remaining after the
bound-off section).
Place a pin or piece of yarn through these two stitches,
then bind off the next 5 sts until 2sts remain (the first and last of the
round).
Strap:
Slip the last two sts back to your LHN and begin I-cord strap.
I-cord Row 1 With RS facing: K1, m1, k1. (3 sts)
I-cord Row 2 With RS facing: Slip these 3 sts back to the LHN, bring the yarn
across the back of the work, k3.
Repeat I-cord Row 2 until your strap is the required length (approx 24"). The
strap will shorten when felted, but not a great deal. End the cords by threading
the tail through all the stitches and tightening the slack.
Repeat a second strap on the remaining 2 sts.
Neaten any tails; those from the top of the straps may be tucked down inside
the I-cord tubes. The one from the base of the second strap may be used to
connect the bound -off edge securely to the base of the cord before tucking the
tail up inside the cord. You may wish to neaten the other cord base similarly,
using an additional piece of yarn.
Method 2: Double-knitted in Reverse Stocking Stitch (This is a more efficient
way of achieving a very similar result.)
Cast on 14 sts using long-tail method.
Row 1 (S1, p1), repeat to end of row.
Every alternate stitch has now been worked and the intervening ones have been
slipped with the yarn in front. Two rows equal one round. In this situation
there is no need to move the working yarn out of the way of the far bag stitches,
thus speeding things up considerably and almost eliminating the possibility of
an accidental snag.
Repeat Row 1.
This row will work the stitches previously slipped and complete one round of
knitting.
With a little practice, the slipping and purling can be done as one manoeuver:
The RHN can be put into both the stitch to be slipped and the stitch to be
purled simultaneously, throw the yarn for the purl stitch, and then gradually
withdraw the LHN until the stitch to be slipped drops onto the RHN, then
complete purling of the next stitch. This reduces the number of wasted needle
movements, but it takes a little practice to become proficient!
Repeat Row 1 until the desired pre-felting length is reached.
(Approximately 58 times more, 60 rows / 30 rounds total)
Periodically puff up the bottom of the bag to check that the sides are separate.
Complete the bag as for Method 1, or, you may invert the bag before working the
straps if you prefer to have Stocking Stitch outermost.
Modifications for Larger Bags:
This bag may be varied considerably to suit your containment requirements: for
larger bags more stitches may require to be reserved for an appropriate handle
size.
For a video pod try 24 sts with 4 stitch I-cords, bind off all but the first
and last two stitches of each side of the bag, and use these stitches as the
basis for your cords.
Felting and Finishing the Bags
Complete bags as given above. Now immerse the bag in a little hot water (you
don't need gallons), lubricate with a little soap and proceed to abuse the wool.
Rub, squeeze, knead, turn the bag outside-in and vice versa, refresh the hot
water as it cools..... Don't forget to work the cords too, and pay special
attention to upper edge.
Keep an eye on the size of the bag. It will suddenly
begin to feel more solid; keep working on it until you reach the desired size.
It is better to stop too soon; you can always felt it further later but you
can't reverse the process.
Rinse out any remaining soap, squeeze out excess moisture, and stuff the bag
with plastic wrapped cardboard to simulate the shape of your player. Allow to
air dry.
If your yarn has felted very enthusiastically, it is possible to cut openings
in the bag to allow access to the controls of your particular player. Cut small
openings initially: they can always be enlarged.
To stabilize the edges, you may
wish to sew around the opening, using blanket stitch.
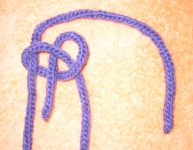
The cords may be turned into an adjustable length strap by tying the end of
each cord around the opposite strap with a simple overhand knot (See the photo above).
This pattern may be printed for your personal use from www.lucyneatby.com, not for resale or commercial distribution.
PayPal; VISA; MasterCard; Toll-free Order Line 1 (866) 272-7796
TRADEWIND KNITWEAR DESIGNS
45 Dorothea Drive, Dartmouth, NS, B2W 5X4, Canada
All images and text Copyright © 2007; Lucy Neatby, Tradewind Knitwear Designs
www.lucyneatby.com