
User interface specifications
This section covers cabling pinouts for the Control Monitor, Palmtop Controller, and MIF interfaces. Control port and cabling pinouts for the Control Monitor and MIF
The Control port uses a standard DE-9 female connector that conforms to the EIA RS-232 standard for serial interfaces. Table C-1 lists all MAX models that use the RS-232 pinouts.
Pinouts for the Palmtop Controller
Table C-2 specifies the pins and corresponding functions of the Palmtop Controller jacks.
MAX RJ12 pin |
Function |
I/O |
|---|---|---|
|
1
|
Power to Palmtop, +5V
|
O
|
|
2
|
Control Out
|
O
|
|
3
|
Control In
|
I
|
|
4
|
Serial Transmit Data
|
O
|
|
5
|
Serial Receive Data
|
I
|
|
6
|
Ground
|
|
Palmtop port cabling pinouts for a Control Monitor
Table C-3 lists the specifications you need to adapt the Palmtop port for use as a Control Monitor or MIF interface through a vt-100 terminal.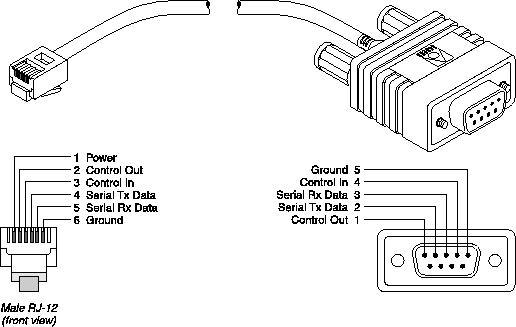
Figure C-1. Control Monitor and MIF Palmtop port and cable
Ethernet interface specifications
The base unit of a MAX has an Ethernet interface that supports the physical specifications of IEEE 802.3 and IEEE 802.14 with Ethernet 2 (Ethernet/DIX) framing. It provides a single Ethernet interface that auto-senses the Ethernet type to which it is connected. The following types are supported:
Use an EIA/TIA 568 or IEEE 802.3 10Base-T cable.
Use one of the following cables:100BASE-T2, 100BASE-T4 (not very popular), 100BASE-TX, or 100BASE-FX.
T1/PRI interface specifications
This section provides the specifications for the MAX unit's T1/PRI interface and covers cabling requirements. T1/PRI CSU requirements
Your requirements differ depending on whether or not you enable the internal CSU on each T1/PRI port on the MAX. Enable the internal CSU by setting the Net/T1 > Line Config > Line N > Front End parameter to CSU. Disable the internal CSU by setting Front End to DSX.
To avoid harming the WAN, you must contact your carrier for approval before installation. Once you install the MAX, you must notify the carrier before disconnecting the MAX from the WAN. If you disconnect or turn off the MAX without prior notification, the carrier might temporarily discontinue your T1/PRI service.
T1/PRI cable specifications
The maximum cable distance between the T1/PRI WAN interface equipment and the MAX should not exceed 655 feet (200 m) for a MAX without CSUs. Measure the line length and record it when you install the MAX. You must specify this length when you configure the Line Profile parameters. For more information, see the MAX Reference Guide.
Model number RJ48C-XPart number 2510-0059/0323-001 | |||
|---|---|---|---|
Pair # |
Signal (MAX) |
Male RJ48C (MAX) |
Male RJ48C (remote) |
|
1
|
Receive
|
2 1
|
5 4
|
|
2
|
Transmit
|
5 4
|
2 1
|
T1/PRI straight-through cable: RJ48C/RJ48C
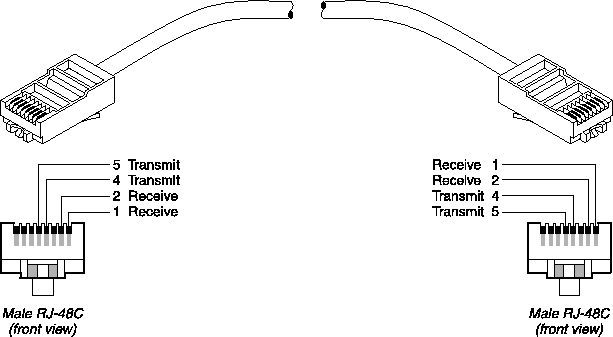
Before installing this cable, verify that the WAN interface transmits on pins 2 and 1 and receives on pins 5 and 4. Refer to Figure C-3 and Table C-6.
T1/PRI straight-through cable: RJ48C/DA-15
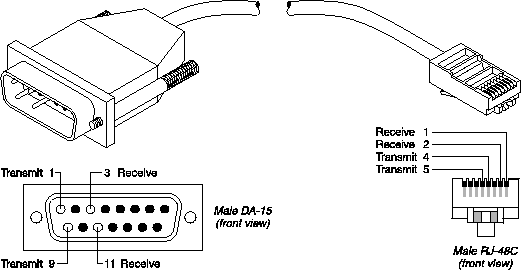
Before installing this cable, verify that the WAN interface transmits on pins 3 and 11 and receives on pins 1 and 9. Refer to Figure C-4 and Table C-7.

T1/PRI crossover cable: RJ48C/DA
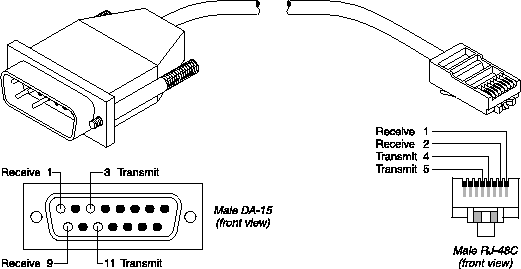
Before installing this cable, verify that the WAN interface transmits on pins 1 and 9 and receives on pins 3 and 11. Refer to Figure C-5 and Table C-8.

Model number DA15-SPart number 2510-0065-001 | |||
|---|---|---|---|
Pair # |
Signal (MAX) |
Male RJ48C (MAX) |
Male DA-15P (remote) |
|
1
|
Receive
|
1 2
|
1 9
|
|
2
|
Transmit
|
5 4
|
3 11
|
T1/PRI straight-through cable: RJ48C/Bantam
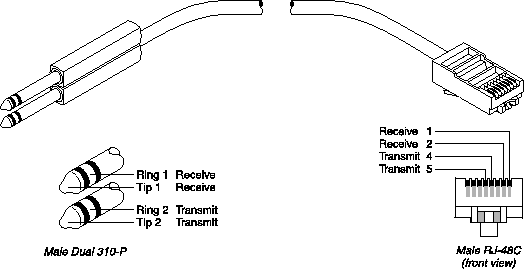
The WAN side of the cable connects to dual bantam jacks. Refer to Figure C-6 and Table C-9.

T1 RJ48C-Loopback plug
This plug loops the transmit signal back to the MAX
Pair # |
Signal |
Male RJ48C |
|---|---|---|
|
1
|
Receive
|
1 (connects to 5) 2 (connects to 4)
|
|
2
|
Transmit
|
5 (connects to 1) 4 (connects to 2)
|
T1/PRI WAN ports
Table C-11 lists the pins on RJ48C sockets on the MAX used for T1/PRI WAN interface. Only pins 1, 2, 4, and 5 are used. The remaining pins are not connected.
WAN switched services available to the MAX
The MAX is compatible with both AT&T and Northern Telecom central office switches, and can access all T1/PRI switched digital services offered by AT&T's ACCUNET Switched Digital Services:
E1/PRI interface specifications
This section provides the specifications for the MAX unit's E1/PRI interface and covers cabling requirements. E1/PRI cable specifications
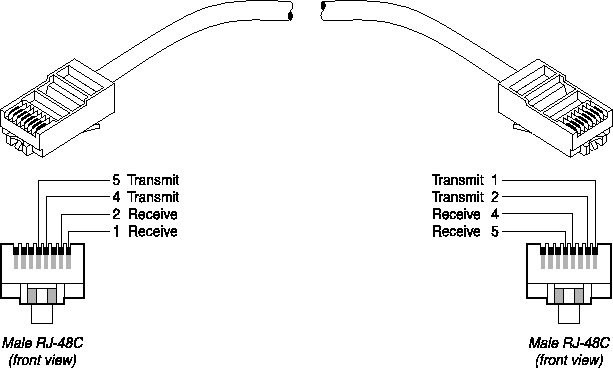
The WAN interface cables and plugs described in this section are available for the MAX unit's WAN interfaces. Use only the cable specifically constructed for transmission. E1/PRI crossover cable: RJ48C/RJ48C
Install this cable when the WAN interface transmits on pins 5 and 4 and receives on pins 2 and 1. Refer to Figure C-7 and Table C-12.
Figure C-7. RJ48C/RJ48C crossover cable
E1/PRI straight-through cable: RJ48C/RJ48C
Before installing this cable, verify that the WAN interface transmits on pins 2 and 1 and receives on pins 5 and 4. Refer to Figure C-8 and Table C-13.

E1/PRI straight-through cable: RJ48C/DA-15
Before installing this cable, verify that the WAN interface transmits on pins 3 and 11 and receives on pins 1 and 9. Refer to Figure C-9 and Table C-14.
E1/PRI crossover cable: RJ48C/DA
Before installing this cable, verify that the WAN interface transmits on pins 1 and 9 and receives on pins 3 and 11. Refer to Figure C-10 and Table C-15.
Model number DA15-SPart number 2510-0065-001 | |||
|---|---|---|---|
Pair # |
Signal (MAX) |
Male RJ48C (MAX) |
Male DA-15P (remote) |
|
1
|
Receive
|
1 2
|
1 9
|
|
2
|
Transmit
|
5 4
|
3 11
|
E1/PRI straight-through cable: RJ48C/Bantam
The WAN side of the cable connects to dual bantam jacks. Refer to Figure C-11 and Table C-16.
E1/PRI straight-through cable: MAX 6000 BNC to RJ-48C
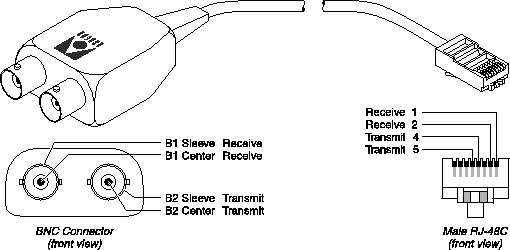
This cable adapts a modular E1 port on the MAX to coaxial cable E1 lines. You must also set the jumpers within the MAX for 50 Ohm service. Refer to Figure C-12 and Table C-17.
E1/PRI WAN ports
Table C-18 lists the pins on RJ48C sockets on the MAX used for E1/PRI WAN interface. Only pins 1, 2, 4, and 5 are used. The remaining pins are not connected.
ISDN BRI interface specifications
This section provides the specifications for the MAX unit's ISDN BRI interface.![]() Warning: To reduce the risk of fire, communication cable conductors must be 26 AWG or
larger.
Warning: To reduce the risk of fire, communication cable conductors must be 26 AWG or
larger.
For the Net/BRI module
The Net/BRI module (MX-SL-8BRIN) connects to the WAN through a network termination (NT1) device. You must install a cable from the NT1 that ends in a 100Ohm termination. The maximum distance between the NT1 and its termination is 3280 feet (1000 m). You can install the Net/BRI module anywhere along the length of the cable. Use only cable specifically constructed for ISDN BRI interfaces.
For the Host/BRI module
Each ISDN BRI line provided by the Host/BRI module (MX-SL-8BRIT) must end in a 100Ohm termination. The maximum cable distance between the Host/BRI and its termination is 3280 feet (1000 m). You can install the local ISDN BRI device anywhere along the length of the cable. Use only cable specifically constructed for ISDN BRI "S" interfaces.
Serial host interface specifications
This section describes the cabling requirements, timing requirements, and interface types for the serial host ports on the MAX.
V.35 cabling
The sections that follow list the pinouts for different types of V.35 cabling. V.35/V.25 bis cable to Cisco
This cable connects the MAX to the V.35 port of a Cisco router that uses V.25 bis dialing. Figure C-13 and Table C-20 list the V.35/V.25 bis cable pinouts.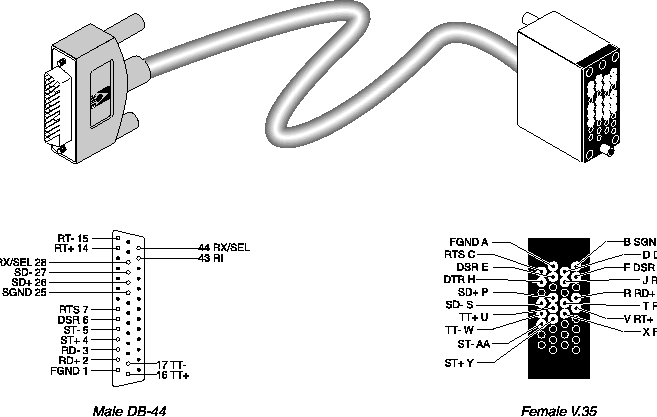
Figure C-13. V.35/V.25 bis cable to Cisco
Pair # |
Signal(MAX) |
MAX male DB-44(MAX) |
Host female V.35 |
|---|---|---|---|
|
1
|
FGND
|
1
|
A
|
|
2
|
SD+ SD-
|
26 27
|
P S
|
|
3
|
RD+ RD-
|
2 3
|
R T
|
|
4
|
ST+ ST-
|
4 5
|
Y AA
|
|
5
|
RT+ RT-
|
14 15
|
V X
|
|
6
|
DSR DCD
|
6 36
|
E, F* D
|
|
7
|
RTS RI
|
7 43
|
C J
|
|
8
|
DTR SGND
|
8 25
|
H B
|
|
9
|
TT+ TT-
|
16 17
|
U W
|
|
10
|
RX/SEL
|
28, 44*
|
|
V.35 cable to generic serial host
This cable connects the MAX to the V.35 ports of a wide variety of equipment. A female-to-male V.35 gender changer is included when you order the cable. Table C-21 lists the V.35 cable pinouts.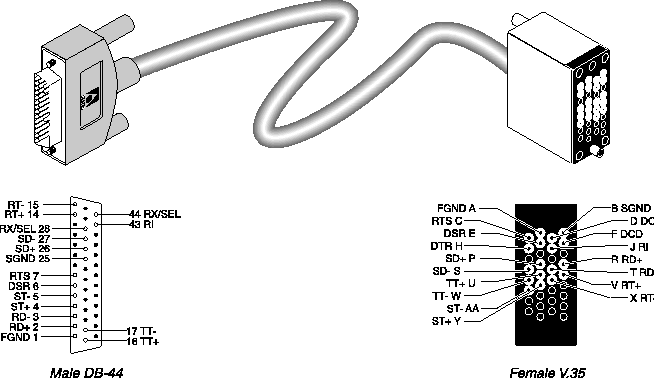
Figure C-14. V.35 cable to generic serial host
Pair # |
Signal(MAX) |
MAX male DB-44(MAX) |
Host female V.35 |
|---|---|---|---|
|
1
|
FGND
|
1
|
A
|
|
2
|
SD+ SD-
|
26 27
|
P S
|
|
3
|
RD+ RD-
|
2 3
|
R T
|
|
4
|
ST+ ST-
|
4 5
|
Y AA
|
|
5
|
RT+ RT-
|
14 15
|
V X
|
|
6
|
DSR DCD
|
6 36
|
E D, F*
|
|
7
|
RTS RI
|
7 43
|
C J
|
|
8
|
DTR SGND
|
8 25
|
H B
|
|
9
|
TT+ TT-
|
16 17
|
U W
|
|
10
|
RX/SEL
|
28, 44*
|
|
V.35/RS-366 cable to generic serial host
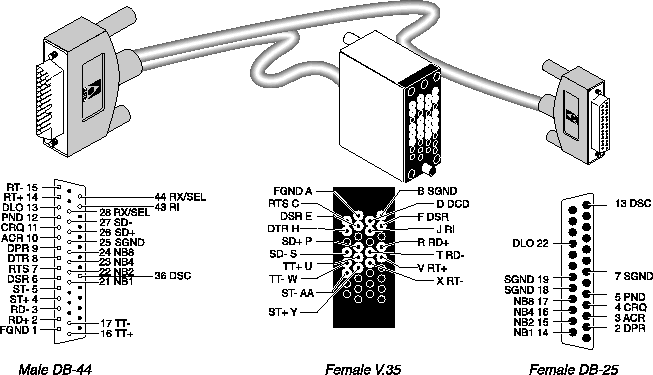
This cable connects the MAX to the V.35 ports of a wide variety of equipment using RS-366 dialing. A female-to-male V.35 gender changer is included when you order the cable. Figure C-15 and Table C-22 list the V.35/RS-366 cable pinouts.
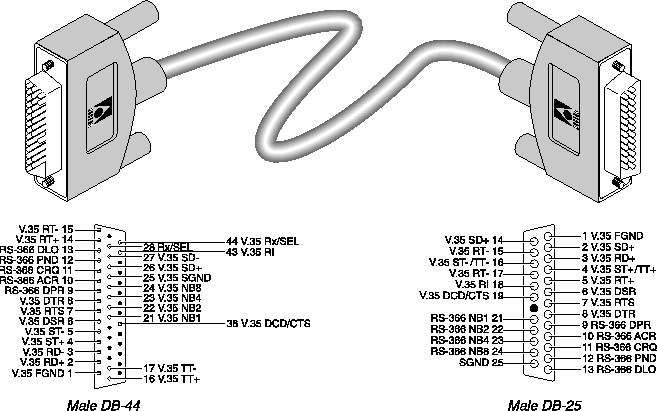
V.35/RS-366 cable to CLI
This cable connects the MAX to the V.35 port of the Compression Labs Rembrandt II codec with support for RS-366 dialing. Figure C-16 and Table C-23 list the V.35/RS-366 cable pinouts.
V.35/RS-366 cable to PictureTel
This cable connects the MAX to the V.35 port of the PictureTel codec with support for RS-366 dialing. Figure C-17 and Table C-24 list the V.35/RS-366 cable pinouts.
Figure C-17. V.35/RS-366 cable to PictureTel
Model number MBHD-449PTPart number 2510-0093-001 | ||||
|---|---|---|---|---|
Pair # |
Signal(MAX) |
MAX male DB-44(MAX) |
Host female DB-37 |
RS-366 Female DB-25 |
|
1
|
FGND
|
1
|
1
|
|
|
2
|
SD+ SD-
|
26 27
|
4 22
|
|
|
3
|
RD+ RD-
|
2 3
|
6 24
|
|
|
4
|
ST+ ST-
|
4 5
|
5 23
|
|
|
5
|
RT+ RT-
|
14 15
|
8 26
|
|
|
6
|
DSR DCD/CTS
|
6 36
|
11 9, 13*
|
|
|
7
|
RTS RI
|
7 43
|
7 15
|
|
|
8
|
DTR SGND
|
8 25
|
12 19, 20, 37*
|
|
|
9
|
TT+ TT-
|
16 17
|
17 35
|
|
|
10
|
DPR ACR
|
9 10
|
|
2 3
|
|
11
|
CRQ PND
|
11 12
|
|
4 5
|
|
12
|
DLO SGND
|
13 25
|
|
22 7
|
|
13
|
NB1 NB2
|
21 22
|
|
14 15
|
|
14
|
NB4 NB8
|
23 24
|
|
16 17
|
|
15
|
DSC
|
36
|
|
13
|
|
16
|
RX/SEL
|
28, 44*
|
|
|
RS-366 cabling
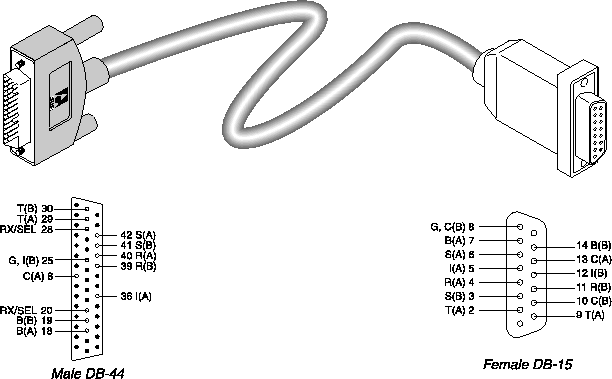
Ascend supplies a variety of RS-366 cables. The sections that follow list the pinouts for different types of RS-366 cabling. RS-449 / RS-366 / DB-37 cable to Video Telecom
This cable connects the MAX to the RS-449 port of a Video Telecom codec with support for RS-366 dialing. Figure C-18 and Table C-25 list the RS-449 / RS-366 / DB-37 cable pinouts.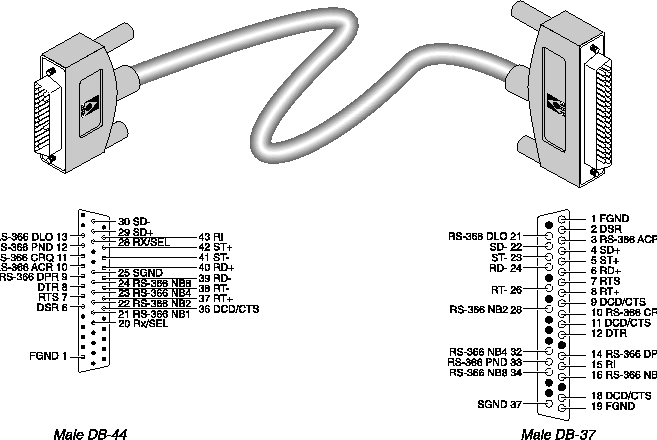
Figure C-18. RS-449/RS-366/DB-37 cable to Video Telecom codec
RS-449/RS-366 cable to generic serial host
This cable connects the MAX to the RS-449 ports of a wide variety of equipment using RS-366 dialing. A female-to-male DB-37 gender changer is included when you order the cable. Figure C-19 and Table C-26 list the RS-449/RS-366 cable pinouts.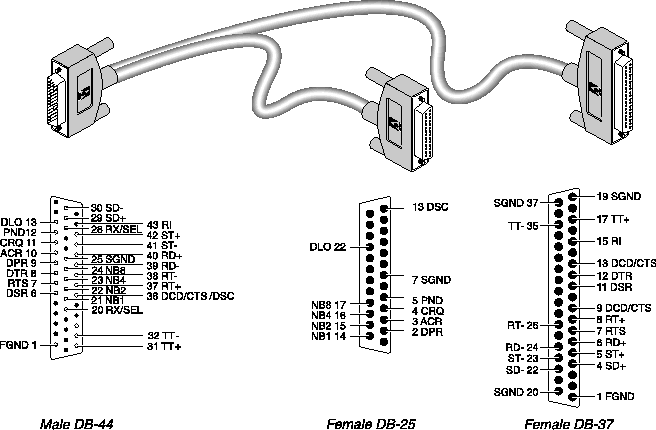
Figure C-19. RS-449/RS-366 cable to generic serial host
Model number MBHD-449-366Part number 2510-0078-001 | ||||
|---|---|---|---|---|
Pair # |
Signal(MAX) |
MAX male DB-44(MAX) |
Host female DB-37 |
RS-366 Female DB-25 |
|
1
|
FGND
|
1
|
1
|
|
|
2
|
SD+ SD-
|
29 30
|
4 22
|
|
|
3
|
RD+ RD-
|
40 39
|
6 24
|
|
|
4
|
ST+ ST-
|
42 41
|
5 23
|
|
|
5
|
RT+ RT-
|
37 38
|
8 26
|
|
|
6
|
DSR DCD/CTS
|
6 36
|
11 9, 13*
|
|
|
7
|
RTS RI
|
7 43
|
7 15
|
|
|
8
|
DTR SGND
|
8 25
|
12 19, 20, 37*
|
|
|
9
|
TT+ TT-
|
31 32
|
17 35
|
|
|
10
|
DPR ACR
|
9 10
|
|
2 3
|
|
11
|
CRQ PND
|
11 12
|
|
4 5
|
|
12
|
DLO SGND
|
13 25
|
|
22 7
|
|
13
|
NB1 NB2
|
21 22
|
|
14 15
|
|
14
|
NB4 NB8
|
23 24
|
|
16 17
|
|
15
|
DSC
|
36
|
|
13
|
|
16
|
RX/SEL
|
20, 28*
|
|
|
RS-449 cable to generic serial host
This cable connects the MAX to the RS-449 ports of a wide variety of equipment. A female-to-male DB-37 gender changer is included when you order the cable. Table C-27 lists the RS-449 cable pinouts.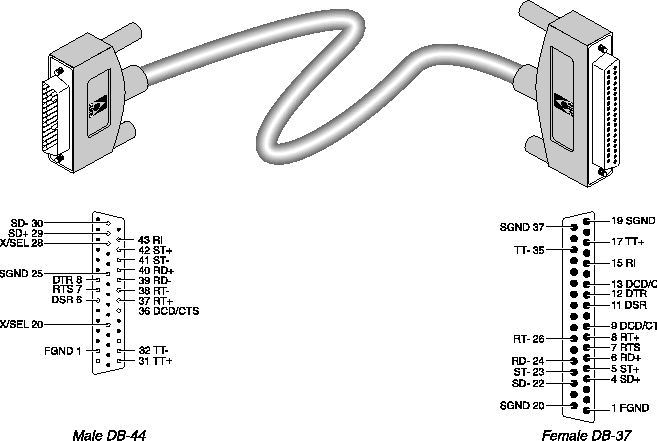
Figure C-20. RS-449 cable to generic serial host
Cable length requirements
Table C-29 specifies the recommended maximum length of the cable between the MAX and the serial host equipment. Longer distances at the specified data rates are possible when you use terminal timing, and still longer distances are supported by the installation of the Ascend RPM, a hardware device that provides an extended distance high-speed link between the MAX and the serial host equipment.
Max cable length |
Serial data rate |
|---|---|
|
25 feet
|
3 Mbps
|
|
75 feet
|
2 Mbps
|
|
150 feet
|
512 kbps
|
Serial WAN cabling specifications
The MAX unit's serial WAN interface supports nailed-up connections to the WAN. Data packets from the MAX unit's bridge/router module can use this interface, but bit streams from devices connected to the MAX unit's serial host ports cannot.
Pair # |
Signal(MAX) |
MAX male DB-44(MAX) |
Host male V.35 |
|---|---|---|---|
|
1
|
FGND RI
|
1 8
|
A J
|
|
2
|
SD+ SD-
|
39 40
|
P S
|
|
3
|
RD+ RD-
|
30 29
|
R T
|
|
4
|
ST+ ST-
|
41 42
|
Y AA
|
|
5
|
RT+ RT-
|
32 31
|
V X
|
|
6
|
TT+ TT-
|
38 37
|
U W
|
|
7
|
DTR DSR
|
6 11
|
H E
|
|
8
|
DCD SGND
|
9 25
|
F B
|
|
9
|
CTS RTS
|
7 36
|
D C
|
RS-449 cable to WAN
You can connect an RS-449 cable to the RS-449 port of a DCE device. The RS-449 cable has the pinouts described in
Pair # |
Signal(MAX) |
MAX male DB-44(MAX) |
Host female DB-37 |
|---|---|---|---|
|
1
|
FGND RI
|
1 8
|
1 15
|
|
2
|
SD+ SD-
|
39 40
|
4 22
|
|
3
|
RD+ RD-
|
30 29
|
6 24
|
|
4
|
ST+ ST-
|
41 42
|
5 23
|
|
5
|
RT+ RT-
|
32 31
|
8 26
|
|
9
|
TT+ TT-
|
38 37
|
17 35
|
|
8
|
DTR DSR
|
6 11
|
12 11
|
|
6
|
DCD SGND
|
9 25
|
13 19, 20, 37*
|
|
7
|
CTS RTS
|
7 36
|
9 7
|
|
Network Interface Specifications
|
Compatible with:
|
|
Loopback Testing
|
|
Copyright © 1998, Ascend Communications, Inc. All rights reserved.