 Tradewind
Knitwear
Designs by Lucy Neatby
Tradewind
Knitwear
Designs by Lucy Neatby
Tradewind
Knitwear
Designs by Lucy Neatby
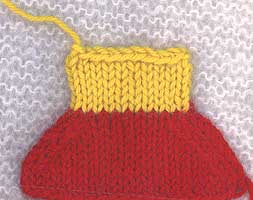
Grafting from the needles can be a worrisome affair. Grafting with a toe chimney will hold all the stitches securely and also offers the opportunity to neaten both corners of the graft. Socks present a particular grafting challenge, as they are often worked on fine needles with dark-coloured, happy-to-split yarns. Once these stitches are released, they can be hard to recapture. Waste yarn to the rescue!
Complete the knitting of the sock at one side. If you wish to make a final decrease to follow the usual shaping sequence before reaching the side, feel free to do so. Do not be concerned that the top and bottom of the sock may now have a one stitch difference in stitch numbers.
Do not bind off. Cut off the working yarn, leaving a 6" tail. Knot on a length of waste yarn; this yarn should be smooth, of the same weight and have a very bright color-contrast to the main yarn. Knit 6 - 8 rounds of waste yarn onto the remaining stitches of the sock. Cast off or thread the waste yarn stitches onto the tail of yarn.
Push the projecting chimney of waste yarn through to the wrong side of the work. Thread a new length (approx 16") of grafting yarn onto a darning needle, this will usually be matching with the sock. A new piece of grafting yarn is used, not the old tail of the working yarn. This provides a tail at either end of the graft with which to neaten any projecting corner stitches and allows the graft to be started from the mid-point of the toe for clarity.
Insert your non-sewing hand into the sock and pinch the chimney of waste yarn so that the central stitches from either side of the sock line up, and so that the intersection of the waste and the garment yarns are just visible on either side.
Commence grafting from the middle stitch. On one side, insert the needle under two strands of the main yarn, exactly duplicating the path of one of the central waste yarn sts. Pull through half of the yarn, leave the remainder dangling as a tail. Cross to other side of the sock and repeat.
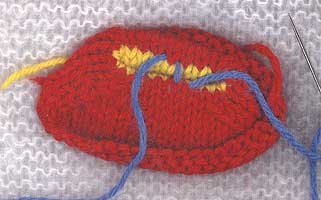
Grafting yarn is shown in blue for clarity.
From this point, always bring the needle across to the opposite side, put the needle into the main color stitch last exited by the grafting yarn, and duplicate the way the next waste yarn stitch intersects with the main yarn.
Repeat until the needle enters the last stitch on either side. Push your fingers up from underneath to stretch the stitches for a better view. The grafting yarn will only go through these outer sts once only. Leave the grafting yarn tail dangling on the outside of the work.
Thread the needle onto the dangling tail at the midpoint, turn the work around if desired and graft out towards the opposite corner.

Now doublecheck the graft. Stitches in the central section should appear to run unbroken across the row of grafted stitches. At the corners, check that there is one thread of the grafting yarn through each of the last stitches. Push your fingers up from underneath to stretch the stitches for a better view.
If you have any doubts about the graft (or you wish to practice!), the grafting yarn may be pulled out entirely and the toe reworked. All the stitches are still securely held.
Once you are happy with the toe, unravel the toe chimney. Recheck, and use the grafting tails to neaten the piggy stitches at either corner. Darn in the working yarn tail also. Darn these tails into the back of the sole fabric to further reinforce the soles.
Next topic - Excuse Me, But What is a "Steek"?
Back to the Bosun's Locker and the full topic listing.
TRADEWIND KNITWEAR DESIGNS
45 Dorothea Drive, Dartmouth, NS, B2W 5X4, Canada
All images and text Copyright © 2004; Lucy Neatby, Tradewind Knitwear Designs