 Tradewind
Knitwear
Designs by Lucy Neatby
Tradewind
Knitwear
Designs by Lucy Neatby
Tradewind
Knitwear
Designs by Lucy Neatby
A steek is nothing more fearsome than a vertical column of extra knitted stitches designed to be cut open when a garment is being finished. It is similar to the seam allowance around the sewing lines on a pattern for a woven fabric.
A steek may run right from the lower edge of a garment (to later form the front opening for a vest or cardigan) or be built to bridge the openings for armholes and neck without having to break the rhythm of the circular knitting (particularly helpful in two-colors-per-round knitting). As a steek is a preplanned cutting area, fully fashioned shapings may be made on either side of the steek for smart and easy finishing and no loss of patterned fabric.
Steeks are less commonly used in single-color-per-round work, but can still be very useful to ensure a perfect match with a long color gradation yarn or complex stripes (and in this case also fewer ends to darn in), or to facilitate a certain technique. For example, Bavarian travelling sts are much more easily worked with the right side of the work facing. If making a cardigan or required armholes, a steek would allow the work to be maintained in the round.
General Steek and Cutting Information
 Any knitted fabric may be cut, without or without a steek. Non-superwash wool yarns are the most stable to practice on initially. Shetland wool yarns scarcely even need sewing. Practice your first cutting on a redundant swatch. When cutting fabric without a steek, make basting stitches to guide you as it is easy to lose your orientation.
A steek may vary in width, (usually from 1 to 10 sts) according to your preference and confidence and the location on the project; however, the width of the steek generally remains constant once it is established. Be generous the first time around, you have the rest of your life to trim down to a one st steek (used by production knitters for speed). I like an eight st steek at the centre front of a cardigan when color changes are set to occur frequently - this allows me 4 steek sts to get back into gauge and rhythm before reaching the garment again. For an armhole or neck, I use 6 sts, which wastes as little yarn and effort as possible and gives me a comfortable selvage.
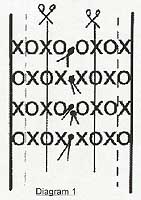
Whilst the stitch pattern in two-color-per-round work across the steek is not vital, an alternating salt-and-pepper pattern of stitches with a double' on the centerline helps to define the steek, beds the yarns together as intimately as possible, and highlights where to cut later; for these reasons I prefer "even number" stitch steeks.
                                           xoxooxox
                                           oxoxxoxo
                                           xoxooxox
                                           oxoxxoxo
When working a design where the yarn color is changed mid-steek, an even number of sts serves to remind you of the exact spot at which to change colors. Knot on the new yarn and resume the steek pattern.
The Conjuring Trick
 One of the coolest assets of a steek is the way it cunningly eliminates
thousands of yarn tails when working a project with multiple color
changes, most commonly experienced in cardigan, vest or flat fabric form.
By changing colors mid-steek, (they may be knotted together to help
maintain gauge) when you open the steek and neaten it back, all the knots
and yarn tails are exterminated.
One of the coolest assets of a steek is the way it cunningly eliminates
thousands of yarn tails when working a project with multiple color
changes, most commonly experienced in cardigan, vest or flat fabric form.
By changing colors mid-steek, (they may be knotted together to help
maintain gauge) when you open the steek and neaten it back, all the knots
and yarn tails are exterminated.
 An immense asset of this method is that once this steek is opened and
trimmed, every single yarn tail and knot is cut away without the need to ever raise
a darning needle.
An immense asset of this method is that once this steek is opened and
trimmed, every single yarn tail and knot is cut away without the need to ever raise
a darning needle.
A steek may be trimmed and tucked into a double band, but ensure that the
resulting triple thickness is not going to become a problem and that the
steek doesn't interfere with any buttonholes. Steeks around armholes may
be encased by knitting on an extra facing piece to the top of the
sleeve head.
Running Yarn Markers
This form of marker is particularly useful for marking steek edges and also when working in the round on dpns, (circular or yarn loop markers drop of the needles every time they fall at a needle junction). Take a 6 -8" length of contrasting yarn (not too slippery) and place it between the needles at the desired position. As you work the next st, the marker becomes lightly trapped in the fabric. Each time you pass this position on subsequent rounds, flip the top of the marker yarn to the opposite side of the fabric. Once the marker is well lodged, it is not necessary to flip it every round. Knot on extra yarn as needed. If you begin with a long yarn, it is easy to sit on it and pull it out. A marker may be reinserted with a darning needle if required.
The marker will be most visible on the rev st st side of the work and it will provide an invaluable guide for cutting the steek, and where to cease and resume patterning on either side of the steek. It can be helpful to use a unique color for the centre front steek and a different color for both armholes.
Centre Front Steek
If planning a piece to be knit in the round but later required to be
flat, add a number of stitches to it for the steek. For a cardigan with a 100 st body , cast on 110sts - the first and last five sts will be the steek.
Armholes or Neck Steeks
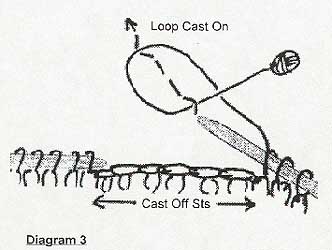
Cast off for the opening ensuring that, in the case of armholes they are
centered at the sides of the garment. *Continue knitting around until you
reach the edge of the yawning chasm created by the cast-off. Bridge this
gap by casting on 6 sts onto the end of the righthand needle with your
working yarn
- a simple loop cast-on is fine, as these new sts will be folded inside the garment. Continue knitting the garment sts from the lefthand needle. Note that the gap was created by casting off a number of sts (depending on the nature of the opening and sweater size) and these stitches have been replaced by only 6 new sts, so there will probably be a a projecting bulge of garment fabric and in all cases a slit opening, below the bridge of new sts.
On reaching the first newly established steek, place a running yarn marker up either side of the 6 steek sts to differentiate between garment and steek sts, or work the 6 steek sts in purl every round. Maintain the steeks as now set.
Casting Off
Once the desired opening depth has been reached, cast off all the steek
sts apart from the first and last stitches of each steek as you work the
final round.
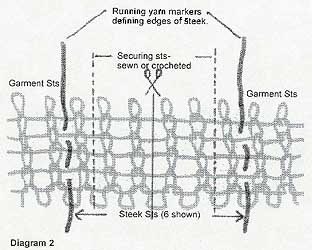
Securing The Steeks
With the live stitches remaining on the needles or holders, sew a line
of
stitches (by machine or hand)
between both the first and final pairs of steek sts. (A firm crochet
chain using a fine matching yarn may be substituted if preferred). Nothing
can now come unravelled or go astray; sew a couple of times, if it makes
you feel more comfortable.
Once you feel confident that all is secure, cut the steeks open along the centre line. Don't neaten the steeks until you are ready to sew them down. Turn the body inside-out and join the shoulder by three-needle bind-off in the appropriate color, starting at the single remaining steek st at the shoulder edge and working toward the neck.
Neatening Steeks
After blocking, and applying bands or sleeves, turn to the inside of the
garment and trim the steek to 2 sts in width (this is one stitch outside
of the line of stitching which remains in situ). With a matching or finer
wool yarn, oversew the steek gently to the inside of the fabric with
blanket or cross st.
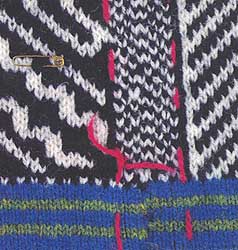
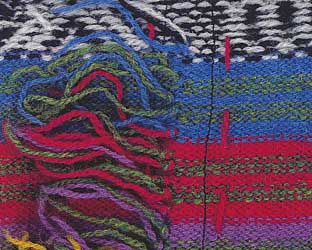
The pictures above show both Right and Wrong sides of a steek, marked with running yarn markers on either side. Note: Machine stitching shows up much more clearly on the WS; the knots at yarn color changes will be cut away when the steek is opened; the safety pin marks an error in the pattern, marking it for future surgery.
Next topic - Siamese Sleeves - Thoughts for Steek Connoiseurs
Back to the Bosun's Locker and the full topic listing.
TRADEWIND KNITWEAR DESIGNS
45 Dorothea Drive, Dartmouth, NS, B2W 5X4, Canada
All images and text Copyright © 2004; Lucy Neatby, Tradewind Knitwear Designs