
|
|
Tradewind Knitwear Designs |

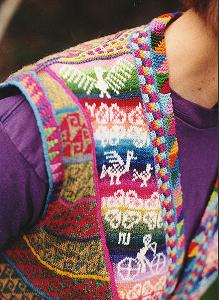
Hot off the needles! A wandering friend, knitwear designer and writer, Catherine Vardy, stowed away for South America. She returned to spin a yarn to all hands, and display the treasure she had gleaned in foreign lands. (Tales of her adventures, and the treasures she returned with, can be viewed at The Needle Arts Book Shoppe) The hats..... they were breathtaking. Such tiny stitches, so many different designs styles and patterns... I was off on a mental adventure of my own. I thought about burning my needles and giving up, but this wasn't really an option - I don't think I could exist peaceably without my knitting.
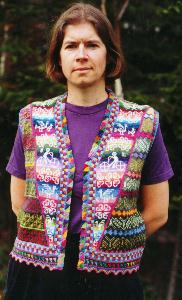
The vest was constructed in an unusual fashion, using stranded knitting techniques and cut-and-sew. The pieces of knitting run in several directions. The front and back pieces are knit from the top down and the sides from the bottom up. The triangles were united by Mattress stitching (see Tricks &Techniques - Mattress Stitch for more information ) to either side of a piece of I cord. The earflap was knitted on the projecting section of the back triangle, followed by the band which was picked up as one piece and knitted all around. The Puntas edgings on the lower edge were knitted upwards and then grafted onto the bands. The whole was then completed by simultaneously knitting and attaching a series of garter st intarsia triangles around the front edge! It was great fun.
Andean Vest Recipe - written due to demand from a few manic hardcore
knitters (who refused to leave me in peace!). Contains a color detail
sheet, 11 x 17 charts, details of the original, along with the measurement
information in order to construct your own vest from first principles.
Very challenging!
For those who love to know the Details.....read on!
My quest began with gathering a collection of very fine yarns. I searched through my stash for any likely candidates; purchased fine Canadian merino in a myriad of shades; and scoured my local yarn store and bought a little of this and a little of that, mainly Shetland and Rowan Donegal lambswool tweeds (an enduring and hardwearing favourite of mine ). Some 70 or so eventually found their way into the finished garment.
All the while I was charting motifs and collecting ideas, but it didn't work out. The breakthrough came when I realised (in the middle of the night) that 4 triangles make a tube. In this way I could use 4 different styles of hat, and simulate the appearance of hats by use of the triangle shape.
Then came the tension swatches..... I decided that I would use 2mm needles, as fine as I could bear to go, but nowhere near the gauge of the originals. The four sections were knit separately, starting at the wide end with a steek between the end of the round and the beginning of the following one. The work looked not unlike a lopsided ice cream cone. The fronts were knit as one with two steeks and the shaping was rather interesting, with increases at the neck edge and decreases, quite unrelated at the sides of the triangles and then gradually tapered to a point.
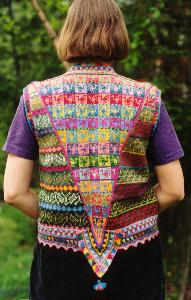
The length of the back triangle was calculated to extend below the desired length of the vest to give me the opportunity to incorporate an Andean ear flap and tassel. The pieces all had to be cut first, then sewn; the points of the cones were too tiny to sew beforehand.
The pieces were joined together using Mattress St. onto either side of a four stitch I cord tube ( knit on 2.25 mm needles to slightly increase the length of the stitches, since this tube was to run along the hypotenuse of the triangles).
After all 5 pieces had been joined, it was cold water blocked (see Tricks &Techniques - Blocking for more information ) , as this was the last time all the pieces would lay flat.
The shoulders presented a new challenge as I hadn't been able to
incorporate any shaping into the tops of the triangles. I hit upon the idea
of knitting them together and adding the shapings as I went along, as follows:
Pick up and knit across the right front from neck to shoulder, across the
back from right shoulder to left, across the left front from shoulder to
neck. I then returned knitting across all these stitches. I reorganized
the stitches onto several DPN needles so that I could bind off, by the three
needle method from the wrong side, the outermost 10st on each shoulder. This
whole process was repeated several times, incorporating patterning until all
the shoulder stitches had been bound off.
This only left the neck and shoulder bands to do... the front band however was to run from one side of the ear flap right around the entire vest to the other side of the earflap, a mere 647 sts to begin with. The band was mitred at the corners and increases made at the turn of the neck, to allow the band to lay well. This involved working on a lot of different circular needles and the whole bore an uncanny resemblance to someone wrestling with a recalcitrant porcupine.
Having completed the knitting of the band I felt it was necessary to trim it with a series of tiny garter St. intarsia triangles, which were actually much more fun than slogging along the rows of the entire band. However before the band could be finished it was necessary to finish the lower edge, which I had decided should be embellished with a Puntas edging and a small patterned section to increase the length of the lower band.
Puntas have to be worked from a cast on edge! I swatched and calculated how many Puntas I would require to fit along the lower edge, worked my Puntas and pattern and finished with a section of waste yarn (see Tricks and Techniques - Waste Yarn for more information )
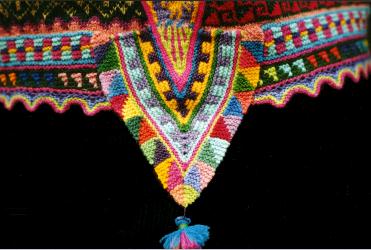
There were 10 sts less in the finished Puntas strip than the number of stitches I had to graft them to, and to sort this out I knit across the stitches of the lower edge again in WY making the necessary decreases as I went. This enabled me to graft the two pieces together with the decreases included and made a perfect match! Once the second piece of Puntas was in place it was quite straightforward to attach the intarsia style triangles, picking the raw stitches up from the front band as I went along.
Next gallery image - Fish Hanging
PayPal; VISA; MasterCard; Toll-free Order Line 1 (866) 272-7796
TRADEWIND KNITWEAR DESIGNS
45 Dorothea Drive, Dartmouth, NS, B2W 5X4, Canada
All images and text Copyright © 2008; Lucy Neatby, Tradewind Knitwear Designs
www.lucyneatby.com