
![[Top]](../../images/home.jpg)
![[Contents]](../../images/contents.jpg)
![[Prev]](../../images/previous.jpg)
![[Next]](../../images/next.jpg)
![[Last]](../../images/index.jpg)


Configuring Frame Relay
This chapter covers these topics:
Using the MAX as a Frame Relay concentrator
In a Frame Relay backbone, every access line connects directly to a Frame Relay (FR) switch. In the past, most connections to the Frame Relay network were relatively high speed, such as full T1 or E1 lines. With recent changes in Frame Relay pricing, many sites now want to concentrate many low-speed dial-in connections into one high-speed nailed connection to a frame relay switch. When you can configure the MAX as a Frame Relay concentrator, it accepts incoming dial-in connections as usual and forwards them out to a frame relay switch.
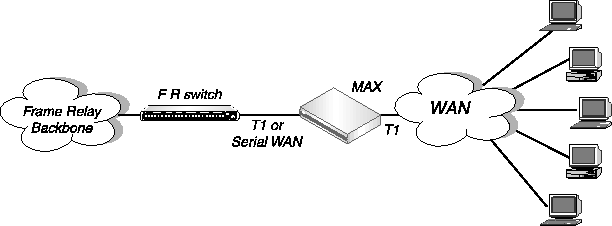
Figure 4-1. The MAX operating as a Frame Relay concentrator
As a Frame Relay concentrator, the MAX can accept up to 96 low-speed connections in North America or Japan, or 120 low-speed connections in Europe. If all of the Frame Relay connections are concentrated onto the single 2-Mbps serial WAN interface, the MAX turns a single high-cost Frame Relay port on a traditional Frame Relay switch into approximately 100 operational ports.
Configuring the MAX as a Frame Relay concentrator involves the following elements:
- An interface to the Frame Relay switch (usually nailed T1, nailed E1, or serial WAN).
- A logical datalink to the Frame Relay switch (defined in a Frame Relay profile)
- User connections (defined in Connection profiles or RADIUS)
Kinds of physical network interfaces
The MAX typically uses serial WAN, nailed T1, or nailed E1 to connect to a Frame Relay switch. For details on configuring these interfaces, see Chapter 2, Configuring the MAX for WAN Access.
Kinds of logical interfaces to a Frame Relay switch
Figure 4-2 shows the types of Frame Relay interfaces supported in the MAX:

Figure 4-2. Types of logical interfaces to Frame Relay switches
Note: As a Frame Relay concentrator, the MAX can operate as a CPE (Customer Premise
Equipment) device or as a FR switch, or both. In Figure 4-2, all of the elements could be
Ascend units, but are not necessarily so.
The MAX supports these types of interfaces to the Frame Relay network:
Network to Network Interface (NNI)
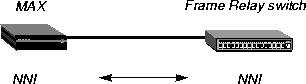
Figure 4-3. Network to Network interface (NNI) in a MAX unit
An NNI interface connection allows the MAX to appear as a Frame Relay network interface based on the NNI specifications. It performs both DTE and DCE link management, and allows two separate Frame Relay networks to connect via a common protocol. See Configuring an NNI interface.
User to Network Interface-Data Communications Equipment (UNI-DCE)
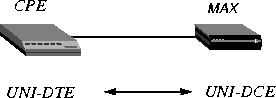
Figure 4-4. User to Network Interface-Data Communications Equipment (UNI-DCE)
UNI is the interface between an end-user and a network end point (a router or a switch) on the Frame Relay network. In a UNI-DCE connection, the MAX operates as a Frame Relay router communicating with a DTE device. To the DTE devices, it appears as a Frame Relay network end point. See Configuring a UNI-DCE interface.
User to Network Interface-Data Terminal Equipment (UNI-DTE)
In a UNI-DTE connection, configure the MAX as a UNI-DTE communicating with a Frame Relay switch. It acts as a Frame Relay feeder and performs the DTE functions specified for link management. See Configuring a UNI-DTE interface.
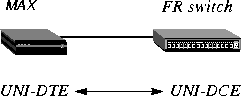
Figure 4-5. User to Network Interface - Data Terminal Equipment (UNI-DTE)
Note: For NNI or UNI-DTE connections, the MAX is able to query the device at the other
end of the link about the status of the DLCIs in the connection. If any of the DLCIs become
unusable and the DLCI's Connection profile has a specified Backup connection, the MAX
dials the Connection profile specified in the Backup parameter in Connections > Session
Options. See the MAX Reference Guide for details on the Backup parameter.
Types of Frame Relay connections
For Frame Relay connections, the MAX supports the following:
Gateway connections
The MAX receives an incoming PPP call, examines the destination IP address, and brings up the appropriate Connection profile to that destination, as usual. If the Connection profile specifies Frame Relay encapsulation, the Frame Relay profile, and a DLCI, the MAX encapsulates the packets in Frame Relay (RFC 1490) and forwards the data stream out to the Frame Relay switch using the specified DLCI. The Frame Relay switch uses the DLCI to route the frames. This is known as gateway mode.
Frame Relay circuits
A circuit is a permanent virtual circuit (PVC) segment that consists of two DLCI end points and possibly two Frame Relay profiles. It requires two and only two DLCI numbers: data drops if the circuit has only one DLCI and if Frame Relay defines more than two DLCI, Frame Relay only uses two DLCI numbers. You define circuits in two Connection profiles. Data coming in on the DLCI configured in the first Connection profile switches to the DLCI configured in the second one.
Redirect connections (rarely used)
When the MAX receives an incoming PPP call for which the session options specify FR Direct, it ignores the destination IP address in the packets from the dial-in client. Instead, the MAX routes the packet using the FR DLCI specified in the session options. In effect, the MAX does not route packets from the client in the usual sense, it simply passes them on to the Frame Relay network and assumes that another device routes the packets based on the destination IP address. This is known as redirect mode, and is not commonly used.
Configuring the logical link to a Frame Relay switch
The Frame Relay profile specifies a link, usually across a single cable, to the Frame Relay network. This link can support many permanent virtual circuits (PVCs), each with a different endpoint. These are the Frame Relay parameters:
Ethernet
      Frame Relay
            Name=NNI
            Active=Yes
            Call Type=Nailed
            FR Type=NNI
            LinkUp=Yes
            Nailed Grp=1
            Data Svc=64k
            PRI # Type=N/A
            Dial #=N/A
            Bill #=N/A
            Call-by-Call=N/A
            Transit #=N/A
            Link Mgmt=Q.933A
            N391=6
            DTE N392=3
            DTE N393=4
            DCE N392=3
            DCE N393=4
            T391=10
            T392=15
            MRU=1532
For more information about each of these parameters, see the MAX Reference Guide.
Understanding the Frame Relay parameters
This section provides some background information about the Frame Relay parameters:
Specifying a profile name and activating the profile
User connections link up with the Frame Relay connection specified in this profile by specifying its profile name. The name must be unique and cannot exceed 15 characters.
Set the Active parameter to Yes to make this profile available for use.
Bringing down the datalink when DLCIs are not active
LinkUp indicates that the datalink comes up automatically and stays up even when the last DLCI has been removed. If you set this parameter to No, the datalink does not come up unless a Connection profile (DLCI) brings it up, and it shuts down after the last DLCI has been removed.
Note: You can start and drop Frame Relay datalink connections by using the DO DIAL and
DO HANGUP commands. DO DIAL brings up a datalink connection. DO HANGUP closes
the link and any DLCIs on it. If LinkUp=Yes, DO HANGUP brings the link down, but it
automatically restarts. A restart also occurs if there is a DLCI profile invoking the datalink.
Defining the nailed connection to the switch
Nailed is the default for Frame Relay connections. When you define the call type as nailed, dial numbers and other telco options are N/A. You can specify switched if the Frame Relay switch allows dial-in; however, Frame Relay networks currently have no dial-out connection capability. The two types of data service that are available are 64K or 56K.
Specifying the type of Frame Relay interface
You can set the FR Type parameter to NNI (for an NNI interface to the switch), DCE (for a UNI-DCE interface), or DTE (for a UNI-DTE interface). See Kinds of logical interfaces to a Frame Relay switch.
Link management protocol
The Link Mgmt setting may be None (no link management), T1.617D (for T1.617 Annex D), and Q.933A (for Q.933 Annex A).
Frame Relay timers and event counts
Frame Relay timers and event counts are as follows:
- N391 specifies the interval at which the MAX requests a Full Status Report (between 1 and 255 seconds). It is N/A if FR Type is DCE.
- DCE N392 specifies the number of errors during DCE N393 monitored events which causes the network side to declare the user side procedures inactive. Its value should be less than DCE N393 (between 1 and 10). It is N/A when FR Type is DTE.
- DCE N393 specifies the DCE monitored event count (between 1 and 10). It is N/A when FR Type is DTE.
- DTE N392 specifies the number of errors during DTE N393 monitored events which cause the user side to declare the network side procedures inactive. Its value should be less than DTE N393 (between 1 and 10). It is N/A when FR Type is DCE.
- DTE N393 specifies the DTE monitored event count (between 1 and 10). It is N/A when FR Type is DCE.
- T391 specifies the Link Integrity Verification polling timer (between 5 and 30 seconds). Its value should be less than T392. It is N/A when FR Type is DCE.
- T392 specifies the time for Status Enquiry messages (between 5 and 30 seconds). The MAX records an error message if it does not receive an Status Enquiry message within T392 seconds. This parameter is N/A when FR Type is DTE.
MRU (Maximum Receive Units)
The MRU parameter specifies the maximum number of bytes the MAX can receive in a single packet across this link. Usually the default 1532 is the right setting, unless the far end device requires a lower number.
Example Frame Relay profile configurations
This section shows an example Frame Relay profile configuration for each type of Frame Relay interface (NNI, UNI-DCE, and UNI-DTE).
Configuring an NNI interface
In this example, the MAX has a nailed connection to another Frame Relay switch and also has an NNI interface configuration to that switch. Figure 4-6 shows the connection.
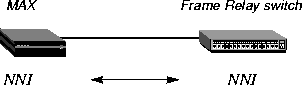
Figure 4-6. Example NNI interface to another switch
To configure the Frame Relay profile for this NNI interface:
- Open a Frame Relay profile.
- Assign the profile a name and activate it.
Ethernet
      Frame Relay
            Name=ATT-NNI
            Active=Yes
- Set the FR Type to NNI.
FR Type=NNI
- Set up the nailed connection to the remote switch and specify the data service for the link.
For example:
            Call Type=Nailed
            Nailed Grp=1
            Data Svc=64k
- Specify the link management protocol and its configuration parameters. For example:
            Link Mgmt=T1.617D
            N391=6
            T391=10
            T392=15
            MRU=1532
- Close the Frame Relay profile.
Configuring a UNI-DCE interface
In this example, the MAX has a nailed connection to customer premises equipment (CPE) and also has a UNI-DCE interface configuration to that equipment. Figure 4-7 shows the connection.
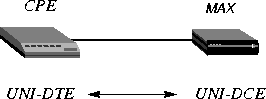
Figure 4-7. Example UNI-DCE interface to an end-point (DTE)
To configure the Frame Relay profile for this UNI-DCE interface:
- Open a Frame Relay profile.
- Assign the profile a name and activate it.
Ethernet
      Frame Relay
            Name=ATT-DCE
            Active=Yes
- Set the FR Type to DCE.
FR Type=DCE
- Set up the nailed connection to the remote switch and specify the data service for the link.
For example:
            Call Type=Nailed
            Nailed Grp=1
            Data Svc=64k
- Specify the link management protocol and its configuration parameters. For example:
            Link Mgmt=T1.617D
            DCE N392=3
            DCE N393=4
            T392=15
- Close the Frame Relay profile.
Configuring a UNI-DTE interface
In this example, the MAX has a nailed connection to a Frame Relay switch configured as a DCE and has a UNI-DTE interface configuration that switch. Figure 4-8 shows the connection.
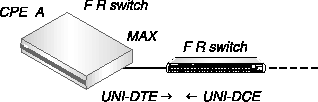
Figure 4-8. UNI-DTE interface to a Frame Relay switch
To configure the Frame Relay profile for this UNI-DTE link:
- Open a Frame Relay profile.
- Assign the profile a name and activate it.
Ethernet
      Frame Relay
            Name=ATT-DTE
            Active=Yes
- Set the FR Type to DTE.
FR Type=DTE
- Set up the nailed connection to the remote switch and specify the data service for the link.
For example:
            Call Type=Nailed
            Nailed Grp=1
            Data Svc=64k
- Specify the link management protocol and its configuration parameters. For example:
            Link Mgmt=Q.933A
            N391=6
            DTE N392=3
            DTE N393=4
            T391=10
- Close the Frame Relay profile.
Configuring Connection profiles for Frame Relay
All connections that use Frame Relay must specify the name of a configured Frame Relay profile as the datalink between the MAX and the Frame Relay network. Forwarded or routed connections over the Frame Relay link use the following parameters:
Ethernet
      Answer
            Encaps...
                  PPP=Yes
                  FR=Yes
            PPP Options...
                  Route IP=Yes
For gateway connections:
Ethernet
      Connections
            Encaps=FR
            Encaps options...
                  FR Prof=pacbell
                  DLCI=16
                  Circuit=N/A
Route IP=Yes
            Ip options...
                  LAN Adrs=10.2.3.4/24
For Frame Relay circuits:
Ethernet
      Connections
            Encaps=FR_CIR
            Encaps options...
                  FR Prof=pacbell
                  DLCI=16
                  Circuit=circuit-1
For redirect connections:
Ethernet
      Connections
            Encaps=PPP
            Route IP=Yes
            Ip options...
                  LAN Adrs=10.2.3.4/24
            Session options...
                  FR Direct=Yes
                  FR Prof=pacbell
                  FR DLCI=16
For more information about each parameter, see the MAX Reference Guide.
Understanding the Frame Relay connection parameters
This section provides some background information about the Frame Relay connection parameters:
Gateway connections (Encaps=FR)
Gateway connections require FR encapsulation, a Frame Relay profile name, and a DLCI. Your Frame Relay provider tells you the DLCI to assign to each connection.
The far end specified in a Frame Relay encapsulated Connection profile lies at the end of a PVC, whose first hop is known by the DLCI named in the Connection profile. The MAX does not allow you to enter duplicate DLCIs, except when they are carried by separate physical links specified in different Frame Relay profiles.
Frame Relay circuits (Encaps=FR_CIR)
A circuit is a PVC segment configured in two Connection profiles. Data coming in on the DLCI configured in one Connection profile switches to the DLCI configured in the other. Data drops if the circuit has only one DLCI. If more than two Connection profiles specify the same circuit name, the MAX uses only two DLCI.
In a circuit, both Connection profiles must specify FR_CIR encapsulation and the same circuit name. Each profile must specify a unique DLCI. The MAX does not allow you to enter duplicate DLCIs, except when separate physical links specified in different Frame Relay profiles carry duplicate DLCIs.
Redirect connections (FR Direct=Yes)
In an FR Direct connection, the MAX simply attaches a Frame Relay PVC to multiple Connection profiles. It does so on the Session Options subprofile by enabling FR Direct, specifying a Frame Relay profile, and setting a DLCI for the PVC endpoint in the FR DLCI parameter. Any packet coming into the MAX on these connections gets switched out on the DLCI. In this mode, the MAX allows multiple Connection profiles to specify the same PVC (the same DLCI).
In this unusual mode called Frame Relay redirect, the MAX ignores the destination of these packets. It assumes that some device at the far end of the PVC makes the routing decisions. However, the Connection profile must use IP routing to enable the MAX to route data back to the client.
Example connection configurations
This section shows example Connection profile configurations for Frame Relay gateway, circuit, and redirect configurations.
Configuring a Frame Relay gateway connection
This example configuration shows how to configure a Frame Relay gateway connection. It presumes that dial-in users who need to reach the distant IP network have valid Connection profile (or RADIUS user profiles). This example shows the Connection profile that assigns a DLCI and passes the data stream out to a Frame Relay switch. The example network is shown in Figure 4-9:

Figure 4-9. Gateway connections
In this example, the MAX communicates with a remote Frame Relay switch using ATT-NNI, a Frame Relay profile. To configure this link:
- Open a Connection profile.
- Specify the station name, activate the profile, and specify FR encapsulation.
Ethernet
      Connections
            Station=gateway-1
            Active=Yes
            Encaps=FR
- Enable IP routing and specify the address of the remote IP router.
            Route IP=Yes
            Ip options...
                  LAN Adrs=10.2.3.4/24
- Open the Encaps Options subprofile and specify the name of the Frame Relay profile with
a nailed connection to the Frame Relay switch, and a DLCI assigned by the Frame Relay
administrator.
            Encaps options...
                  FR Prof=ATT-NNI
                  DLCI=55
                  Circuit=N/A
- Close the Connection profile.
Configuring a Frame Relay circuit
This example configures a circuit between a UNI-DCE and NNI datalinks. Configure a circuit between any two interfaces within the MAX in the same way. Figure 4-10 shows an example of a Frame Relay circuit network: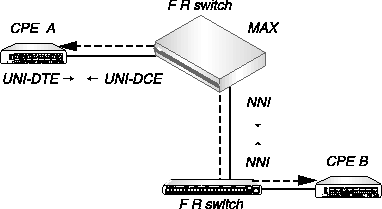
Figure 4-10. A Frame Relay circuit
ATT-DCE is the Frame Relay profile for the UNI-DCE interface in the MAX. ATT-NNI is the Frame Relay profile for the NNI interface. To configure this circuit:
- Open the first Connection profile.
- Specify the station name, activate the profile, and specify FR_CIR encapsulation.
Ethernet
      Connections
            Station=victor
            Active=Yes
            Encaps=FR_CIR
- Open the Encaps Options subprofile and specify the name of the Frame Relay profile with
a nailed connection to the Frame Relay switch, a DLCI assigned by the Frame Relay
administrator, and a name for the Frame Relay circuit.
            Encaps options...
                  FR Prof=ATT-DCE
                  DLCI=18
                  Circuit=Circuit-1
- Close the Connection profile.
- Open the second Connection profile.
- Specify the station name, activate the profile, and specify FR_CIR encapsulation.
Ethernet
      Connections
            Station=marty
            Active=Yes
            Encaps=FR_CIR
- Open the Encaps Options subprofile and specify the name of the Frame Relay profile with
a nailed connection to the Frame Relay switch, a DLCI assigned by the Frame Relay
administrator, and a name for the Frame Relay circuit.
            Encaps options...
                  FR Prof=ATT-NNI
                  DLCI=23
                  Circuit=Circuit-1
- Close the second Connection profile.
Configuring a redirect connection
This example shows the configuration of two PPP dial-in connections to be redirected out to the Frame Relay network.
Note: A Frame Relay redirect connection is not a full-duplex tunnel between the PPP dial-in
and the switch. MAX router software handles IP packets coming back from the Frame Relay
switch, so they must contain the PPP caller's IP address for accurate routing back across the
WAN. Figure 4-11 shows an example of a redirect connection.
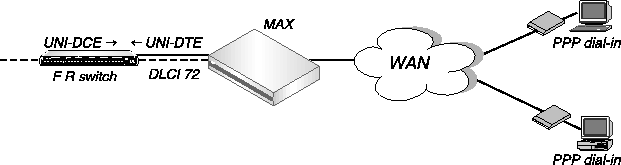
Figure 4-11. Redirect connection
In this example, the MAX communicates with ATT-DTE, a Frame Relay switch using a Frame Relay profile. To configure two PPP dial-in connections to be redirected using the same DLCI:
- Open a Connection profile.
- Specify the station name, activate the profile, and specify PPP encapsulation.
Ethernet
      Connections
            Station=caller-1
            Active=Yes
            Encaps=PPP
- Make sure you enable IP routing.
Route IP=Yes
- Open the Session Options subprofile, enable FR Direct, and specify the name of the Frame
Relay profile to use.
            Session options...
                  FR Direct=Yes
                  FR Prof=ATT-DTE
- Assign a DLCI available for this redirect connection, which may already be in use by
other redirect Connection profiles.
FR DLCI=72
- Close the Connection profile.
- Open a second Connection profile.
- Specify the station name, activate the profile, and specify PPP encapsulation.
Ethernet
      Connections
            Station=caller-2
            Active=Yes
            Encaps=PPP
- Make sure you enable IP routing.
Route IP=Yes
- Open the Session Options subprofile, enable FR Direct, and specify the name of the Frame
Relay profile to use.
            Session options...
                  FR Direct=Yes
                  FR Prof=ATT-DTE
- Assign a DLCI available for this redirect connection. For example, you may assign the
same DLCI used in the previous redirect Connection profile.
FR DLCI=72
- Close the Connection profile.
Monitoring Frame Relay connections
The terminal server command-line interface has new Show FR commands for monitoring Frame Relay in the MAX. To see the options, invoke the terminal server interface (System > Sys Diag > Term Serv) and then use the Show FR command. For example:
ascend% show fr ?
show fr ?           Display help information
show fr stats       Display Frame Relay information
show fr lmi         Display Frame Relay LMI information
show fr dlci [name] Display all DLCI information or just for [name]
show fr circuits    Display the FR Circuit table
Displaying Frame Relay statistics
To display Frame Relay statistics:
ascend% show fr stats
Name         Type   Status    Speed    MTU     InFrame     OutFrame
fr1          DCE    Down     64000    1532           0            1
fr1-temp     DCE      Up     64000    1532           0            1
fr1-temp-9   DCE      Up     64000     1532          0            0
The output contains these fields:
- Name: The name of the Frame Relay profile associated with the interface.
- Type: The type of interface.
- Status: The status of the interface. "Up" means the interface is functional, but is not necessarily handling an active call. "Down" means the interface is not functional.
- Speed: The data rate in bits per second.
- MTU: The maximum packet size allowed on the interface.
- InFrame: The number of frames the interface has received.
- OutFrame: The number of frames transmitted.
Displaying link management information
To display LMI (Link Management Information) for each link activated by a Frame Relay profile, enter this command:
ascend% show fr lmi
T1_617D LMI for fr1
  Invalid Unnumbered info         0  Invalid Prot Disc                0
  Invalid Dummy Call Ref          0  Invalid Msg Type                 0
  Invalid Status Message          0  Invalid Lock Shift               0
  Invalid Information ID          0  Invalid Report Type              0
  Num Status Enqs Sent            0  Num Status Msgs Rcvd             0
  Num Update Status Rcvd          0  Num Status Timeouts           2779
LMI is not on for fr1-temp
LMI is not on for fr1-temp-9
ANSI T1.617 Annex D local in-channel signaling protocol is the basis for this information. (See Annex D for a full definition of each of the fields reported.)
Displaying DLCI status
To display the status of each DLCI:
ascend% show fr dlci
DLCIs for fr1
DLCIs for fr1-temp
eng-lab-236-Cir   DLCI =   17    Status = ACTIVE
        input pkts               0        output pkts              0
        input octets             0        output octets            0
        input FECN               0        input DE                 0
        input BECN               0
last time status changed: 03/05/1997  14:44:17
DLCIs for fr1-temp-9
eng-lab-236-Cir-9  DLCI =   16    Status = ACTIVE
        input pkts               0        output pkts              0
        input octets             0        output octets            0
        input FECN               0        input DE                 0
        input BECN               0
last time status changed: 03/05/1997  14:45:07
DLCIs not assigned
The MAX reports DLCI information using these fields:
- DLCI: The DLCI number.
- Status: ACTIVE if the connection is up or INACTIVE if not.
- input pkts: The number of frames the interface has received.
- output pkts: The number of frames the interface has transmitted.
- input octets: The number of bytes the interface has received.
- output octets: The number of bytes the interface has transmitted.
- in FECN pkts: The number of packets received with the FECN (Forward Explicit Congestion Notification) bit set. This field always contains a 0 (zero) because congestion management is not currently supported.
- in BECN pkts: The number of packets received with the BECN (Backward Explicit Congestion Notification) bit set. This field always contains a 0 (zero) because congestion management is not currently supported.
- in DE pkts: The number of packets received with the DE (Discard Eligibility) indicator bit set.
- last time status changed: The last time the DLCI state changed.
Displaying circuit information
The Show FR Circuit command shows the Frame Relay profile name, DLCI, and status of configured circuits.
ascend% show fr circuits
cir-9 User Setting Up
fr1-temp-9                   16            Up
fr1-temp                     17            Up
Turning off a circuit without disabling its endpoints
The Set Circuit command enables you to turn off traffic going through a Frame Relay circuit without disabling the circuit endpoints. This command prevents traffic from going between endpoints without disrupting the state of the DLCI. To see the support options:
ascend% set circuit ?
set circuit ?       Display help information
set circuit active [name]  Set the CIRCUIT to active
set circuit inactive [name]  Set the CIRCUIT to inactive
To allow data to flow through a circuit, use the active parameter; for example:
ascend% set circuit active circuit-1
techpubs@eng.ascend.com
Copyright © 1998, Ascend Communications, Inc. All rights
reserved.