
This chapter covers these topics:
Introduction to IP routing and interfaces
The first task described in this chapter, setting up the IP network, involves setting parameters in the MAX unit's Ethernet profile. The parameters define the unit's Ethernet IP interface, network services (such as DNS), and routing policies.
IP addresses and subnet masks
In the MAX, you specify IP addresses in dotted decimal format (not hexadecimal). If you specify no subnet mask, the MAX assumes a default mask on the basis of address class. The default subnet mask is the default number of network bits for the address's class. Table 10-1 shows the classes and the default number of network bits for each class.
Figure 10-1. A class C IP address
IP address = 198.5.248.40
Mask = 255.255.255.248In the example address shown above, the mask specification indicates that 29 bits of the address will be used to specify the network. This is commonly referred to as a 29-bit subnet. The three remaining bits specify unique hosts.
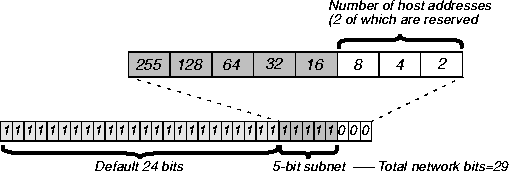
Figure 10-2. A 29-bit subnet mask and number of supported hosts
001
010
100
110
101
011
111 - Reserved for the broadcast address of the subnet Zero subnets
Early implementations of TCP/IP did not allow zero subnets. That is, subnets could have the same base address that a class A, B, or C network would have. For example, the subnet 192.168.8.0/30 was illegal because it had the same base address as the class C network 192.168.8.0/24, while 192.168.8.4/30 was legal (192.168.8.0/30 is called a zero subnet, because like a class C base address, its last octet is zero). Modern implementations of TCP/IP allow subnets to have base addresses that might be identical to the class A, B, or C base addresses. Ascend's implementations of RIP 2 and OSPF treat these so-called zero subnetworks the same as any other network. You should decide whether or not to support and configure zero subnetworks for your environment. If you configure them in some cases and treat them as unsupported in other cases, you will encounter routing problems.
IP address = 198.5.248.120
Mask = 255.255.255.248The Ethernet attached to that router has the following address range:
198.5.248.120 - 198.5.248.127A host route is a special case IP address with a subnet mask of 32 bits. It has a subnet mask of
255.255.255.255.
In each routing table entry, the Destination field specifies a destination network address that may appear in IP packets, and the Gateway field specifies the address of the next-hop router to reach that destination.
When choosing a route to put into the routing table, the router first compares preference values, preferring the lowest number. If the preference values are equal, the router compares the metric fields and uses the route with the lowest metric. Following are the preference values for the various types of routes:
MAX IP interfaces
Ethernet interfaces
The following example displays the routing table for a MAX configured to enable IP routing:
** Ascend MAX Terminal Server **
ascend% iproute show
Destination Gateway IF Flg Pref Met Use AgeThe Ethernet interface has the IP address 10.10.10.2 (with a subnet mask of 255.255.0.0). No Connection profiles or static routes are configured.
10.10.0.0/16 - ie0 C 0 0 3 222
10.10.10.2/32 - local CP 0 0 0 222
127.0.0.0/8 - bh0 CP 0 0 0 222
127.0.0.1/32 - local CP 0 0 0 222
127.0.0.2/32 - rj0 CP 0 0 0 222
224.0.0.0/4 - mcast CP 0 0 0 222
224.0.0.1/32 - local CP 0 0 0 222
224.0.0.2/32 - local CP 0 0 0 222
224.0.0.5/32 - local CP 0 0 0 222
224.0.0.6/32 - local CP 0 0 0 222
224.0.0.9/32 - local CP 0 0 0 222
255.255.255.255/32 ie0 CP 0 0 0 222
Following are descriptions of the interfaces created at startup:
ie0, is always active, because it is always connected. Its IP address is assigned in Ethernet > Mod Config > Ether Options.
bh0) interface is always up. The black-hole address is 127.0.0.3. Packets routed to this interface are discarded silently.
local) interface is always up. The loopback address is 127.0.0.1/32.
rj0) interface is always up. The reject address is 127.0.0.2. Packets routed to this interface are sent back to the source address with an ICMP "host unreachable" message.
wanidle0.
Figure 10-3 shows a sample interface-based routing connection.
Figure 10-3. Interface-based routing example
It is also possible, although not recommended, to specify the local numbered interface (Interface Address) and use the far end device's system-wide IP address (IP Address). In this case, the remote interface must have an address on the same subnet as the local, numbered interface.
If a MAX is using a numbered interface, note the following differences and similarities in operation, compared to unnumbered (system-based) routing:
Configuring the local IP network setup
The Ethernet profile configures system-global parameters that affect all IP interfaces in the MAX. These are the related parameters:
Ethernet
      Mod Config
            Ether options
                  IP Adrs=10.2.3.1/24
                  2nd Adrs=0.0.0.0/0
                  RIP=Off
                  Ignore Def Rt=Yes
                  Proxy Mode=Off
            WAN options...
                  Pool#1 start=100.1.2.3
                  Pool#1 count=128
                  Pool#1 name=Engineering Dept.
                  Pool#2 start=0.0.0.0
                  Pool#2 count=0
                  Pool#2 name=
                  Pool#3 start=10.2.3.4
                  Pool#3 count=254
                  Pool#3 name=Marketing Dept.
                  Pool#4 start=0.0.0.0
                  Pool#4 count=0
                  Pool#4 name=
                  Pool#5 start=0.0.0.0
                  Pool#5 count=0
                  Pool#5 name=
                  Pool#6 start=0.0.0.0
                  Pool#6 count=0
                  Pool#6 name=
                  Pool#7 start=0.0.0.0
                  Pool#7 count=0
                  Pool#7 name=
                  Pool#8 start=0.0.0.0
                  Pool#8 count=0
                  Pool#8 name=
                  Pool#9 start=0.0.0.0
                  Pool#9 count=0
                  Pool#9 name=
                  Pool#A start=0.0.0.0
                  Pool#A count=0
                  Pool#A name=
                  Pool only=No
                  Pool Summary=No
            Shared Prof=No
            Telnet PW=Ascend
            BOOTP Relay...
                  BOOTP Relay Enable=No
                  Server=N/A
                  Server=N/A
            DNS...
                  Domain Name=abc.com
                  Sec Domain Name=
                  Pri DNS=10.65.212.10
                  Sec DNS=12.20 7.23.51
                  Allow As Client DNS=Yes
                  Pri WINS=0.0.0.0
                  Sec WINS=0.0.0.0
                  List Attempt=No
                  List Size=N/A
                  Client Pri DNS=0.0.0.0
                  Client Sec DNS=0.0.0.0
            SNTP Server...
                  SNTP Enabled=Yes
                  Time zone-UTC+0000
                  SNTP host#1=0.0.0.0
                  SNTP host#2=0.0.0.0
                  SNTP host#3=0.0.0.0
            UDP Cksum=No
            Adv Dialout Routes=Always
Usually, devices connected to the same physical wire all belong to the same IP network. With dual IP, a single wire can support two separate IP networks, with devices on the wire assigned to one network or the other and communicating by routing through the MAX.
Dual IP is also used to distribute the load of routing traffic to a large subnet, by assigning IP addresses on that subnet to two or more routers on the backbone. When the routers have a direct connection to the subnet as well as to the backbone network, they route packets to the subnet and include the route in their routing table updates.
Dual IP also allows you to make a smooth transition when changing IP addresses. That is, a second IP address can act as a placeholder while you are making the transition in other network equipment.
Figure 10-4 shows an example IP network to which a MAX is connected:
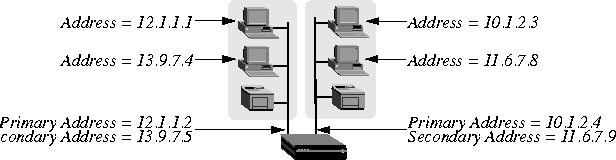
Figure 10-4. Sample dual IP network
Enabling RIP on the Ethernet interface
You can configure each IP interface to send RIP updates (informing other local routers of its routes), receive RIP updates (learning about networks that can be reached via other routers on the Ethernet), or both.
Ignoring the default route
You can configure the MAX to ignore default routes advertised by routing protocols. This configuration is recommended, because you typically do not want the default route changed by a RIP update. The default route specifies a static route to another IP router, which is often a local router such as an Ascend GRF400 or other kind of LAN router. When the MAX is configured to ignore the default route, RIP updates do not modify the default route in the MAX routing table. Proxy ARP and inverse ARP
The MAX can be configured to respond to ARP requests for remote devices that have been assigned an address dynamically. It responds to the ARP request with its own MAC address while bringing up the connection to the remote device. This feature is referred to as Proxy ARP.
Pool Summary indicates the route summarization is in use; that is, a series of host routes will be summarized into a network route advertisement. Packets destined for a valid host address on that network are routed to the host, and packets destined for an invalid host address are rejected with an ICMP host unreachable message.
To use the pool summary feature, create a network-aligned pool and set the Pool Summary parameter to Yes. To be network-aligned, the Pool Start address must be the first host address. Subtract one from the Pool Start address to determine the network address (the zero address on the subnet). Since the first and last address of a subnet are reserved, you must set the Pool Count to a value that is 2 less than a power of 2. For example, you may use values 2, 6, 14, 30, 62, 126 or 253. The netmask will be deduced from a value that is 2 greater than Pool Count. For example, with this configuration:
Pool Summary=Yes
The network alignment address is Pool Start address -1: 10.12.253.0 and the netmask is Pool Count +2 addresses: 255.255.255.128. The resulting address pool network is:
10.12.253.0/25
For an example configuration that shows route summarization, see Configuring DNS.
The Shared Prof parameter specifies whether the MAX will allow more than one incoming call to share the same Connection profile. This feature is related to IP routing because sharing profiles cannot result in two IP addresses reached through the same profile.
You can specify the IP address of one or two BOOTP servers. You are not required to specify a second BOOTP server.
If you specify two BOOTP servers, the MAX that relays the BOOTP request determines when each server is used. The order of the BOOTP servers in the BOOTP Relay menu does not necessarily determine which server is tried first.
UTC +0130For San Francisco, which is 8 hours ahead of UTC:
UTC +0800For Frankfurt, which is 1 hour behind UTC:
UTC -0100
Setting UDP checksums to Yes could cause a slight decrease in performance, but in most environments the decrease is not noticeable.
Configuring the MAX IP interface on a subnet
On a large corporate backbone, many sites configure subnets to increase the network address space, segment a complex network, and control routing in the local environment. For example, Figure 10-5 shows the main backbone IP network (10.0.0.0) supporting an Ascend GRF router (10.0.0.17):

Figure 10-5. Creating a subnet for the MAX
Ethernet
      Mod Config
            Ether options
                  IP Adrs=10.2.3.1/24
RIP=Recv=v2
Ethernet
      Static Rtes
            Name=Default
            Active=Yes
            Dest=0.0.0.0/0
            Gateway=10.0.0.17
            Preference=100
            Metric=1
            DownPreference=140
            DownMetric=7
            Private=Yes
ascend% ping 10.1.2.3You can terminate the Ping exchange at any time by typing Ctrl-C.
Ethernet
      Mod Config
            DNS...
                  Domain Name=abc.com
                  Sec Domain Name=
                  Pri DNS=10.65.212.10
                  Sec DNS=12.20 7.23.51
                  Allow As Client DNS=Yes
                  Pri WINS=0.0.0.0
                  Sec WINS=0.0.0.0
                  List Attempt=Yes
                  List Size=35
                  Client Pri DNS=0.0.0.0
                  Client Sec DNS=0.0.0.0
                  Enable Local DNS Table=No
                Loc.DNSTab Auto Update=No
You create the DNS table from the terminal server by entering the host names and their IP addresses. A table can contain up to eight entries, with a maximum of 35 IP addresses for each entry. If you specify automatic updating, you only have to enter the first IP address of each host. Any others are added automatically.
Automatic updating replaces the existing address list for a host each time the remote DNS server succeeds in resolving a connection to a host that is in the table. You specify how many of the addresses returned by the remote server can be included in the new list.
On the MAX, the table provides includes additional information for each table entry. The information is in the following two fields, which are updated when the system matches the table entry with a host name that was not found by the remote server:
This field is updated each time a local name query match is found in the local DNS table.
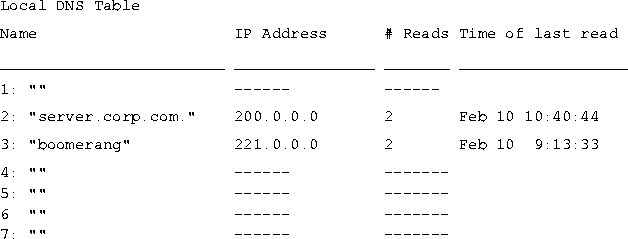
Figure 10-6. Local DNS table example
New terminal server command changes
New show and dnstab commands have been added to help you view, edit, or make entries in the DNS table. show commands
Configuring the local DNS table
To enable and configure the local DNS table:
The default is No.
Before you make any entries, the table is empty. The editor initially displays zeros for each of the eight entries in the table. To exit the table editor without making an entry, press Enter.
A warning appears if you type an invalid entry number. If the entry exists, the current name for that entry appears in the prompt.
If the system accepts the name, it places the name in the table and prompts you for the IP address for the name that you just entered. (For the characteristics of a valid name, see Criteria for valid names in the local DNS table.)
If you enter an invalid name, the system prompts you to enter a valid name.
If you enter an address in the wrong format, the system prompts you for the correct format. If your format is correct, the system places the address in the table and the editor prompts you for the next entry.
If the table has already been created, the number of the entry last edited appears in the prompt.
A warning appears if you type an invalid entry number. If the entry exists, the current value for that entry appears in the prompt.
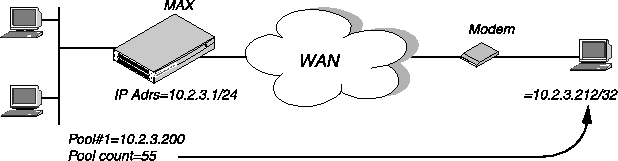
Figure 10-7. Address assigned dynamically from a pool
Subtract 1 from the Pool Start address for the base address for the subnet.
EthernetPool Start is set to 10.12.253.1. When you subtract one from this address, you get 10.12.253.0, which is a valid base address for the 255.255.255.192 netmask. Note that 10.12.253.64, 10.12.253.128, and 10.12.253.192 are also valid zero addresses for the same netmask. The resulting address pool network is 10.12.253.0/26.
Mod Config
WAN options...
Pool#1 start=10.12.253.1
Pool#1 count=62
Pool#1 name=Engineering Dept.
Pool Summary=Yes
Pool Count is set to 62. When you add two to the Pool Count, you get 64. The netmask for 64 addresses is 255.255.255.192 (256-64 = 192). The Ascend subnet notation for a 255.255.255.192 netmask is /26.
After verifying that every one of the configured address pools is network-aligned, you must enter a static route for them. These static routes handle all IP address that have not been given to users by routing them to the reject interface or the blackhole interface. (See MAX IP interfaces.)
EthernetThe routing table will contain the following lines:
Static Rtes
Name=pool-net
Active=Yes
Dest=10.12.253.0/26
Gateway=127.0.0.0
Preference=0
Metric=0
Cost=0
Private=No
Destination Gateway IF Flg Pref Met Use Age
10.12.253.0/26 - bh0 C 0 0 0 172162When you configure Connection profiles that assign IP addresses from the pool, make sure the Private parameter is set to Yes. For example:
127.0.0.0/32 - bh0 CP 0 0 0 172163
127.0.0.1/32 - lo0 CP 0 0 0 172163
127.0.0.2/32 - rj0 CP 0 0 0 172163
Ethernet
      Connections
            Ip options...
                  LAN Adrs=0.0.0.0/0
                  WAN Alias=0.0.0.0
                  IF Adrs=0.0.0.0/0
                  Preference=100
                  Cost=0
                  Private=Yes
                  RIP=Off
                  Pool=1
Configuring IP routing connections
When IP routing is enabled and addresses are specified in a Connection profile, it defines an IP WAN interface. These are the related options:
Ethernet
      Answer
            Assign Adrs=Yes
            PPP options...
                  Route IP=Yes
            Session options...
                  RIP=Off
Ethernet
      Connections
            Station=remote-device
            Route IP=Yes
            IP options...
                  LAN Adrs=0.0.0.0/0
                  WAN Alias=0.0.0.0/0
                  IF Adrs=0.0.0.0/0
                  Preference=100
                  Metric=7
                  DownPreference=120
                  DownMetric=9
                  Private=No
                  RIP=Off
                  Pool=0
            Session options...
                  IP Direct=0.0.0.0
Enabling IP routing for WAN connections
Route IP in Answer > PPP Options must be set to Yes to enable the MAX to negotiate a routing connection. Enabling IP routing for a WAN interface
To enable IP packets to be routed for this connection, set the Route IP parameter to Yes in the Connection profile. When IP routing is enabled, IP packets are always routed, they are never bridged. Configuring the remote IP address
The LAN parameter specifies the IP address of the remote device. Before accepting a call from the far end, the MAX matches this address to the source IP address presented by the calling device. It may be one of the following values:
If the remote device is an IP router, specify its address including its netmask modifier. (See IP addresses and subnet masks for background information.) If you omit the netmask, the MAX inserts a default netmask which makes the entire far-end network accessible.
If the remote device is a dial-in host that will accept dynamic address assignment, leave the remote-address parameter blank.
Each connection represents a static route, which has a default preference of 100. (See Route preferences and metrics.) For each connection, you can fine-tune the route preference and assign a different preference.
Private routes
The Private parameter specifies whether the MAX discloses the existence of this route when queried by RIP or another routing protocol. The MAX uses Private routes internally; they are not advertised. Assigning the IP address dynamically
The Pool parameter specifies an IP address pool from which the caller will be assigned an IP address. If the Pool parameter is null but all other configuration settings enable dynamic assignment, the MAX gets IP addresses from the first defined address pool. See Configuring DNS.
IP direct configuration
An IP Direct configuration bypasses routing and bridging tables for all incoming packets and sends each packet received to the specified IP address. All outgoing packets are treated as normal IP traffic. They are not affected by the IP Direct configuration.
Configuring RIP on this interface
You can configure an IP interface to send RIP updates (informing other routers on that interface of its routes), receive RIP updates (learning about distant networks from other routers on that interface), or both. Checking remote host requirements
IP hosts, such as UNIX systems, Windows or OS/2 PCs, or Macintosh systems, must have appropriately configured TCP/IP software. A remote host calling into the local IP network must also have PPP software. UNIX
UNIX systems typically include a TCP/IP stack, DNS software, and other software, files, and utilities used for Internet communication. UNIX network administration documentation describes how to configure these programs and files. Window or OS/2 software
PCs running Windows or OS/2 need the TCP/IP networking software. The software is included with Windows 95, but the user may need to purchase and install it separately if the computer has a previous version of Windows or OS/2. Macintosh software
Macintosh computers need MacTCP or Open Transport software for TCP/IP connectivity. MacTCP is included with all Apple system software including and after Version 7.1. To see if a Macintosh has the software, the user should open the Control Panels folder and look for MacTCP or MacTCP Admin. Software configuration
For any platform, the TCP/IP software must be configured with the host's IP address and subnet mask. If the host will obtain its IP address dynamically from the MAX, the TCP/IP software must be configured to allow dynamic allocation. If a DNS server is supported on your local network, you should also configure the host software with the DNS server's address. Examples IP routing connections
This section provides example Connection profile configurations for IP routing. These examples all presume that the Ethernet profile has been configured correctly, as described in Configuring the local IP network setup.
Configuring dynamic address assignment to a dial-in host
In this example, the dial-in host is a PC that will accept an IP address assignment from the MAX dynamically. Figure 10-8 shows an example network.
Figure 10-8. A dial-in user requiring dynamic IP address assignment
Username=victorTo configure the MAX to accept dial-in connections from site B and assign an IP address:
Accept Assigned IP=Yes
IP address=Dynamic (or Assigned or N/A)
Netmask=255.255.255.255 (or None or N/A)
Default Gateway=None or N/A
Name Server=10.2.3.55
Domain suffix=abc.com
Baud rate=38400
Hardware handshaking ON
VAN Jacobsen compression ON
Ethernet
      Mod Config
            WAN options
                  Pool#1 start=10.12.253.1
                  Pool#1 count=126
                  Pool#1 name=Engineering Dept.
                  Pool only=Yes
                  Pool Summary=Yes
            Ether options
                  Proxy Mode=Yes
Ethernet
      Answer
            Assign Adrs=Yes
            PPP options
                  Route IP=Yes
Ethernet
      Connections
            Station=victor
            Active=Yes
            Encaps=PPP
            Encaps options...
                  Send Auth=CHAP
                  Recv PW=*SECURE*
            Route IP=Yes
            IP options
                  LAN Adrs=0.0.0.0/0
                  RIP=Off
                  Pool=1
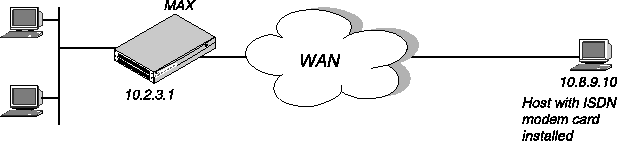
Figure 10-9. A dial-in user requiring a static IP address (a host route)
Username=pattiTo configure the MAX to accept dial-in connections from site B:
Accept Assigned IP=N/A (or No)
IP address=10.8.9.10
Netmask=255.255.255.255
Default Gateway=N/A (or None)
Name Server=10.7.7.1
Domain suffix=abc.com
VAN Jacobsen compression ON
Ethernet
      Answer
            PPP options
                  Route IP=Yes
Ethernet
      Connections
            Station=patti
            Active=Yes
            Encaps=PPP
            Encaps options...
                  Send Auth=CHAP
                  Recv PW=*SECURE*
            Route IP=Yes
            IP options
                  LAN Adrs=10.8.9.10/32
                  RIP=Off
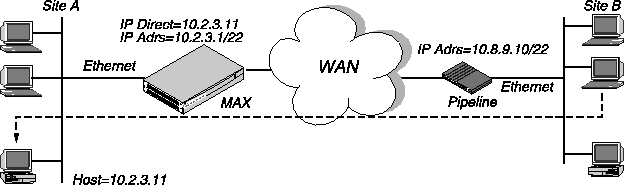
Figure 10-10. Directing incoming IP packets to one local host
To configure an IP Direct connection:
Ethernet
      Answer
            PPP options
                  Route IP=Yes
Ethernet
      Connections
            Station=Pipeline1
            Active=Yes
            Encaps=MPP
            Encaps options...
                  Send Auth=CHAP
                  Recv PW=localpw
                  Send PW=remotepw
            Route IP=Yes
            IP options
                  LAN Adrs=10.8.9.10/22
                  RIP=Off
            Session options
                  IP Direct=10.2.3.11
Configuring a router-to-router connection
In this example, the MAX is connected to a corporate IP network and needs a switched connection to another company that has its own IP configuration. Figure 10-11 shows an example network diagram.
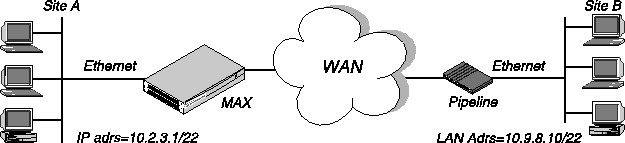
Figure 10-11. A router-to-router IP connection
Ethernet
      Connections
            Station=PipelineB
            Active=Yes
            Encaps=MPP
            Encaps options...
                  Send Auth=CHAP
                  Recv PW=localpw
                  Send PW=remotepw
            Route IP=Yes
            IP options
                  LAN Adrs=10.9.8.10/22
                  RIP=Off
Ethernet
      Connections
            Station=MAXA
            Active=Yes
            Encaps=MPP
            Encaps options...
                  Send Auth=CHAP
                  Recv PW=localpw
                  Send PW=remotepw
            Route IP=Yes
            IP options
                  LAN Adrs=10.2.3.1/22
                  RIP=Off
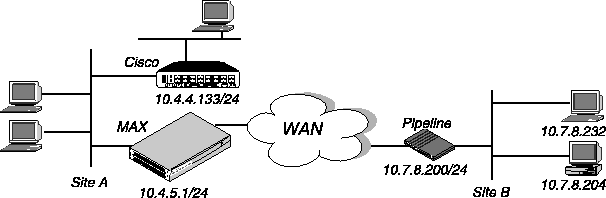
Figure 10-12. A connection between local and remote subnets
Ethernet
      Connections
            Station=PipelineB
            Active=Yes
            Encaps=MPP
            Encaps options...
                  Send Auth=CHAP
                  Recv PW=localpw
                  Send PW=remotepw
            Route IP=Yes
            IP options
                  LAN Adrs=10.7.8.200/24
                  RIP=Off
Ethernet
      Static Rtes
            Name=Default
            Active=Yes
            Dest=0.0.0/0
            Gateway=10.4.4.133
            Metric=1
            Preference=10
            Private=Yes
Ethernet
      Connections
            Station=MAXA
            Active=Yes
            Encaps=MPP
            Encaps options...
                  Send Auth=CHAP
                  Recv PW=localpw
                  Send PW=remotepw
            Route IP=Yes
            IP options
                  LAN Adrs=10.4.5.1/24
                  RIP=Off
Ethernet
      Static Rtes
            Name=Default
            Active=Yes
            Dest=0.0.0/0
            Gateway=10.4.5.1
            Metric=1
            Preference=100
            Private=Yes
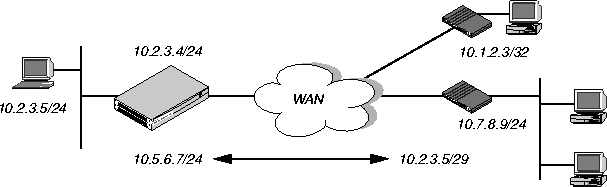
Figure 10-13. Example numbered interface
Ethernet
      Mod Config
            Ether options...
                  IP Adrs=10.2.3.4/24
Ethernet
            Connections
            IP options...
                  LAN Adrs=10.3.4.5/24
            IP options...
                  WAN Alias=10.7.8.9/24
            IP options...
                  IF Adrs=10.5.6.7/24
Configuring IP routes and preferences
The IP routing table contains routes that are configured (static routes) and routes that are learned dynamically from routing protocols such as RIP or OSPF. These are the parameters for configuring static routes:
Ethernet
      Static Rtes
            Name=route-name
            Active=Yes
            Dest=10.2.3.0/24
            Gateway=10.2.3.4
            Metric=2
            Preference=100
            Private=No
            Ospf=Cost=1
            ASE-type=Type1
            ASE=tag=c0000000
Ethernet
      Connections
            Route IP=Yes
            IP options...
                  LAN Adrs=10.2.3.4/24
                  WAN Alias=10.5.6.7/24
                  IF Adrs=10.7.8.9/24
                  Preference=100
                  Metric=7
                  DownPreference=120
                  DownMetric=9
                  Private=No
Ethernet
      Mod Config
            Ether options
                  IP Adrs=10.2.3.1/24
                  2nd Adrs=0.0.0.0/0
                  RIP=Off
            Route Pref
                  Static Preference=100
                  Rip Preference-100
                  RipAseType-Type2
                  Rip Tag=c8000000
                  OSPF Preference=10
                  OSPF ASE Preference=150
The hop count can also be manually configured to give a route a "virtual" hop count. In this way you can manually configure which routes are more desirable than others in your environment. The higher the metric, the less likely that the MAX will use a route.
The cost parameter specifies the cost of an OSPF link. The cost is a configurable metric that can be used to take into account the speed of the link and other issues. The lower the cost, the more likely the interface will be used to forward data traffic. For details, see Chapter 11, Configuring OSPF Routing.
The preference parameter specifies a route preference. Zero is the default for connected routes (such as the Ethernet). When choosing which route to use, the router first compares the preference values, preferring the lower number. If the preference values are equal, the router compares the metric values, using the route with the lower metric. The value of 255 means "Do not use this route." See Route preferences and metrics.
Tagging routes learned from RIP
The rip-tag field is attached to all routes learned from RIP in OSPF updates. The tag is a hexadecimal number that can be used by border routers to filter the record. Type-1 or type-2 metrics for routes learned from RIP
The rip-ase-type parameter can be set to 1 or 2. Type-1 is a metric expressed in the same units as the link-state metric (the same units as interface cost). Type-2 is considered larger than any link-state path. It assumes that routing between autonomous systems is the major cost of routing a packet, and eliminates the need for conversion of external costs to internal link-state metrics. Making a route private
Private routes are used internally but are not advertised.
Routes for Connection profile interfaces
When an IP routing connection is brought up, the MAX activates the route for that WAN interface. The Destination for the route is the remote device's address (LAN Adrs), and the metric and preference values are specified in the Connection profile. If the profile uses numbered interface, an additional route is created for that interface.
A connected route for the Ethernet IP interface
The IP Adrs parameter specifies the MAX unit's IP address on the local Ethernet. The MAX creates a route for this address at system startup. Static route preferences
By default, static routes and RIP routes have the same preference, so they compete equally. ICMP redirects take precedence over both and OSPF take precedence over everything. If a dynamic route's preference is lower than that of the static route, the dynamic route can overwrite or "hide" a static route to the same network. This can be seen in the IP routing table: there will be two routes to the same destination. The static route has an "h" flag, indicating that it is hidden and inactive. The active, dynamically learned route is also in the routing table. However, dynamic routes age and if no updates are received, they eventually expire. In that case, the hidden static route reappears in the routing table. RIP and OSPF preferences
Because OSPF typically involves a complex environment, its router configuration is described in a separate chapter. See Chapter 11, Configuring OSPF Routing.
Tagging routes learned from RIP
The RIP Tag field is attached to all routes learned from RIP in OSPF updates. The tag is a hexadecimal number that can be used by border routers to filter the record. Metrics for routes learned from RIP
The RipAseTag parameter can be type 1 or 2. Type-1 is a metric expressed in the same units as the link-state metric (the same units as interface cost). Type-2 is considered larger than any link-state path. It assumes that routing between autonomous systems is the major cost of routing a packet, and eliminates the need for conversion of external costs to internal link-state metrics. Example static route configurations
For example Connection profile configurations, see Configuring IP routing connections. Each of these results in a static route. For an example of the Ethernet profile configuration of the MAX unit's local IP interface, see Configuring the MAX IP interface on a subnet.
Configuring the default route
If no routes exist for the destination address of a packet, the MAX forwards the packet to the default route. Most sites use the default route to specify a local IP router (such as a Cisco router or a UNIX host running the route daemon) to offload routing tasks to other devices.
EthernetNote: The name of the first IP Route profile is always Default, and its destination is always 0.0.0.0 (you cannot change these values).
Static Rtes
Name=Default
Active=Yes
Dest=0.0.0.0/0
Gateway=10.9.8.10
            Metric=1
            Preference=100
            Private=Yes
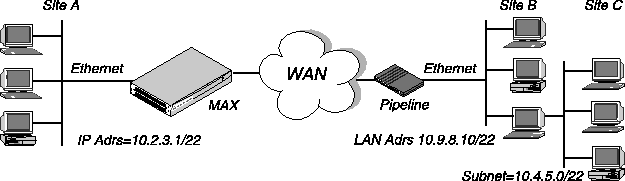
Figure 10-14. Two-hop connection that requires a static route when RIP is off
Ethernet
      Static Rtes
            Name=SITEBGW
            Active=Yes
            Dest=10.4.5.0/22
            Gateway=10.9.8.10
            Metric=2
            Preference=100
            Private=Yes
            Ospf=Cost=1
            ASE-type=Type1
            ASE=tag=c0000000
Ethernet
      Mod Config
            Route Pref
                  Rip Preference=150
Configuring the MAX for dynamic route updates
Each active interface may be configured to send or receive RIP or OSPF updates. The Ethernet interface can also be configured to accept or ignore ICMP redirects. All of these routing mechanisms modify the IP routing table dynamically.
Ethernet
      Mod Config
            Ether options
                  RIP=On
                  Ignore Def Rt=Yes
            RIP Policy=Poison Rvrs
            RIP Summary=Yes
            ICMP Redirects=Accept
Ethernet
      Answer
            Session options...
                  RIP=On
Ethernet
      Connections
            IP options...
                  Private=No
                  RIP=On
Ignoring the default route
You can configure the MAX to ignore default routes advertised by routing protocols. This configuration is recommended, because you typically do not want the default route to be changed by a RIP update. The default route specifies a static route to another IP router, which is often a local router such as a Cisco router or another kind of LAN router. When the MAX is configured to ignore the default route, RIP updates will not modify the default route in the MAX routing table. RIP policy and RIP summary
The RIP Policy and RIP Summary parameters have no effect on RIP-v2. Ignoring ICMP Redirects
ICMP was designed to dynamically find the most efficient IP route to a destination. ICMP Redirect packets are one of the oldest route discovery methods on the Internet and one of the least secure, because it is possible to counterfeit ICMP Redirects and change the way a device routes packets. Private routes
If you configure a profile with Private=Yes, the router will not disclose its route in response to queries from routing protocols. Examples of RIP and ICMP configurations
The following sample configuration instructs the router to ignore ICMP redirect packets, to receive (but not send) RIP updates on Ethernet, and to send (but not receive) RIP updates on a WAN connection.
EthernetReceiving RIP updates on Ethernet means that the router will learn about networks that are reachable via other local routers. However, it will not propagate information about all of its remote connections to the local routers.
Mod Config
Ether options
RIP=Recv-v2
ICMP Redirects=Ignore
EthernetSending RIP on a WAN connection means that the remote devices will be able to access networks that are reachable via other local routers. However, the MAX does not receive information about networks that are reachable through the remote router.
Connections
IP options...
RIP=Send-v2
Managing IP routes and connections
This section describes how to monitor TCP/IP/UDP and related information in the terminal server command-line interface. To invoke the terminal-server interface, select System > Sys Diag > Term Serv and press Enter. Working with the IP routing table
The terminal-server IProute commands display the routing table and enable you to add or delete routes. The changes you make to the routing table using the IProute command last only until the MAX unit resets. To view the IProute commands:
ascend% iproute ?
iproute ?              Display help information

iproute add          iproute add <destination/size> <gateway> [ pref ] [ m

iproute delete    iproute delete <destination/size> <gateway> [ proto ]

iproute show        displays IP routes (same as "show ip routes" command)
ascend% iproute show
Destination        Gateway        IF       Flg Pref  Met   Use   Age

0.0.0.0/0          10.0.0.100     wan0     SG   1     1     0     20887

10.207.76.0/24     10.207.76.1    wanidle0 SG   100   7     0     20887

10.207.77.0/24     10.207.76.1    wanidle0 SG   100   8     0     20887

127.0.0.1/32       -              lo0      CP   0     0     0     20887

10.0.0.0/24        10.0.0.100     wan0     SG   100   1     21387 20887

10.1.2.0/24        -              ie0      C    0     0     19775 20887

10.1.2.1/32        -              lo0      CP   0     0     389   20887

255.255.255.255/32 -              ie0      CP   0     0     0     20887
The Interface column shows the name of the interface through which a packet addressed to this destination will be sent.
The Flg column can contain the following flag values:
0.0.0.0/0 10.0.0.100 wan0 SG 1 1 0 20887
10.207.76.0/24 10.207.76.1 wanidle0 SG 100 7 0 20887
10.207.77.0/24 10.207.76.1 wanidle0 SG 100 8 0 20887
127.0.0.1/32 - lo0 CP 0 0 0 20887
The next route is specified in a Connection profile that is currently active:
10.0.0.0/24 10.0.0.100 wan0 SG 100 1 21387 20887
10.1.2.0/24 - ie0 C 0 0 19775 20887
10.1.2.1/32        -              lo0      CP   0     0     389   20887

255.255.255.255/32 -              ie0      CP   0     0     0     20887
iproute add <destination> <gateway> [<metric>]where <destination> is the destination network address, <gateway> is the IP address of the router that can forward packets to that network, and <metric> is the virtual hop count to the destination network (default 8). For example:
ascend% iproute add 10.1.2.0 10.0.0.3/24 1The command shown immediately above adds a route to the 10.1.2.0 network and all of its subnets through the IP router located at 10.0.0.3/24. The metric to the route is 1 (it is one hop away).
If you try to add a route to a destination that already exists in the routing table, the MAX replaces the existing route, but only if the existing route has a higher metric. If you get the message "Warning: a better route appears to exist", the MAX rejected your attempt to add a route because the routing table already contained the same route with a lower metric. Note that RIP updates can change the metric for the route.
iproute delete <destination> <gateway>For example:
ascend% iproute delete 10.1.2.0 10.0.0.3/24
Displaying route statistics
The Traceroute command is useful for locating slow routers or diagnosing IP routing problems. It traces the route an IP packet follows by launching UDP probe packets with a low TTL (Time-To-Live) value and then listening for an ICMP "time exceeded" reply from a router. Its syntax is:
traceroute [ -n ] [ -v ] [ -m max_ttl ] [ -p port ] [ -q nqueries ]All flags are optional. The only required parameter is the destination hostname or IP address.
[ -w waittime ] host [ datasize ]
Verbose output. Received ICMP packets other than Time Exceeded and ICMP Port Unreachable are listed.
Sets the maximum number of queries for each hop. The default is 3.
Sets the time to wait for a response to a query. The default is 3 seconds.
ascend% traceroute techpubs
traceroute to techpubs (10.65.212.19), 30 hops MAX, 0 byte packetsProbes start with a TTL of one and increase by one until of the following conditions occurs:
1 techpubs.eng.ascend.com (10.65.212.19) 0 ms 0 ms 0 ms
ascend% traceroute -m 60 techpubs
traceroute to techpubs (10.65.212.19), 60 hops MAX, 0 byte packetsThree probes are sent at each TTL setting. The second line of command output shows the address of the router and round trip time of each probe. If the probe answers come from different gateways, the address of each responding system will be printed. If there is no response within a 3 second timeout interval, the command output is an asterisk. The following annotations may be included after the time field in a response:
1 techpubs.eng.abc.com (10.65.212.19) 0 ms 0 ms 0 ms
ascend% ping techpubs
PING techpubs (10.65.212.19): 56 data bytesYou can terminate the Ping exchange at any time by typing Ctrl-C. When you press Ctrl-C, the command reports the number of packets sent and received, the percentage of packet loss, duplicate or damaged echo_response packets (if any), and round-trip statistics. In some cases, round-trip times cannot be calculated.
64 bytes from 10.65.212.19: icmp_seq=0 ttl=255 time=0 ms
64 bytes from 10.65.212.19: icmp_seq=3 ttl=255 time=0 ms
^C
--- techpubs ping statistics ---
2 packets transmitted, 2 packets received, 0% packet loss
round-trip min/avg/MAX = 0/0/0 ms
During the Ping exchange, the MAX displays information about the packet exchange, including the TTL (Time-To-Live) of each ICMP echo_response packet.
The Ping command sends an ICMP mandatory echo_request datagram, which asks the remote station "Are you there?" If the echo_request reaches the remote station, the station sends back an ICMP echo_response datagram, which tells the sender "Yes, I am alive." This exchange verifies that the transmission path is open between the MAX and a remote station.
Configuring Finger support
You can configure the MAX to respond to Finger requests, as specified in RFC 1288-The Finger User Information Protocol.
show arp            Display the Arp Cache

show icmp           Display ICMP information

show if             Display Interface info. Type 'show if ?' for help.

show ip             Display IP information. Type 'show ip ?' for help.

show udp            Display UDP information. Type 'show udp ?' for help.

show tcp            Display TCP information. Type 'show tcp ?' for help.

show pools          Display the assign address pools.
ascend% show arp
entry typ ip address ether addr if rtr pkt insertThe ARP table displays this information:
0 DYN 10.65.212.199 00C07B605C07 0 0 0 857783
1 DYN 10.65.212.91 0080C7C4CB80 0 0 0 857866
2 DYN 10.65.212.22 080020792B4C 0 0 0 857937
3 DYN 10.65.212.3 0000813DF048 0 0 0 857566
4 DYN 10.65.212.250 0020AFF80F1D 0 0 0 857883
5 DYN 10.65.212.16 0020AFEC0AFB 0 0 0 857861
6 DYN 10.65.212.227 00C07B5F14B6 0 0 0 857479
7 DYN 10.65.212.36 00C07B5E9AA5 0 0 0 857602
8 DYN 10.65.212.71 0080C730041F 0 0 0 857721
9 DYN 10.65.212.5 0003C6010512 0 0 0 857602
10 DYN 10.65.212.241 0080C72ED212 0 0 0 857781
11 DYN 10.65.212.120 0080C7152582 0 0 0 857604
12 DYN 10.65.212.156 0080A30ECE6D 0 0 0 857901
13 DYN 10.65.212.100 00C07B60E28D 0 0 0 857934
14 DYN 10.65.212.1 00000C065D27 0 0 0 857854
15 DYN 10.65.212.102 08000716C449 0 0 0 857724
16 DYN 10.65.212.33 00A024AA0283 0 0 0 857699
17 DYN 10.65.212.96 0080C7301792 0 0 0 857757
18 DYN 10.65.212.121 0080C79BF681 0 0 0 857848
19 DYN 10.65.212.89 00A024A9FB99 0 0 0 857790
20 DYN 10.65.212.26 00A024A8122C 0 0 0 857861
21 DYN 10.65.212.6 0800207956A2 0 0 0 857918
22 DYN 10.65.212.191 0080C75BE778 0 0 0 857918
23 DYN 10.65.212.116 0080C72F66CC 0 0 0 857416
24 DYN 10.65.212.87 0000813606A0 0 0 0 857666
25 DYN 10.65.212.235 00C07B76D119 0 0 0 857708
26 DYN 10.65.212.19 08002075806B 0 0 0 857929
ascend% show icmp
3857661 packet received.The Input and Output histograms show the number of ICMP packets received and transmitted in each category.
20 packets received with errors.
Input histogram: 15070
2758129 packets transmitted.
0 packets transmitted due to lack of resources.
Output histogram: 15218
ascend% show if ?
show if ? Display help informationTo display the status and packet count of each active WAN link as well as local and loopback interfaces:
show if stats Display Interface Statistics
show if totals Display Interface Total counts
ascend% show if stats
Interface Name Status Type Speed MTU InPackets OutpacketThe output contains these fields:
ie0 ethernet Up 6 10000000 1500 107385 85384
wan0 Down 1 0 1500 0 0
wan1 Down 1 0 1500 0 0
wan2 Down 1 0 1500 0 0
wanidle0 Up 6 10000000 1500 0 0
lo0 loopback Up 24 10000000 1500 0 0
ascend% show if totals
Name --Octets----Ucast-- -NonUcast- Discard -Error- Unknown -Same IF-The output contains these fields:
ie0 i: 7813606 85121 22383 0 0 0 0
o: 101529978 85306 149 0 0 0 0
wan0 i: 0 0 0 0 0 0 0
o: 0 0 0 0 0 0 0
wan1 i: 0 0 0 0 0 0 0
o: 0 0 0 0 0 0 0
wan2 i: 0 0 0 0 0 0 0
o: 0 0 0 0 0 0 0
wanidle0 i: 0 0 0 0 0 0 0
o: 0 0 0 0 0 0 0
lo0 i: 0 0 0 0 0 0 0
o: 0 0 0 0 0 0 0
ascend% show ip ?
show ip ?           Display help information

show ip stats       Display IP Statistics

show ip address     Display IP Address Assignments

show ip routes      Display IP Routes
ascend% show ip stats
107408 packets received.To view IP interface address information:
0 packets received with header errors.
0 packets received with address errors.
0 packets forwarded.
0 packets received with unknown protocols.
0 inbound packets discarded.
107408 packets delivered to upper layers.
85421 transmit requests.
0 discarded transmit packets.
1 outbound packets with no route.
0 reassembly timeouts.
0 reassemblies required.
0 reassemblies that went OK.
0 reassemblies that Failed.
0 packets fragmented OK.
0 fragmentations that failed.
0 fragment packets created.
0 route discards due to lack of memory.
64 default ttl.
ascend% show ip address
Interface   IP Address    Dest Address   Netmask         MTU     Status

ie0         10.2.3.4      N/A            255.255.255.224   1500      Up

wan0        0.0.0.0       N/A            0.0.0.0           1500    Down

wan1        13.1.2.0      13.1.2.128     255.255.255.248   1500    Down

wan2        0.0.0.0       N/A            0.0.0.0           1500    Down

wan3        0.0.0.0       N/A            0.0.0.0           1500    Down

lo0         127.0.0.1     N/A            255.255.255.255   1500      Up

rj0         127.0.0.2     N/A            255.255.255.255   1500      Up

bh0         127.0.0.3     N/A            255.255.255.255   1500      Up
ascend% show udp ?
show udp ? Display help informationTo display the number of UDP packets received and transmitted:
show udp stats Display UDP Statistics
show udp listen Display UDP Listen Table
ascend% show udp stats
22386 packets received.

    0 packets received with no ports.

    0 packets received with errors.

    0 packets dropped

    9 packets transmitted.
ascend% show udp listen
udp:

Socket Local Port InQLen InQMax    InQDrops    Total Rx

0        1023       0       1           0           0

1         520       0      50           0         532

2           7       0      32           0           0

3         123       0      32           0           0

4        1022       0     128           0           0

5       	 161       0      64           0           0
ascend% show tcp ?
show tcp ? Display help informationTo display the number of TCP packets received and transmitted:
show tcp stats Display TCP Statistics
show tcp connection Display TCP Connection Table
ascend% show tcp stats
     0 active opens.

    11 passive opens.

     1 connect attempts failed.

     1 connections were reset.

     3 connections currently established.

 85262 segments received.

 85598 segments transmitted.

   559 segments re-transmitted.
To display current TCP sessions:
ascend% show tcp connection
Socket       Local               Remote                         State

0            *.23                *.*                           LISTEN

1            10.2.3.23           15.5.248.121.15003       ESTABLISHED
ascend% show pools
Pool #         Base        Count              InUse

1              10.98.1.2     55               27

2              10.5.6.1     128               0

   Number of remaining allocated addresses:    156
Copyright © 1998, Ascend Communications, Inc. All rights reserved.
