
![[Top]](../../images/home.jpg)
![[Contents]](../../images/contents.jpg)
![[Prev]](../../images/previous.jpg)
![[Next]](../../images/next.jpg)
![[Last]](../../images/index.jpg)


Setting Up WAN Connections in RADIUS
This chapter describes how to configure a RADIUS user profile for different types of WAN connections. This chapter contains:
This chapter does not discuss how to set up a frame relay connection. For details on this task, see Chapter 5, Setting Up Frame Relay in RADIUS.
Limiting access to services and protocols
To limit the services and protocols that a link can use, you must specify a value for each of the attributes listed in Table 4-1 (except Ascend-Force-56). If you do not specify a value, the MAX does not restrict the services and protocols the link can use.
To limit access to services and protocols for a connection, follow these steps:
- On the first line of the profile, specify the User-Name and Password attributes.
- To limit the types of services a link can use, set the User-Service attribute on the first line
of the profile.
You can specify one of these values:
- Login-User (1): The operator can use an asynchronous Telnet connection to log into the terminal server. The MAX rejects incoming framed calls. The operator cannot use any framed protocol, but can start Telnet or raw TCP sessions.
- Framed-User (2): Incoming calls must use a framed protocol. Otherwise, the MAX rejects them. Asynchronous Telnet sessions are unframed and therefore not allowed when you specify this value.
- Dialout-Framed-User (5): The MAX can use this profile for outgoing calls only. The MAX sends this value to the RADIUS server during an authentication request.
If RADIUS authenticates an incoming call using the User-Name and Password attributes, and the type of call matches the value of the User-Service attribute, the MAX applies the attributes specified in the user profile to the call. If the type of call does not match the User-Service attribute, the MAX rejects the call. If you do not specify a value for the User-Service attribute, the MAX does not limit the services the link can access.
For more information on using the User-Service attribute, see Putting it all together.
- To specify the type of framed protocol the link can use, set the Framed-Protocol attribute.
When you set this attribute, the MAX does not allow any other type of framed protocol.
Table 4-2 lists the values you can specify for Framed-Protocol.
What Framed-Protocol does depends on how you set User-Service:
- If User-Service=Framed-User or is unspecified, a user requesting access can dial in using the framing specified by Framed-Protocol.
- The MAX rejects other types of framing.
- A user requesting access can also dial in without using a framed protocol, but can then change to the framing specified by the Framed-Protocol attribute.
- If User-Service=Framed-User or is unspecified, and Framed-Protocol has no specified value, the operator can use any framed protocol.
- If User-Service=Login-User, the user cannot use a framed protocol.
- If User-Service=Dialout-Framed-User, Framed-Protocol specifies the type of framing the MAX allows on the outgoing call.
To specify the type of data service the link uses for outgoing calls, set the Ascend-Data-
Svc attribute.
To restrict users to an ISDN or modem connection, set the NAS-Port-Type attribute.
This attribute indicates the type of physical port the MAX is using to authenticate the client. Some ISPs offer different levels of service based on connection type. To prevent a client from using a capability to which he or she has not subscribed, set the NAS-Port-Type attribute to an appropriate value. You can specify one of these settings:
- Async indicates a call routed to a digital modem.
- Sync indicates a non-ISDN synchronous connection, such as a Switched-56K
connection.
- ISDN-Sync indicates a synchronous ISDN connection.
- ISDN-Async-v120 indicates an ISDN connection using V.120 asynchronous rate adaptation.
- ISDN-Async-v110 indicates an ISDN connection using V.110 asynchronous rate adaptation.
- Virtual indicates a connection to the MAX using a transport protocol instead of a physical port.
Set the Ascend-Force-56 attribute.
This attribute specifies whether the MAX uses only the 56-kbps portion of a channel, even when all 64 kbps appear to be available:
Use this feature when you place calls to European or Pacific Rim countries from within North America and the complete path cannot distinguish between the Switched-56 and Switched-64 data services. This feature is not required if you are placing calls only within North America.
Service access example
The dial-in user in this example can use only PPP protocols (PPP, MP+, or MP) and cannot use the terminal server.
Ascend Password="Pipeline", User-Service=Framed-User
Framed-Protocol=PPP,
Framed-Address=200.250.55.9,
Framed-Netmask=255.255.255.248,
Ascend-Link-Compression=Link-Comp-Stac,
Framed-Compression=Van-Jacobson-TCP-IP,
Ascend-Route-IP=Route-IP-Yes,
Ascend-Metric=2
Restricting users to specific lines and channels
To restrict the lines and channels that a user can access, set the NAS-Port attribute, as described in Table 4-3.
To restrict users to specific lines and channels, make these settings on the first line of the user profile:
- Set the New NASPort ID parameter in the System > Sys Config menu on the MAX.
You can choose one of two settings:
- Yes restricts a dial-in user to a shelf, slot, line, and channel number. This format is the one recognized by the MAX TNT.
- No specifies that the MAX recognizes the five-digit format that specifies the type of service in use, the line number, and the channel number. No is the default.
- Specify the User-Name and Password attributes.
- Specify the NAS-Port attribute by doing one of the following:
To restrict the dial-in ISDN user to a shelf, slot, line, and channel number. This is the format the MAX TNT recognizes:
FF SSSS LLLLL CCCCC
- FF specifies the shelf number (always 0 in RADIUS, 1 on the MAX)
- SSSS specifies the slot number (0-15)
- LLLLL specifies the line number (0-31)
- CCCCC specifies the channel number (0-31)
For an analog call, the values are the same, except that the line number can be 0-63, and the channel number is always 1.
Because the value you enter is zero-based, you must add 1 to each component to ascertain the actual slot, line, and channel number. The RADIUS daemon converts the NAS-Port number to decimal on most systems.
You can also restrict the dial-in user to a service, line, and channel.
tlcc
where
- t=digital call or analog call
- ll=line number
- cc=channel number
Line and channel example
To restrict a dial-in user to analog service on line 1, set up a user profile like this one:
Dave Password="password", NAS-Port=20100
User-Name="Dave",
User-Service=Framed-User,
Framed-Protocol=PPP,
Ascend-Assign-IP-Pool=1,
Ascend-Route-IP=1,
Ascend-Idle-Limit=300,
Framed-Routing=None
Setting up a PPP connection
Point-to-Point Protocol (PPP) enables you to set up a single-channel connection to any other device running PPP. A PPP connection can support IP routing, IPX routing, protocol-independent bridging, and password authentication using PAP, CHAP, or MS-CHAP.
A PPP connection is usually a bridged or routed network connection initiated in PPP dialup software. Figure 4-1 shows the MAX with a PPP connection to a remote user running Windows 95 with the TCP/IP stack and PPP dialup software.

Figure 4-1. A PPP connection
Before you begin
Before configuring the RADIUS user profile for a PPP connection, you must perform the following tasks:
- Work with the caller to find out what software and modem device exists at the remote end.
- Determine the appropriate routing, authentication, and compression settings.
- For the MAX to use the Answer profile as the default when answering a call, set Use
Answer as Default=Yes in the Ethernet > Answer menu.
If you accept the default setting of No, the MAX uses the factory defaults.
- In the Ethernet > Answer > PPP Options menu, set Recv Auth=PAP, CHAP, MS-CHAP, or
Either.
If the incoming PPP call does not include a source IP address, the MAX requires PAP, CHAP, or MS-CHAP authentication.
- To enable PPP encapsulation, set PPP=Yes in the Ethernet > Answer > Encaps menu.
- Assign a name to the MAX in the System profile.
For information on the tasks specific to the MAX configuration interface, see the MAX ISP and Telecommuting Configuration Guide.
Configuring a PPP connection in RADIUS
To configure a PPP connection in RADIUS, use the attributes listed in Table 4-4.
To configure a PPP connection in a RADIUS user profile, follow these steps:
- On the first line of the profile, specify the User-Name and Password attributes, and set
User-Service=Framed-User.
- Set Framed-Protocol=PPP.
- Set Ascend-Send-Auth=Send-Auth-PAP or Send-Auth-CHAP (outgoing calls only).
The Ascend-Send-Auth attribute specifies the authentication protocol that the MAX requests when initiating a connection using PPP or MP+ encapsulation. The answering side of the connection determines which authentication protocol, if any, the connection uses. Both sides of the connection must support the specified protocol.
You can set Ascend-Send-Auth to one of these values:
- Send-Auth-None (0) specifies that the MAX does not request an authentication protocol for outgoing calls: This setting is the default.
- Send-Auth-PAP (1) specifies that the MAX requests Password Authentication Protocol (PAP): PAP is a PPP authentication protocol that provides a simple method for the MAX to establish its identity in a two-way handshake. Authentication takes place only upon initial link establishment, and does not use encryption. The remote device must support PAP. If you choose this setting, the MAX requests PAP authentication, but uses CHAP authentication if the called unit requires CHAP. Choose this setting for non-token card authentication if you want to send your password unencrypted.
- Send-Auth-CHAP (2) specifies that the MAX requests Challenge Handshake Authentication Protocol (CHAP): CHAP is a PPP authentication protocol that is more secure than PAP. CHAP provides a way for the remote device to periodically verify the identity of the MAX using a three-way handshake and encryption. Authentication takes place upon initial link establishment. A device can repeat the authentication process any time after the connection is made. The remote device must support CHAP. If you choose this setting, the MAX does not bring up the connection using PAP. Choose this setting for non-token card authentication if you do not wish to send your password unencrypted-that is, if you do not wish to use PAP authentication.
- If you request PAP or CHAP authentication, you must also specify a password using
Ascend-Send-Secret or Ascend-Send-Passwd (outgoing calls only).
Both of these attributes specify the password that the MAX sends to the remote end of a connection on outgoing calls. If the value you specify for Ascend-Send-Secret or Ascend-Send-Password does not match the value of the remote end's Ascend-Receive-Secret attribute (in a RADIUS user profile) or the Recv PW parameter (in a Connection profile), the remote system rejects the call.
Use Ascend-Send-Passwd only if your version of the MAX does not support Ascend-Send-Secret.
- To specify the MAX unit's IP address, set the Ascend-PPP-Address attribute.
If you do not specify a value for this attribute, or if you specify the value 0.0.0.0, IPCP negotiates using the value of the IP Adrs parameter in the Ethernet \> Mod Config \> Ether Options menu. If you specify a valid IP address, IPCP negotiates with that IP address. If you set the value of this attribute to 255.255.255.255, IPCP negotiates with the address 0.0.0.0. Note that you can assign Ascend-PPP-Address a value different from the MAX unit's true IP address, as long as the user requesting access understands that limitation.
- To specify the async control character map for the PPP session, set the Ascend-PPP-
Async-Map attribute.
The value you specify is a 4-byte bitmap to one or more control characters. The async control character map is defined in RFC 1548 and specifies that each bit position represents its ASCII equivalent. The bits are ordered with the lowest bit of the lowest byte being 0 (zero). For example, bit 19 corresponds to Control-S (DC3) or ASCII 19. The control characters pass through the PPP link as data. Only applications running over the link can use these characters.
- To specify the maximum number of bytes the MAX can receive in a single packet on a
PPP link, set the Framed-MTU attribute.
The default value is 1524. You should accept this default unless the device at the remote end of the link cannot support it. If the administrator of the remote network specifies that you must change this value, specify a number between 1 and 1524.
- To turn data compression on or off for a PPP link, set the Ascend-Link-Compression
attribute.
- Link-Comp-None (0) turns off data compression: This value is the default.
- Link-Comp-Stac (1) turns on data compression: The MAX applies the STACKER LZS compression/decompression algorithm.
Both sides of the link must set either the Ascend-Link-Compression attribute (in RADIUS) or the Link Comp parameter (on the MAX) to turn on data compression.
- To turn on TCP/IP header compression, set Framed-Compression=Van-Jacobson-TCP-IP.
This setting applies only to packets in TCP applications, such as Telnet, and turns on header compression for both sides of the link. Turning on header compression is most effective in reducing overhead when the data portion of the packet is small.
- To instruct the Ascend PPP code not to use slot compression when sending VJ-
compressed packets, set Ascend-PPP-VJ-Slot Comp=VJ-Slot-Comp-No.
When you set Framed-Compression=Van-Jacobson-TCP-IP, the MAX removes the TCP/IP header, and associates a TCP/IP packet with a connection by giving it a slot ID. The first packet coming into a connection must have a slot ID, but succeeding packets need not have one. If the packet does not have a slot ID, the MAX associates it with the last-used slot ID. This scenario uses slot ID compression, because only the first packet in a stream uses slot compression.
However, there may be times when you want each VJ-compressed packet to have a slot ID. For this purpose, set the Ascend-PPP-VJ-Slot-Comp attribute to VJ-Slot-Comp-No. This setting specifies that no slot compression take place. If you do not specify a value for Ascend-PPP-VJ-Slot-Comp and Framed-Compression=Van-Jacobson-TCP-IP, slot compression occurs.
- To instruct the Ascend PPP code to use the 0x0037 value for the VJ compression type, set
Ascend-PPP-VJ-1172=PPP-VJ-1172.
The MAX uses the value 0x0037 only during IPNCP negotiation. The MAX accepts incoming 1172 type options without your setting this attribute.
RFC 1172 section 5.2 contains an erroneous statement that the VJ compression type value is 0x0037. It should be 0x002d. However, many older PPP implementations use the 0x0037 value when negotiating VJ compression. If you do not specify a value for Ascend-PPP-VJ-1172, the VJ compression type is 0x002d.
- Specify routing or bridging attributes for the connection.
For details on specifying that the connection use IP, see Specifying IP routing and RIP behavior.
For details on specifying that the connection use IPX, see Specifying IPX routing.
For details on specifying protocol-independent bridging, see Specifying protocol-independent bridging.
- Configure the bridging or routing setup in the MAX for the WAN connection.
For details, see Chapter 6, Setting Up Routing and Bridging Links in this guide, and the relevant chapters of the MAX ISP and Telecommuting Configuration Guide.
PPP connection example
The following is a sample user profile showing a PPP link that requests link compression, TCP/IP header compression, and IP routing:
Emma Password="m2dan", User-Service=Framed-User
Framed-Protocol=PPP,
Framed-Address=200.250.55.9,
Framed-Netmask=255.255.255.248,
Ascend-Link-Compression=Link-Comp-Stac,
Framed-Compression=Van-Jacobson-TCP-IP,
Ascend-Route-IP=Route-IP-Yes,
Ascend-Metric=2
Setting up an MP or MP+ connection
Both Multilink Protocol (MP) and Multilink Protocol Plus (MP+) connections use PPP encapsulation over a multichannel link.
MP supports multichannel links, but not Dynamic Bandwidth Allocation (DBA). The base channel count determines the number of calls to place, and the number of channels does not change. In addition, MP requires that all channels in the connection share the same phone number-that is, the channels on the answering side of the connection must be in a hunt group.
MP+ enables the MAX to support DBA-to increase bandwidth as necessary and to drop bandwidth when a session no longer needs it. An MP+ connection can combine up to 30 channels into a single high-speed connection.
Figure 4-2 shows the MAX connected to a remote Pipeline 25 with an MP+ connection.

Figure 4-2. An MP+ connection
Other types of units may support MP but not MP+, so if you configure an MP+ connection in RADIUS between the MAX and a non-Ascend unit, the MAX first requests the MP+ protocol. If the remote end refuses MP+, the MAX uses MP instead. If the answering device refuses both MP+ and MP, the MAX sets up a PPP call on a single channel.
Before you begin
Before configuring the RADIUS user profile for an MP or MP+ connection, you must perform the following tasks:
- Work with the caller to find out about the dial-up software and the Ascend configuration at
the remote end.
- Determine the appropriate routing, bridging, and authentication settings for the caller.
- For the MAX to use the Answer profile as the default when answering a call, set Use
Answer as Default=Yes in the Ethernet > Answer menu.
If you accept the default setting of No, the MAX uses the factory defaults.
- In the Ethernet > Answer > PPP Options menu, set Recv Auth=PAP, CHAP, MS-CHAP, or
Either.
If the incoming PPP call does not include a source IP address, the MAX requires PAP, CHAP, or MS-CHAP authentication.
- To enable MP encapsulation, set MP=Yes in the Ethernet > Answer > Encaps menu.
- To enable MP+ encapsulation, set MPP=Yes in the Ethernet > Answer > Encaps menu.
- Assign a name to the MAX in the System profile.
For information on the tasks specific to the MAX configuration interface, see the MAX ISP and Telecommuting Configuration Guide.
Configuring an MP or MP+ connection in RADIUS
To configure an MP or MP+ connection in RADIUS, use the attributes listed in Table 4-5.
To configure an MP or MP+ connection in a RADIUS user profile, follow these steps:
- On the first line of the profile, specify the User-Name and Password attributes, and set
User-Service=Framed-User.
- Set Framed-Protocol=MPP.
- Set Ascend-Send-Auth=Send-Auth-PAP or Send-Auth-CHAP (outgoing calls only).
The Ascend-Send-Auth attribute specifies the authentication protocol that the MAX requests when initiating a connection using PPP or MP+ encapsulation. The answering side of the connection determines which authentication protocol, if any, the connection uses. Both sides of the connection must support the specified protocol.
You can set Ascend-Send-Auth to one of these values:
- Send-Auth-None (0) specifies that the MAX does not request an authentication protocol for outgoing calls: This setting is the default.
- Send-Auth-PAP (1) specifies that the MAX requests Password Authentication Protocol (PAP): PAP is a PPP authentication protocol that provides a simple method for the MAX to establish its identity in a two-way handshake. Authentication takes place only upon initial link establishment, and does not use encryption. The remote device must support PAP. If you choose this setting, the MAX requests PAP authentication, but uses CHAP authentication if the called unit requires CHAP. Choose this setting for non-token card authentication if you want to send your password unencrypted.
- Send-Auth-CHAP (2) specifies that the MAX requests Challenge Handshake Authentication Protocol (CHAP): CHAP is a PPP authentication protocol that is more secure than PAP. CHAP provides a way for the remote device to periodically verify the identity of the MAX using a three-way handshake and encryption. Authentication takes place upon initial link establishment. A device can repeat the authentication process any time after the connection is made. The remote device must support CHAP. If you choose this setting, the MAX does not bring up the connection using PAP. Choose this setting for non-token card authentication if you do not wish to send your password unencrypted-that is, if you do not wish to use PAP authentication.
- If you request PAP or CHAP authentication, you must also specify a password using
Ascend-Send-Secret or Ascend-Send-Passwd (outgoing calls only).
Both of these attributes specify the password that the MAX sends to the remote end of a connection on outgoing calls. If the value you specify for Ascend-Send-Secret or Ascend-Send-Password does not match the value of the remote end's Ascend-Receive-Secret attribute (in a RADIUS user profile) or the Recv PW parameter (in a Connection profile), the remote system rejects the call.
Use Ascend-Send-Passwd only if your version of the MAX does not support Ascend-Send-Secret.
- To turn on TCP/IP header compression, set Framed-Compression=Van-Jacobson-TCP-IP.
This setting applies only to packets in TCP applications, such as Telnet, and turns on header compression for both sides of the link. Turning on header compression is most effective in reducing overhead when the data portion of the packet is small.
- Configure Dynamic Bandwidth Allocation attributes.
For details, see Setting up Dynamic Bandwidth Allocation (DBA).
- Set call management attributes.
For details, see Specifying a time limit and idle connection attributes.
- Specify routing or bridging attributes for the connection.
For details on specifying that the connection use IP, see Specifying IP routing and RIP behavior. For details on specifying that the connection use IPX, see Specifying IPX routing. For details on specifying protocol-independent bridging, see Specifying protocol-independent bridging.
- Configure the bridging or routing setup in the MAX for the WAN connection.
For details, see Chapter 6, Setting Up Routing and Bridging Links in this guide, and the relevant chapters of the MAX ISP and Telecommuting Configuration Guide.
MP+ connection example
This example shows a user profile for an MP+ link that sets DBA attributes and uses IP routing:
John Password="4yr66", User-Service=Framed-User
Framed-Protocol=MPP,
Framed-Address=200.0.5.1,
Framed-Netmask=255.255.255.0,
Ascend-Target-Util=80,
Ascend-History-Weigh-Type=History-Constant,
Ascend-Seconds-Of-History=90,
Ascend-Add-Seconds=30,
Ascend-Remove-Seconds=30,
Ascend-Maximum-Channels=10,
Ascend-Inc-Channel-Count=2,
Ascend-Dec-Channel-Count=2,
Ascend-Route-IP=Route-IP-Yes,
Ascend-Metric=7,
Framed-Routing=None,
Ascend-Idle-Limit=0,
Ascend-Bridge=Bridge-No
Setting up a BACP connection
Bandwidth Allocation Control Protocol (BACP) is the Internet standard protocol equivalent to the Ascend MP+ bandwidth allocation protocol. BACP functions similarly to MP+ and uses the same attributes as MP+. The only additional attribute you must set is listed in Table 4-6.
To set up a BACP connection, follow these steps:
- To enable incoming BACP calls, set BACP=Yes in the Ethernet > Answer > PPP Options
menu.
- In a RADIUS user profile, set Ascend-BACP-Enable=BACP-Yes.
- Follow the instructions in Setting up an MP or MP+ connection, except for the following:
- You need not set MPP=Yes in the Ethernet > Answer > PPP Options menu.
- You need not set Framed Protocol=MPP.
All other MP+ settings apply to a BACP connection.
Setting up a Nailed/MPP connection
A Nailed/MPP connection is a nailed-up connection that can add switched channels for increased bandwidth. The MAX establishes a Nailed/MPP connection by connecting nailed-up or switched channels end-to-end
The MAX adds or subtracts switched channels as required by the DBA parameters in the Connection profile or RADIUS user profile. If the two sides of a connection disagree on the number of channels necessary for a connection, the side requesting the greater number prevails. Both sides make calculations on the required number of channels based on the traffic each side receives.
The maximum number of channels for the Nailed/MPP connection is the value of the Ascend-Maximum-Channels attribute or the number of nailed-up channels in the specified group, whichever is greater. If a nailed-up channel fails, MAX replaces that channel with a switched channel, even if the call is online with more than the minimum number of channels.
Before you begin
Before configuring the RADIUS user profile for a Nailed/MPP connection, you must perform the following tasks:
- Work with the caller to find out about the dial-up software and the Ascend configuration at
the remote end.
- Determine the appropriate routing, bridging, and authentication settings for the caller.
- For the MAX to use the Answer profile as the default when answering a call, set Use
Answer as Default=Yes in the Ethernet > Answer menu on the MAX.
If you accept the default setting of No, the MAX uses the factory defaults.
- In the Ethernet > Answer > PPP Options menu, set Recv Auth=PAP, CHAP, MS-CHAP, or
Either.
If the incoming PPP call does not include a source IP address, the MAX requires PAP, CHAP, or MS-CHAP authentication.
- To enable MP+ encapsulation, set MPP=Yes in the Ethernet > Answer > Encaps menu.
- Assign a name to the MAX in the System profile.
- Set up a Line profile in the MAX configuration interface by making these settings:
- On the remote end of the connection, set the AnsOrig and FT1 Caller parameters for
answering only.
Note that the DO Hangup command works only from the caller end of the connection.
For complete information on the tasks specific to the MAX configuration interface, see the MAX ISP and Telecommuting Configuration Guide.
Configuring a Nailed/MPP connection in RADIUS
To configure a Nailed/MPP connection in RADIUS, you must set the attributes for a regular MP+ connection, and then configure the additional RADIUS attributes listed in Table 4-7.
To configure a Nailed/MPP connection in a RADIUS user profile, follow these steps:
- Configure a regular MP+ connection in RADIUS, as described in Setting up an MP or
MP+ connection.
- Set Ascend-Call-Type=Nailed/Mpp.
- To specify that the MAX is the designated caller for the switched part of the connection,
set Ascend-FT1-Caller=FT1-Yes.
When you specify this setting, the MAX dials to bring online any switched circuits
that are part of the call. The remote end must have the setting FT1 Caller=No (in a Connection profile) or Ascend-FT1-Caller=FT1-No (in a RADIUS user profile).
- To specify the nailed-up channels the profile can use, set the Ascend-Group attribute.
This attribute points to the nailed-up channels the WAN link uses. Specify a single number, or specify a list of numbers between 1 and 60, separated by commas. Do not include spaces. The default value is 1. For example, setting the Ascend-Group attribute to "1,3,5,7" assigns four nailed-up groups to the profile.
If a Nailed/MPP connection is down and the nailed-up channels are also down, the connection does not re-establish itself until the nailed-up channels come back up or the switched channels are dialed. (The switched channels are dialed when the calling unit receives a packet whose destination is the unit at the remote end of the Nailed/MPP connection.)
Nailed/MPP connection example
In this example, a Nailed/MPP connection uses the channels in group 2:
Permconn-MAX2 Password="Ascend", User-Service=Dialout-Framed-
User
User-Name="Matt",
Framed-Protocol=MPP,
Framed-Address=50.1.1.1,
Framed-Netmask=255.0.0.0,
Ascend-Route-IP=Route-IP-Yes,
Ascend-Metric=7,
Framed-Routing=None,
Ascend-Idle-Limit=0,
Ascend-Bridge=Bridge-No,
Ascend-Call-Type=Nailed/Mpp,
Ascend-Group="2",
Ascend-FT1-Caller=FT1-Yes
Setting up a nailed-up connection
A nailed-up connection is a permanent link that is always up as long as the physical connection persists. If the unit or central switch resets or if the link goes down, the MAX attempts to restore the link at ten-second intervals. If the MAX or the remote unit is powered off, the link comes back up when the device is plugged in again. On an ISDN line, a nailed-up connection uses one or more of the line's channels. A serial WAN link has no channels and is always 100% nailed up.
Before you begin
Before configuring a nailed-up connection in a RADIUS user profile, you must carry out these tasks in the MAX configuration interface:
- In the Line profile, specify which channels are nailed-up.
For example, if channel 2 is nailed-up, specify this setting:
Ch 2=Nailed
Nailed specifies that the channel is permanently connected. No dialout is required, so nailed-up channels do not require a phone number.
- For each nailed-up channel, specify a group number from 1 to the maximum number of
nailed groups that the MAX allows.
For example, to assign channel 2 to group 9, make this specification:
Ch 2 Prt/Grp=9
Each number represents a nailed-up group-that is, a permanent connection across the WAN.
Configuring a nailed-up connection in RADIUS
To configure a nailed-up connection in RADIUS, use the attributes listed in Table 4-8.
To configure a nailed-up connection in a RADIUS user profile, follow these steps:
- On the first line of the RADIUS user profile, specify the User-Name, Password, and User-
Service attributes.
- For the User-Name attribute, specify a name that indicates an outgoing nailed-up
connection.
- Set Password= "Ascend".
- Set User-Service=Dialout-Framed-User: This setting ensures that the MAX cannot use the profile for authentication of an incoming call.
For example, you might enter this first line in the profile:
Permconn-MAX2 Password="Ascend", User-Service=Dialout-Framed-User
- On the second line of the user profile, specify the User-Name attribute to indicate the
name of the user that can make the nailed-up connection.
- Set the Framed-Protocol attribute.
- Set the Ascend-Call-Type attribute to Nailed or Nailed/Mpp.
- Nailed (1) specifies a link that consists entirely of nailed-up channels: This value is the default.
- Nailed/Mpp (2) specifies a link that consists of both nailed-up and switched channels: If you specify this setting, you must also set Framed-Protocol=MPP. For information on setting up a Nailed/MPP connection, see Setting up a Nailed/MPP connection.
- Set the Ascend-FT1-Caller attribute.
This attribute specifies whether the MAX initiates an FT1-AIM or an FT1-B&O call, or whether it waits for the remote end to initiate these types of calls.
- FT1-No (0) specifies that the MAX waits for the remote end to initiate the call. This value is the default.
- FT1-Yes (1) specifies that the MAX initiates the call. If you choose this setting, the MAX dials to bring online any switched circuits that are part of the call.
If the remote end has FT1 Caller=No (in a Connection profile) or Ascend-FT1-Caller=FT1-No (in a RADIUS user profile), set Ascend-FT1-Caller=FT1-Yes in the RADIUS user profile for the local MAX. By the same token, if the remote end has FT1 Caller=Yes (in a Connection profile) or Ascend-FT1-Caller=FT1-Yes (in a RADIUS user profile), set Ascend-FT1-Caller=FT1-No in the RADIUS user profile for the local MAX.
- To specify the nailed-up channels the profile can use, set the Ascend-Group attribute.
This attribute points to the nailed-up channels that the WAN link uses. Your usage depends upon the value you specify for the Ascend-Call-Type attribute:
- If you set Ascend-Call-Type=Nailed, you can specify a number between 1 and 60 for Ascend-Group. The default value is 1.
- If you set Ascend-Call-Type=Nailed/Mpp, you can use the Ascend-Group attribute to assign multiple nailed-up groups to the profile. Specify a single number, or specify a list of numbers between 1 and 60, separated by commas. Do not include spaces. The default value is 1. For example, setting the Ascend-Group attribute to "1,3,5,7" assigns four nailed-up groups to the profile.
Nailed-up connection example
The pseudo-user profile in this example defines a nailed-up PPP connection using group number 2:
Permconn-MAX2 Password="Ascend", User-Service=Dialout-Framed-
User
User-Name="Matt",
Framed-Protocol=PPP,
Framed-Address=50.1.1.1,
Framed-Netmask=255.0.0.0,
Ascend-Route-IP=Route-IP-Yes,
Ascend-Metric=7,
Framed-Routing=None,
Ascend-Idle-Limit=0,
Ascend-Bridge=Bridge-No,
Ascend-Call-Type=Nailed,
Ascend-Group="2",
Ascend-FT1-Caller=FT1-Yes
Modifying or deleting nailed-up profiles
To modify or delete nailed-up profiles, follow these steps:
- Change or delete the profile on the RADIUS server.
- Choose the Upd Rem Cfg command from the Sys Diag menu.
The Ascend unit closes all the sessions related to all nailed-up profiles, deletes all the profiles from the system, and restarts the process of retrieving profiles from RADIUS.
Setting up a Combinet connection
The MAX supports Combinet bridging to link two LANs as though they were one segment. Figure 4-3 shows a Combinet connection between two networks.

Figure 4-3. A Combinet connection
Before you begin
Before configuring the RADIUS user profile for a Combinet connection, you must perform the following tasks:
- Work with the caller to find out about the remote device's MAC address and
authentication information.
- For the MAX to use the Answer profile as the default when answering a call, set Use
Answer as Default=Yes in the Ethernet > Answer menu.
If you accept the default setting of No, the MAX uses the factory defaults.
- To disable Guest access via Combinet, set Profile Reqd=Yes in the Ethernet > Answer
menu.
Note that Combinet does not support PAP or CHAP authentication.
- To enable Combinet encapsulation, set COMB=Yes in the Ethernet > Answer > Encaps
menu.
- Set Bridging=Yes in the Ethernet > Mod Config menu.
For information on the tasks specific to the MAX configuration interface, see the MAX ISP and Telecommuting Configuration Guide.
Configuring a Combinet connection in RADIUS
To configure a Combinet connection in RADIUS, use the attributes listed in Table 4-9.
To configure a Combinet connection in a RADIUS user profile, follow these steps:
- Specify a MAC address using the User-Name attribute, and a password using the
Password attribute.
When Profile Reqd=Yes in the Ethernet > Answer menu, the MAX compares the caller's MAC address to the value of the User-Name attribute, and the value of the caller's password to the value of the Password attribute. When Profile Reqd=No, the MAX uses the caller's MAC address only.
Note that Combinet bridging cannot use PAP or CHAP authentication. The MAX must use the caller's MAC address and password to authenticate calls.
- Set Framed-Protocol=COMB.
- To turn on bridging for the profile, set Ascend-Bridge=Bridge-Yes.
- Specify a password using Ascend-Send-Secret or Ascend-Send-Passwd (outgoing calls
only).
Both of these attributes specify the password that the MAX sends to the remote end of a connection on outgoing calls. If the value you specify for Ascend-Send-Secret or Ascend-Send-Password does not match the value of the remote end's Ascend-Receive-Secret attribute (in a RADIUS user profile) or the Recv PW parameter (in a Connection profile), the remote system rejects the call.
Use Ascend-Send-Passwd only if your version of the MAX does not support Ascend-Send-Secret.
- To turn on TCP/IP header compression, set Framed-Compression=Van-Jacobson-TCP-IP.
This setting applies only to packets in TCP applications, such as Telnet, and turns on header compression for both sides of the link. Turning on header compression is most effective in reducing overhead when the data portion of the packet is small.
- Configure the bridging setup in the MAX for the WAN connection.
For details, see Chapter 6, Setting Up Routing and Bridging Links in this guide, and the relevant chapters of the MAX ISP and Telecommuting Configuration Guide.
Combinet connection example
This user profile sets up a Combinet link:
000145CFCF01 Password="m2dan", User-Service=Framed-User
Framed-Protocol=COMB,
Ascend-Route-IP=Route-IP-No,
Ascend-Bridge=Bridge-Yes,
Ascend-Link-Compression=Link-Comp-Stac,
Ascend-Idle-Limit=240
Setting up an AppleTalk connection
To set up an AppleTalk connection in RADIUS, use the attributes in Table 4-10.
To configure an AppleTalk connection in RADIUS, follow these steps:
- Specify whether the calles is an AppleTalk router or a dial-in AppleTalk client in Ascend-
AppleTalk Peer-Mode.
- Enable AppleTalk routing for the connection by specifying Ascend-Route-Appletalk-Yes.
To define a static route for the connection, follow these steps:
- Create a pseudo-user profile with the first line in the following format:
appleroute-num Password="ascend', user-service=Dialout-Framed-User
	Address 1
	Address 2
	...
	Address n
where num is a number in a series starting at 1, and Address n is the actual route associate with this entry.
- Enter one or more static AppleTalk route specifications in the following format:
Ascend-Appletalk-Route="net_start net_end zone_name profile_name"
See Table 4-11 for descriptions of the arguments in this line.
Keep in mind the following:
Table 4-11. AppleTalk static route attributes
- Each static route must appear in a user profile.
- Ascend-Route-AppleTalk must be set to Yes.
Example of AppleTalk connection with static route
An example of a static route with the associated connection profile is:
appleroute-1    Password = "ascend" User-Service = Dialout-
Framed-User Ascend-Appletalk-Route = "20 25 testzone1 pipe50"
pipe50  Password = "ascend" User-Service = Dialout-Framed-User,

        User-Service = Framed-User,

        Framed-Protocol = MPP,

        Ascend-Appletalk-Peer-Mode = Appletalk-Peer-Router,

        Ascend-Route-Appletalk = Route-Appletalk-Yes,

        Ascend-Dialout-Allowed = Dialout-Allowed,

        Ascend-Dial-Number = "83272",

        Ascend-Send-Auth = Send-Auth-PAP,

        Ascend-Send-Passwd = "MAX"
Setting up an ARA connection
AppleTalk Remote Access (ARA) connections rely on AppleTalk. The MAX includes a minimal AppleTalk stack for ARA support. The minimal stack includes a Name Binding Protocol (NBP) network-visible entity and an AppleTalk Echo Protocol (AEP) echo responder. You can therefore use standard AppleTalk management and diagnostic tools, such as InterPoll (from Apple Computer), to obtain information.
For a pure AppleTalk connection, a Macintosh user must have ARA Client software and an asynchronous modem. For a TCP/IP connection through ARA, the Macintosh must also be running TCP/IP software such as MacTCP or Open Transport.
ARA is an asynchronous protocol. It supports V.120, X.75, and modem calls only. It does not support V.110 calls or synchronous connections.
Figure 4-4 shows a Macintosh with an internal modem dialing into the MAX. The Macintosh uses the ARA Client software to communicate with an IP host on the Ethernet.

Figure 4-4. An ARA connection
Before you begin
Before configuring a RADIUS user profile for an ARA connection, you must perform the following tasks in the MAX configuration interface:
- For the MAX to use the Answer profile as the default when answering a call, set Use
Answer as Default=Yes in the Ethernet > Answer menu.
If you accept the default setting of No, the MAX uses the factory defaults.
- To disable Guest access via ARA, set Profile Reqd=Yes in the Ethernet > Answer menu.
Note that ARA does not support PAP or CHAP authentication.
- To enable ARA encapsulation, set ARA=Yes in the Ethernet > Answer > Encaps menu.
- Set Appletalk=Yes in the Ethernet > Mod Config menu.
- Set Auth=RADIUS or Auth=RADIUS/LOGOUT in the Ethernet > Mod Config menu.
- If the local Ethernet supports an AppleTalk router with configured zones, set the Zone
Name parameter in the Ethernet > Mod Config > AppleTalk menu.
For information on the tasks specific to the MAX configuration interface, see the MAX ISP and Telecommuting Configuration Guide.
Configuring an ARA connection in RADIUS
To configure an ARA connection in RADIUS, use the attributes listed in Table 4-12.
To configure an ARA connection in a RADIUS user profile, follow these steps:
- Specify a user name using the User-Name attribute, and a password using the Password
attribute.
For details on specifying a user name and password for incoming calls, see Specifying a user name and Specifying a password. For information on specifying a user name and password for outgoing calls, see Setting up outgoing calls.
- On any line other than the first one, set Framed-Protocol=ARA.
This setting specifies that a dial-in user can establish an ARA connection to the Ethernet network.
- Set the Ascend-Ara-PW attribute to the same value specified by the Password attribute.
The MAX requires both the Password and the Ascend-Ara-PW attributes. The ARA software in the Ascend unit uses DES to encrypt and decrypt the ARA password.
- For a TCP/IP connection through ARA, turn on IP routing by setting Ascend-Route-
IP=Route-IP-Yes.
Then, carry out one of these tasks:
- If the MAC TCP/IP software has a hard-coded IP address, set the Framed-Address attribute (and, optionally, the Framed-Netmask attribute) to specify the Macintosh user's IP address.
- If the MAC TCP/IP software expects a dynamic IP address assignment, set up dynamic IP addressing as described in Defining a pool of IP addresses for dynamic assignment. Then, set the Ascend-Assign-IP-Pool attribute in the user profile to specify the address pool from which RADIUS should assign the user an address.
- Configure the bridging or routing setup in the MAX for the WAN connection.
For details, see Chapter 6, Setting Up Routing and Bridging Links in this guide, and the relevant chapters of the MAX ISP and Telecommuting Configuration Guide.
ARA connection example
This example sets up a TCP connection through ARA with dynamic IP address assignment:
Emma Password="pwd"
Framed-Protocol=ARA,
Ascend-Ara-PW="pwd",
Ascend-Route-IP=Route-IP-Yes,
Ascend-Assign-IP-Pool=1
Setting up a terminal server connection
A terminal server connection is typically an incoming call that uses V.34, V.42, V.110, V.120, or X.75 encapsulation. It can also be an asynchronous data stream, such as a call from an analog modem or a serial connection to the MAX.
When the MAX receives a call that uses V.34, V.42, V.110, V.120, and X.75 encapsulation, it removes the encapsulation and then determines if the call is further encapsulated in PPP. If no PPP encapsulation is present, the MAX establishes a terminal server connection.
Figure 4-5 shows an incoming modem call initiated by a PC running SoftComm, a program that causes the user's modem to dial into the MAX. The MAX directs the call to its digital modems, and then forwards the calls to its terminal server software. In Figure 4-5, the MAX immediately directs the call to a Telnet host.

Figure 4-5. A terminal server connection
When the MAX directs the call to the terminal server, the user sees one of the terminal server interfaces (command line or menu), or bypasses the terminal server interface and initiates an immediate Telnet, TCP, or Rlogin connection to a host on the local network.
Note: Most sites restrict dial-in access to the terminal server interface of the MAX, because a
user who has logged into the MAX is able to access status and routing information, and may be
able to modify routes. See the MAX Security Supplement for details.
You can set RADIUS attributes in a user profile to perform these tasks relating to the terminal server interface:
- Enable Telnet, TCP, and Rlogin connections.
- Set the terminal server idle timer
- Configure menu items and an input prompt.
- Configure the banner text and a list of hosts to which users can Telnet.
- Control access to the MAX unit's digital modems on a per-user basis
Before you begin
Before configuring a terminal server connection in a RADIUS user profile, carry out these tasks in the MAX configuration interface:
- For the MAX to use the Answer profile as the default when answering a call, set Use
Answer as Default=Yes in the Ethernet > Answer menu.
If you accept the default setting of No, the MAX uses the factory defaults.
Note: You can restrict a specific user's access to terminal server commands if the user's
connection is built in part upon the Answer profile. See the MAX Security Supplement for
more information.
- If you give the terminal server operator raw TCP access, makes sure that TCP-Clear=Yes
in the Ethernet > Answer > Encaps menu.
- To allow V.120 calls, set V.120=Yes in the Ethernet > Answer > Encaps menu.
- To allow X.75 calls, set EU-RAW=Yes and EU-UI=Yes in the Ethernet > Answer >
Encaps menu.
- Navigate to the Ethernet > Mod Config > TServ Options menu.
- To specify the type of security that the MAX uses for a remote terminal server session, set
the Security parameter.
- To specify whether users can establish Telnet sessions from the terminal server interface,
set the Telnet parameter.
- If you want the RADIUS server to remotely configure a login banner and a list of
Telnet hosts, set Remote Conf=Yes.
- To specify whether the operator uses the command-line interface or the menu-driven
interface, set the Initial Scrn parameter, the Toggle Scrn parameter, or both.
The operator has access to a list of Telnet hosts only in the terminal server menu-driven interface.
- To specify that you want to control the use of the MAX unit's digital modems for outgoing
calls on a per-user basis, set Imm. Modem Auth=User.
- In the Ethernet > Mod Config > Auth menu, set the Auth TS Secure parameter.
For further details on terminal server options in the MAX configuration interface, see the MAX ISP and Telecommuting Configuration Guide.
Overview of terminal server attributes
To configure a terminal server connection in RADIUS, use the attributes listed in Table 4-13.
Table 4-13. Terminal server attributes
Attribute
|
Description
|
Possible values
|
|---|
|
Ascend-Dialout-Allowed (131)
|
Specifies whether the user associated with the RADIUS user profile can dial out using one of the MAX unit's digital modems.
|
Dialout-Not-Allowed (0)
Dialout-Allowed (1)
The default value is Dialout-Not Allowed.
|
|
Ascend-Host-Info (252)
|
Specifies the IP address and name of the first, second, third, and fourth hosts to which you can establish a Telnet session, as listed in the terminal server menu-driven interface.
|
IP_address specifies the IP address of each host.
text describes each host.
The default address is 0.0.0.0/0 and the default description is null.
|
|
Ascend-Menu-Item (206)
|
Defines a single menu item that appears in lieu of the terminal server prompt You can specify up to 20 Ascend-Menu-Item attributes per profile to give the user a custom menu of items from which to choose. The menu items display in the order in which they appear in the RADIUS profile.
|
command is the string sent to the terminal server when the user selects the menu item.
text is the text that displays to the user.
match is the pattern the user must type to select the item.
The first semi-colon (;) that appears acts as the delimiter between command and text. The second semi-colon that appears acts as the delimiter between text and match.
By default, the MAX uses the standard terminal server menu.
|
|
Ascend-Menu-Selector (205)
|
Specifies a string as a prompt for user input in the terminal server menu interface.
|
Text string containing up to 31 characters. The default is Enter Selection (1-num, q), where num is the number of items on the menu.
|
|
Ascend-TS-Idle-Limit (169)
|
Specifies the number of seconds that a terminal server connection must be idle before the MAX disconnects the session.
|
Integer between 0 and 65535.The default value is 120. A setting of 0 (zero) means that the line can be idle indefinitely.
|
|
Ascend-TS-Idle-Mode (170)
|
Specifies whether the MAX uses a terminal server idle timer and, if so, whether both the user and host must be idle before the MAX disconnects the session.
|
TS-Idle-None (0)
TS-Idle-Input (1)
TS-Idle-Input-Output (2)
The default value is TS-Idle-Input.
|
|
Login-Host (14)
|
Specifies the host to which the automatically connects when you set User-Service=Login-User and specify a value for the Login-Service attribute.
|
IP address in dotted decimal notation n.n.n.n, where n is an integer between 0 and 255.
The default value is 0.0.0.0. This setting specifies that the Login-User does not automatically connect to a particular host.
|
|
Login-Service (15)
|
Specifies the type of terminal service connection to an IP host that occurs immediately after authentication.
|
Telnet (0)
Rlogin (1)
TCP-Clear (2)
By default, the MAX does not grant immediate access to an IP host.
|
|
Login-TCP-Port (16)
|
Specifies the port number to which a TCP session connects.
|
Integer between 1 and 65535. The default value is 23.
|
|
Password (2)
|
Specifies the user's password.
|
Alphanumeric string containing up to 252 characters. The default value is null.
|
|
Reply-Message (18)
|
Specifies text that appears to the terminal server operator using the menu-driven interface. You can specify up to 16 entries per user profile.
|
Text string containing up to 80 characters. The default value is null.
|
|
User-Name (1)
|
Specifies the user's name.
|
Alphanumeric string containing up to 252 characters. The default value is null.
|
|
User-Service (6)
|
Indicates whether the link can use framed or unframed services.
|
Login-User (1)
Framed-User (2)
Dialout-Framed-User (5)
By default, the MAX does not restrict the services that a link can use.
|
Enabling Telnet, TCP, and Rlogin connections
The terminal server software manages dial-in Telnet, TCP, and BSD-style Rlogin connections. You can set them up as regular terminal server connections, or you can direct them to an IP host immediately so that the dial-in user never sees the terminal server software. Telnet, TCP, and Rlogin connections are TCP/IP based.
To enable Telnet, TCP, and Rlogin connections in a RADIUS user profile, follow these steps:
- Set User-Service=Login-User on the first line of the user profile, along with the User-
Name and Password attributes.
Once the terminal server has authenticated an incoming caller, the operator can use an asynchronous Telnet connection to log into the terminal server, and can start Telnet or raw TCP sessions to an IP host on the local network. The MAX rejects incoming framed calls and the user cannot use any framed protocol.
For details on specifying a user name and password for incoming calls, see Specifying a user name and Specifying a password. For information on specifying a user name and password for outgoing calls, see Setting up outgoing calls.
- To specify the type of service that user immediately accesses upon login, set the Login-
Service attribute.
When you set the Login-Service attribute, a dial-in terminal server user makes an immediate connection to an IP host on your local network and never sees the terminal server interface. You can specify one of these values:
- Telnet (0). The user immediately establishes a Telnet session with the host specified by the Login-Host attribute.
- Rlogin (1). The user immediately establishes an Rlogin session with the host specified by the Login-Host attribute.
- TCP-Clear (2). This setting specifies a TCP/IP connection with no Telnet protocol. TCP-Clear establishes a TCP session between the MAX and the host specified by Login-Host over which the user can run an application specified by Login-TCP-Port. If you specify this setting, the Ethernet > Answer menu must specify TCP-Clear=Yes.
- To specify the host to which the Login-User automatically connects, set the Login-Host
attribute.
Specify an IP address in dotted decimal notation. Access begins immediately after login. When you specify an IP address, the Login-User never sees the MAX interface, but connects immediately to the specified host via a Telnet, Rlogin, or TCP-Clear connection.
If you do not specify a value for the Login-Host attribute, the user can access any remote host through the Telnet or raw TCP commands of the terminal server command-line interface. When the operator uses the menu-driven terminal server interface, he or she can only have access to the hosts listed by the Ascend-Host-Info attribute.
If you specify Login-Service=Telnet or Login-Service=TCP-Clear, and you do not specify a value for the Login-Host attribute, the MAX unit's response depends on the value of the Auth TS Secure parameter in the Ethernet > Mod Config > Auth menu. If Auth TS Secure=Yes (the default), the MAX drops the call. If Auth TS Secure=No, the MAX allows the caller access to the terminal server interface. For details on the Auth TS Secure parameter, see the MAX Reference Guide.
For information on the Ascend-Host-Info attribute, see Configuring the message text and a list of hosts.
- If you set Login-Service=TCP-Clear, set the Login-TCP-Port attribute.
Specify the port number to which a TCP session connects. The default value is 23.
Terminal service access examples
In this example, an Rlogin session starts automatically for anyone using the Userx user name and xyzzy password. When the session terminates, the connection also terminates.
# This profile causes an auto-rlogin to 10.0.200.4 upon login.
Userx Password="xyzzy"
User-Service=Login-User,
Login-Service=Rlogin,
Login-Host=10.0.200.4,
...
Further, when you specify the following settings, a raw TCP session starts automatically for anyone using the User1 user name and Test1 password:
# This profile causes an auto-TCP to 4.2.3.1 port 9 upon login.
User1 Password="Test1"
User-Service=Login-User,
Login-Service=TCP-Clear,
Login-Host=4.2.3.1,
Login-TCP-Port=9,
...
Setting the terminal server idle timer
The terminal server idle timer determines the circumstances under which the MAX disconnects a session. You cannot make terminal server idle timer settings for a frame relay or raw TCP connection.
To set the terminal server idle timer in a user profile, follow these steps:
- To specify whether the MAX uses a terminal server idle timer and, if so, whether both the
user and host must be idle before the MAX disconnects the session, set the Ascend-TS-
Idle-Mode attribute.
You can specify one of these settings:
- To specify the number of seconds that a terminal server connection must be idle before the
MAX disconnects the session, set the Ascend-TS-Idle-Limit attribute.
Configuring a custom menu and an input prompt
You can configure the user profile give the operator a custom menu of items from which to choose, along with an input prompt. The server uses the custom menu to present the user with a subset of terminal server commands. The user does not have access to the regular menu or to the terminal server command line.
To configure a custom menu and an input prompt, follow these steps:
- Set one or more Ascend-Menu-Item attributes.
Each Ascend-Menu-Item attribute defines a single menu item that appears in lieu of the terminal server prompt. You can specify up to 20 Ascend-Menu-Item attributes per profile. RADIUS ignores additional entries. The menu items display in the order in which they appear in the RADIUS profile.
Enter your specifications using this format:
Ascend-Menu Item="command;text[;match]"
Table 4-14 lists each argument.
If any entry consists of an option containing more that the maximum number of characters allowed, the RADIUS server discards the entry.
- To specify a string as a prompt for user input in the terminal server menu interface, set the
Ascend-Menu-Selector attribute.
By default, when you create a custom menu with the Ascend-Menu-Item attribute, the terminal server displays this string when prompting the user to make a selection:
Enter Selection (1-num, q)
The num argument represents the last number in the list. The terminal server code automatically determines the value of num by determining the number of items in the menu. The only valid user input is in the range 1 through num, and q to quit.
However, you can specify a different string for prompting the user to make a selection. The Ascend-Menu-Selector attribute enables you to specify a string that the terminal server displays when prompting a user for a menu selection. If you define this attribute, its value overrides the default.
Enter your specification using this format:
Ascend-Menu-Selector="string"
string contains the text you want the terminal server to display when prompting the user for a menu selection. You can specify up to 31 characters.
Custom terminal server menu examples
Suppose you set these attributes:
Emma Password="m2dan", User-Service=Login-User
Ascend-Menu-Item="show ip stats;Display IP Stats",
Ascend-Menu-Item="ping 1.2.3.4;Ping server",
Ascend-Menu-Item="telnet 10.2.4.5;Telnet to Ken's machine",
Ascend-Menu-Item="show arp;Display ARP Table",
Ascend-Menu-Selector=" Option:",
...
The terminal server displays this text:
1. Display IP Stats 3. Telnet to Ken's machine
2. Ping server 4. Display ARP Table.
Option:
Now, suppose you also enter specifications for the match option, as in this profile:
Emma Password="m2dan", User-Service=Login-User
Ascend-Menu-Item="show ip stats;ip=Display ip stats;ip",
Ascend-Menu-Item="ping 1.2.3.4;p=Ping server. Ctrl-C stops ping;p",
Ascend-Menu-Item="telnet 10.2.4.5;t=Telnet to Ken's machine;t",
Ascend-Menu-Item="show arp;dsp=Display arp table;dsp ",
Ascend-Menu-Selector=" Option:",
...
The terminal server displays this text:
ip=Display ip stats p=Ping server. Ctrl-C stops ping
t=Telnet to Ken's machine dsp=Display arp table
Option:
Note that you cannot combine numeric menu selections with pattern matching. This example shows what you should not do:
Emma Password="m2dan", User-Service=Login-User
Ascend-Menu-Item="show ip stats;ip=Display ip stats",
Ascend-Menu-Item="ping 1.2.3.4;p=Ping server. Ctrl-C stops ping;p",
Ascend-Menu-Item="telnet 10.2.4.5;t=Telnet to Ken's machine;t",
Ascend-Menu-Item="show arp;dsp=Display arp table;dsp ",
Ascend-Menu-Selector=" Option:",
...
If you mix numbered selections and pattern matching, the terminal server screen displays the following text:
1. ip=Display ip stats 3. t=Telnet to Ken's machine
2. p=Ping server. Ctrl-C stops ping 4. dsp=Display arp table
Option:
Configuring the message text and a list of hosts
For terminal server operators using the standard menu-driven interface, you can specify message text and a list of available Telnet hosts. The message text can contain instructions or other helpful information. The list of hosts consists of each host's IP address and description.
To set up message text and a list of hosts, follow these steps:
- Create the first line of a pseudo-user profile using the User-Name, Password, and
User-Service attributes.
You create a pseudo-user profile to store information that the MAX can query-in this case, in order to store message text and a list of hosts. You can configure pseudo-users for both global and MAX-specific configuration of the message text and list. The terminal server loads the unit-specific information in addition to the global information.
For a unit-specific configuration, specify the first line of a pseudo-user profile in this
format:
Initial-Banner-unit_name Password="Ascend", User-Service=
Dialout-Framed-User
unit_name is the system name of the Ascend unit-that is, the name specified by the Name parameter in the System profile.
For a global configuration, specify the first line of a pseudo-user profile in this format:
Initial-Banner Password="Ascend", User-Service=Dialout-Framed-User
- To specify message text, set one or more Reply-Message attributes.
The maximum number of Reply-Message attributes per profile is 16. Use this format:
Reply-Message="string"
string contains the text of the reply message. Enter up to 80 characters.
An Access-Terminate-Session packet is a RADIUS packet identified by the code number 31. Only RADIUS daemons you customize support this packet code can send an Access-Terminate-Session packet. Neither the Ascend RADIUS daemon nor the Livingston RADIUS daemon supports this packet type. This packet can include only one attribute-the Reply-Message attribute-and this attribute can specify up to 80 characters of text.
When the MAX receives an Access-Terminate-Session packet, it starts a timer, displays any Reply-Message included in the packet, and terminates the session. For example, if a user's bill is past due, the Access-Terminate-Session packet could include the message
Emma, you have not paid your connect charges.
- To specify a list of hosts to which a user can establish a Telnet session, set the Ascend-
Host-Info attribute.
You can specify up to 10 Ascend-Host-Info entries. Enter your attribute settings in this format:
Ascend-Host-Info="IP_address text"
IP_address specifies the IP address of each host, and text describes each host. You can enter up to 31 characters for text. The RADIUS server assigns the text a number. When the user selects the number, the terminal server initiates a Telnet session with the host at the specified IP address.
If you specify a value for the Ascend-Host-Info attribute, you must also make these settings in the Ethernet > Mod Config > TServ Options menu:
- Set Initial Scrn=Menu or Toggle Scrn=Yes.
- Set Remote Conf=Yes.
Message text and host list example
Suppose you configure a MAX named Cal to use a RADIUS server. When Cal boots up (or when you enter the Upd Rem Cfg command), it looks into the RADIUS database for a pseudo-user profile named Initial-Banner-Cal. If it does not find this pseudo-user profile, it then looks for a pseudo-user profile named Initial-Banner. If it does not find this pseudo-user profile, it uses the value of the Banner parameter in the Ethernet > Mod Config > TServ Options menu.
Whenever a user logs into the MAX unit's terminal server, the screen displays the appropriate message text and list of hosts. Here is an example for a MAX named Cal:
Initial-Banner-Cal Password="Ascend", User-Service=Dialout-
Framed-User
Reply-Message="Up to 16 lines of up to 80 characters each",
     Reply-Message="will be accepted. Long lines will be
truncated",
Reply-Message="Additional lines will be ignored.",
Reply-Message="",
Ascend-Host-Info="1.2.3.4 Berkeley",
Ascend-Host-Info="1.2.3.5 Alameda",
Ascend-Host-Info="1.2.36 San Francisco",
...
Controlling access to the unit's digital modems on a per-user basis
The immediate modem feature enables a user to Telnet to a MAX in order to access the MAX unit's modems. The user can place outgoing calls without going through MAX terminal server interface. The MAXDial software offers the same outgoing call ability, but through a GUI interface.
You can control access to the modems on a per-user basis. Follow these steps:
- In the Ethernet > Mod Config > TServ Options menu, set Imm. Modem Auth=User.
When Imm. Modem Auth=User, the MAX requests a login name before allowing any user access to the immediate modem feature. The MAX attempts to find a profile with the name the user provides, looking first for a local Connection profile and then for a RADIUS user profile. If the MAX cannot find a profile matching the name the user provides, the MAX rejects the call and closes the Telnet session. If the MAX finds a matching profile, the MAX prompts the user for the password associated with the profile and verifies that the user enters the correct password.
If the user enters the correct password, the MAX checks the Ascend-Dialout-Allowed attribute in the RADIUS user profile.
- In a RADIUS user profile, set the Ascend-Dialout-Allowed attribute.
This attribute specifies whether the user associated with the RADIUS user profile can dial out using one of the MAX unit's digital modems. You can specify one of these settings:
- Dialout-Not-Allowed (0) indicates that the RADIUS user profile does not allow modem dialout. The default value is Dialout-Not Allowed.
- Dialout-Allowed (1) indicates that the RADIUS user profile allows modem dialout.
When you configure the MAX to use RADIUS accounting, RADIUS generates the appropriate session Start and Stop records for the immediate modem dialout sessions. In the Stop record, the attribute Ascend-Connect-Progress identifies a modem dialout session. The User-Name attribute contains the user name if Imm. Modem Auth=User. If Imm. Modem Auth=Global or None, the User-Name attribute is null. The Acct-Input-Octets attribute specifies the number of bytes the MAX received from the modem. The Acct-Output-Octets attribute specifies the number of bytes the MAX sent to the modem.
Call accounting does not record outgoing modem calls made through the terminal server interface. It applies only to immediate modem calls.
Digital modem dialout example
This profile enables the user Fred to dial out using the MAX unit's digital modems:
Fred Password="scr41"
User-Service=Framed-User,
Framed-Protocol=PPP,
Framed-Address=10.0.1.1,
Framed-Netmask=255.255.255.0,
Ascend-Metric=2,
Framed-Routing=None,
Ascend-Idle-Limit=30,
Ascend-Dialout-Allowed=Dialout-Allowed
An extended terminal server example
In this example, a network administrator needs to set up a terminal server menu giving each user the choice of logging into a BBS or starting PPP, SLIP, or CSLIP. RADIUS is running on a UNIX server. The RADIUS server uses the Default profile to determine the kind of access it grants to users who do not appear in the users file.
Note: You can configure only one Default profile in the users file. Make sure that the Default
profile is last in the file. RADIUS ignores any profiles that follow the Default profile.
The first line of the user profile enables a terminal server user to log in using his or her UNIX account name or password. The Reply-Message attribute provides introductory message text. The Ascend-Menu-Selector and Ascend-Menu-Item attributes provide each line of menu text.
Default Password="UNIX"
Ascend-Idle-Limit=1800,
Framed-Routing=None,
Framed-Compression=Van-Jacobsen-TCP-IP,
Ascend-Link-Compression=Link-Comp-None,
Ascend-PPP-VJ-1172=PPP-VJ-1172,
Ascend-Assign-IP-Pool=1,
Ascend-Route-IP=Route-IP-Yes,
Ascend-Route-IPX=Route-IPX-No,
Ascend-Bridge=Bridge-No,
Ascend-Handle-IPX=Handle-IPX-None,
Ascend-Callback=Callback-No,
Ascend-Data-Svc=Switched-Voice-Bearer,
Reply-Message="Welcome to ABCNet's Terminal Server."
Ascend-Menu-Selector="Press q to Quit>>",
Ascend-Menu-Item="rlogin bbs.net;BBS",
Ascend-Menu-Item="ppp;Start PPP",
Ascend-Menu-Item="slip;Start SLIP",
Ascend-Menu-Item="cslip;Start CSLIP"
This text displays on the terminal server screen:
Welcome to ABCNet's Terminal Server
1. BBS 3. Start SLIP
2. Start PPP 4. Start CSLIP
Press q to Quit>>
Notice that pressing the first option causes the MAX to establish an Rlogin session with the BBS at bbs.net.
Instead of using the Default profile, you can configure individual profiles to restrict users from certain services. For example, if you want the user Emma to immediately establish an Rlogin session with bbs.net upon authentication, you might use this user profile:
Emma Password="UNIX"
User-Service=Login-User,
Login-Host=bbs.net,
Login-Service=Rlogin
To let new users sign up, you might use a profile like this one:
Guest Password="UNIX"
User-Service=Login-User,
Login-Host=unix.bbs.net,
Login-Service=Rlogin
When a user dials in as Guest, he or she immediately logs into the UNIX machine. The UNIX machine has a shell /usr/local/bin/guest like this one:
#!/bin/sh
echo Welcome to BBS.NET.
signup
The signup line refers to an interactive shell script you can write in order to gather introductory information, set up a temporary account for verification, or perform any other relevant tasks.
Setting up a TCP connection between two MAX units
The MAX unit's Dialed Number Information Service (DNIS) support enables ISPs to receive TCP connections instead of switched calls. Using DNIS, a MAX unit at a central switch
creates a TCP connection to port 150 on a second MAX at an ISP. The MAX at the ISP treats the connection like a modem connection, routing the call to the terminal server interface or handling it as an asynchronous PPP session. The user appears to be connected to the second MAX.
This type of setup bypasses the Public Switched Telephone Network (PTSN). It also has the advantage of concentrating phone calls. For example, if the central switch receives two asynchronous calls, each of which use 32K of bandwidth, the MAX can handle both calls on one T1 PRI channel.
Figure 4-6 shows a TCP connection between MAX units.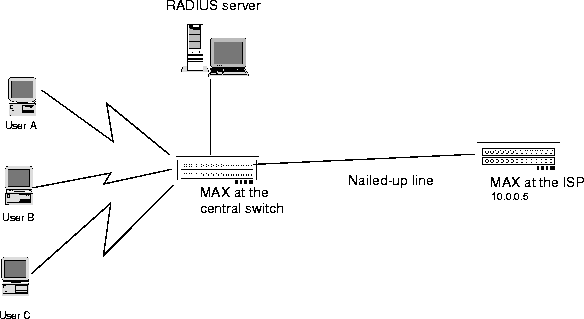
Figure 4-6. Sample TCP connection between MAX units
Before you begin
Before you set up the TCP connection in RADIUS, you must set Id Auth=Called Require in the Answer profile for the MAX at the central switch. This setting indicates that the called number must match the value of the called number in the user profile before the MAX can answer the call. For details, see the MAX Reference Guide.
Overview of TCP connection attributes
To set up the connection, you use the attributes in Table 4-15.
Configuring the MAX at the central switch
To configure the MAX at the central switch, follow these steps:
- Verify that the first line of all dial-in RADIUS user profiles has the following format:
phonenum Password="Ascend-DNIS"
- phonenum
represents the called number.
- The Password value specifies that RADIUS authenticates the caller by called number only.
- Set User-Service=Login-User.
- Set Login-Service=TCP-Clear.
- Set Login-Host to the IP address of the MAX at the ISP.
- Set Login-TCP-Port=50.
Configuring the MAX at the ISP
To configure the MAX at the ISP, follow these steps:
- Set User-Service=Login-User on the first line of the user profile, along with the User-
Name and Password attributes.
Once the terminal server has authenticated an incoming caller, the operator can use an asynchronous Telnet connection to log into the terminal server, and can start Telnet or raw TCP sessions to an IP host on the local network. The MAX rejects incoming framed calls and the user cannot use any framed protocol.
- To specify the type of service that a user immediately accesses upon login, set the Login-
Service attribute.
When you set the Login-Service attribute, a dial-in terminal server user makes an immediate connection to an IP host on your local network and never sees the terminal server interface. You can specify one of these values:
- Telnet (0). The user immediately establishes a Telnet session with the host specified by the Login-Host attribute.
- Rlogin (1). The user immediately establishes an Rlogin session with the host specified by the Login-Host attribute.
- TCP-Clear (2). This setting specifies a TCP/IP connection with no Telnet protocol. TCP-Clear establishes a TCP session between the MAX and the host specified by Login-Host over which the user can run an application specified by Login-TCP-Port.
- To specify the host to which the Login-User automatically connects, set the Login-Host
attribute.
Specify an IP address in dotted decimal notation. Access begins immediately after login. When you specify an IP address, the Login-User never sees the MAX interface, but connects immediately to the specified host via a Telnet, Rlogin, or TCP-Clear connection.
If you do not specify a value for the Login-Host attribute, the user can access any remote host through the Telnet or raw TCP commands of the terminal server command-line interface. When the operator uses the menu-driven terminal server interface, access to remote hosts is limited to the hosts listed by the Ascend-Host-Info attribute.
For information on the Ascend-Host-Info attribute, see Configuring the message text and a list of hosts.
- If you set Login-Service=TCP-Clear, set the Login-TCP-Port attribute.
Specify the port number to which a TCP session connects. The default value is 23.
TCP connection example
Suppose the MAX at the central switch has this RADIUS user profile:
555-1212 Password="Ascend-DNIS"
User-Service=Login-User,
Login-Service=TCP-Clear,
Login-Host=10.0.0.5,
Login-TCP-Port=150
When the MAX receives a connection from a device at 555-1212, it opens a TCP connection to the specified IP address. The MAX at the ISP receives an incoming TCP connection on port 150 and treats that connection like a modem connection. The second MAX routes the call to the terminal server interface using a RADIUS user profile like this one:
UserA Password="Test1"
User-Service=Login-User,
Login-Service=TCP-Clear,
Login-Host=10.0.0.6,
Login-TCP-Port=9
Managing bandwidth
You can manage bandwidth in one of the following ways:
To manage bandwidth in RADIUS, use the attributes listed in Table 4-16.
Table 4-16. Bandwidth management attributes
Attribute
|
Description
|
Possible values
|
|---|
|
Ascend-Add-Seconds (240)
|
Specifies the number of seconds that average line utilization (ALU) for transmitted data must exceed the threshold indicated by the Ascend-Target-Util attribute before the MAX begins adding bandwidth to a session.
|
Integer between 1 and 300. The default value is 5.
|
|
Ascend-Base-Channel-Count (172)
|
Specifies the initial number of channels the MAX sets up when originating calls for a PPP, MP+, MP, or Combinet multichannel link.
|
For a PPP link, the maximum number of channels is always 1.
For an MP+ or MP link, you can specify any value up to the number of channels available, but the device at the remote end of the link must also support MP+ or MP.
For a Combinet link, you can specify up to two channels.
The default value is 1.
|
|
Ascend-DBA-Monitor (171)
|
Specifies how the MAX monitors traffic on an MP+ call.
|
DBA-Transmit (0)
DBA-Transmit-Recv (1)
DBA-None (2)
The default value is DBA-
Transmit.
|
|
Ascend-Dec-Channel-Count (237)
|
Specifies the number of channels the MAX removes when bandwidth changes either manually or automatically during a call.
|
Integer between 1 and 32. The default value is 1.
|
|
Ascend-History-Weigh-Type (239)
|
Specifies which Dynamic Bandwidth Allocation (DBA) algorithm to use for calculating average line utilization (ALU) of transmitted data.
|
History-Constant (0)
History-Linear (1)
History-Quadratic (2)
The default value is
History-Quadratic.
|
|
Ascend-Idle-Limit (244)
|
Specifies the number of seconds the MAX waits before clearing a call when a session is inactive.
|
Integer between 0 and 65535. The default value is 120.
If you accept the default and the Answer profile specifies a value for the analogous Idle parameter on the MAX, the MAX ignores the Idle value uses the Ascend-Idle-Limit default.
|
|
Ascend-Inc-Channel-Count (236)
|
Specifies the number of channels the MAX adds when bandwidth changes either manually or automatically during a call.
|
Integer between 1 and 32. The default value is 1.
|
|
Ascend-Maximum-Call-Duration (125)
|
Specifies the maximum number of minutes an incoming call can remain connected.
|
Integer between 0 and 1440. The default value is 0 (zero).
|
|
Ascend-Maximum-Channels (235)
|
Specifies the maximum number of channels the MAX allows on an MP+ call.
|
Integer between 1 and the maximum number of channels your system supports. The default value is 1.
|
|
Ascend-Maximum-Time (194)
|
Specifies the maximum length of time in seconds that any session can remain online. Once a session reaches the time limit, the MAX takes its connection offline.
|
Integer between 0 and 4,294,967,295. The default value is 0 (zero). When you accept the default, the MAX does not enforce a time limit.
|
|
Ascend-Minimum-Channels (173)
|
Specifies the minimum number of
channels an MP+ call maintains.
|
The default value is 1.
|
|
Ascend-MPP-Idle-Percent (254)
|
Specifies a percentage of bandwidth utilization below which the MAX clears a single-channel MP+ call.
|
Integer between 0 and 99. The default value is 0 (zero).
|
|
Ascend-Preempt-Limit (245)
|
Specifies the number of idle seconds the MAX waits before using one of the channels of an idle link for a new call.
|
Integer between 0 and 65535. The default value is 60.
|
|
Ascend-Remove-Seconds (241)
|
Specifies the number of seconds that average line utilization (ALU) for transmitted data must fall below the threshold indicated by the Ascend-Target-Util attribute before the MAX begins removing bandwidth from a session.
|
Integer between 1 and 300. The default value is 10.
|
|
Ascend-Seconds-Of-History (238)
|
Specifies the number of seconds the MAX uses as a sample for calculating average line utilization (ALU) of transmitted data.
|
Integer between 1 and 300. The default value is 15.
|
|
Ascend-Target-Util (234)
|
Specifies the percent bandwidth utilization at which the MAX adds or subtracts bandwidth dynamically.
|
Integer between 0 and 100. The default value is 70.
|
Setting up Dynamic Bandwidth Allocation (DBA)
How DBA works
The MAX uses the historical time period specified by the Ascend-Seconds-Of-History attribute as the basis for calculating average line utilization (ALU), and uses the algorithm specified by the Ascend-History-Weigh-Type attribute for calculating ALU.
The MAX then compares ALU to the amount specified by the Ascend-Target-Util attribute. When ALU exceeds the threshold defined by Ascend-Target-Util for a period of time greater than the value of the Ascend-Add-Seconds attribute, the MAX attempts to add the number of channels specified by the Ascend-Inc-Channel-Count attribute. When ALU falls below the threshold defined by Ascend-Target-Util for a period of time greater than the value of the Ascend-Remove-Seconds attribute, the MAX attempts to remove the number of channels specified by the Ascend-Dec-Channel-Count attribute.
The MAX compares the calculated ALU to the percentage specified in the Ascend-Target-Util attribute. It uses this logic to decide when to add channels:
If ALU > Ascend-Target-Util for > Ascend-Add-Seconds seconds, add
Ascend-Inc-Channel-Count channels.
The MAX uses this logic to decide when to subtract channels:
If ALU < Ascend-Target-Util for > Ascend-Remove-Seconds seconds, subtract
Ascend-Dec-Channel-Count channels.
How RADIUS authenticates multiple channels
When the system adds additional channels, the MAX must authenticate each one. You can secure each circuit using one of methods described in the following sections.
Static passwords
Before the MAX dials a new circuit, it prompts the user to enter a static, reusable password as specified in the RADIUS user profile. To prevent intruders from capturing the password as it travels across the WAN, you can specify that the MAX use the Challenge Handshake Authentication Protocol (CHAP). This protocol uses encryption to protect the password and verify the identity of the caller.
For information on specifying a static password, see Setting the Password attribute. For information on requiring CHAP authentication, see Requiring PAP, CHAP, or MS-CHAP for PPP, MP, and MP+ calls.
Dynamic passwords
Using PAP-TOKEN authentication, RADIUS can require a user to specify a one-time-only password from a security-card server for each additional channel. For information, see Configuring PAP-TOKEN authentication.
Combination of static and dynamic passwords
In RADIUS, you can indicate that the user need only specify a dynamic password for the initial channel, and that CHAP will authenticate all additional channels. Whenever the MAX adds channels to a PPP or MP+ call using PAP-TOKEN-CHAP authentication, the calling unit sends the encrypted value of Aux Send PW (in the Connection profile at the remote end), and the answering unit checks this password against the value of Ascend-Receive-Secret in the RADIUS user profile. The answering unit receives Ascend-Receive-Secret from the RADIUS server when the first channel of the call connects.
For details, see Configuring PAP-TOKEN-CHAP authentication.
Cached passwords
You can configure RADIUS to reuse a password dynamically generated during session initiation. In this case, both the user and the MAX cache the password. Then, when the MAX needs to add bandwidth, the user provides the CHAP-encrypted password automatically and the MAX uses an internal key to authenticate the additional channels. You can specify a timeout value for the cached password, or configure RADIUS to maintain the password throughout the session.
For details on setting up RADIUS for cached passwords, see Configuring CACHE-TOKEN authentication.
Configuring DBA in RADIUS
To configure DBA for a RADIUS user profile, follow the steps described below. For guidelines on how to set up DBA for optimal performance, see Guidelines for optimal use of DBA.
- Configure an MP+ connection, as described in Configuring an MP or MP+ connection in
RADIUS.
- To specify the percentage of bandwidth use at which the MAX should add or subtract
bandwidth, set the Ascend-Target-Util attribute.
- To select the algorithm to use for calculating ALU, set the Ascend-History-Weigh-Type
attribute.
Figure 4-7 illustrates the differences among the algorithms you can choose.
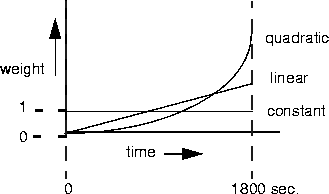
Figure 4-7. Bandwidth algorithms for MP+ calls
- History-Constant (0) gives equal weight to all samples taken during the historical time period specified by Ascend-Seconds-Of History. When you select this option, older historical samples have as much impact on the decision to change bandwidth allocation as do more recent samples.
- History-Linear (1) gives more weight to recent samples of bandwidth usage than to older samples taken during the historical period specified by Ascend-Seconds-Of-History. The weighting grows at a linear rate.
- History-Quadratic (2) gives more weight to recent samples of bandwidth usage than to older samples taken during the historical period specified by Ascend-Seconds-Of-History. The weighting grows at a quadratic rate. History-Quadratic is the default.
- To specify the number of seconds that the MAX uses as a sample for calculating ALU, set
the Ascend-Seconds-of-History attribute.
- To specify the number of seconds that ALU must exceed the threshold indicated by the
Ascend-Target-Util attribute before the MAX begins adding bandwidth to a session, set
the Ascend-Add-Seconds attribute. Once the MAX adds bandwidth, there is typically a
minimum usage charge. Thereafter, billing is time sensitive.
- To specify the number of seconds that ALU must fall below the threshold indicated by the
Ascend-Target-Util attribute before the MAX begins removing bandwidth from a session,
set the Ascend-Remote-Seconds attribute.
The Ascend-Remove-Seconds value should be at least equal to the minimum duration charge plus one or two billing time increments. Typically, billing is done to the next multiple of six seconds, with a minimum charge for the first thirty seconds. Your carrier representative can help you understand the billing structure of the switched tariffs.
- To specify the initial number of channels the MAX sets up when originating calls for the
link, specify the Ascend-Base-Channel-Count attribute.
- To specify the maximum number of channels the MAX allows on a call, set the Ascend-
Maximum-Channels attribute.
- To specify the minimum number of channels the call maintains, set the Ascend-Minimum-
Channels attribute.
- To specify the number of channels to add to a call when increasing bandwidth, set the
Ascend-Inc-Channel-Count attribute.
- To specify the number of channels to remove from a call when decreasing bandwidth, set
the Ascend-Dec-Channel-Count attribute.
- To specify how the MAX monitors traffic on an MP+ call, set the Ascend-DBA-Monitor
attribute.
You can specify one of these values:
- DBA-Transmit (0). This setting specifies that the MAX adds or subtracts bandwidth based on the amount of data it transmits. DBA-Transmit is the default.
- DBA-Transmit-Recv (1). This setting specifies that the MAX adds or subtracts bandwidth based on the amount of data it transmits and receives.
- DBA-None (2). This setting specifies that the MAX does not monitor traffic over the link, and disables DBA.
Guidelines for optimal use of DBA
For optimum MP+ performance, set these values to the same number on both sides of a connection:
- The base channel count, as specified by Base Ch Count (in the Connection profile) or Ascend-Base-Channel-Count (in RADIUS)
- The minimum channel count, as specified by Min Ch Count (in the Answer profile or Connection profile) or Ascend-Minimum-Channels (in RADIUS)
- The maximum channel count, as specified by Max Ch Count (in the Answer profile or Connection profile) or Ascend-Maximum-Channels (in RADIUS)
The values for the Ascend-Seconds-Of-History, Ascend-Add-Seconds, and Ascend-Remove-Seconds attributes should smooth out spikes in bandwidth utilization that last for a shorter time than it takes to add capacity. Over T1 lines, the MAX can add bandwidth in less than ten seconds. Over ISDN lines, the MAX can add bandwidth in less than five seconds.
If you specify a small value for the Ascend-Seconds-Of-History attribute, and increase the values of the Ascend-Add-Seconds attribute and the Ascend-Remove-Seconds attribute relative to the value of Ascend-Seconds-Of-History, the system becomes less responsive to quick spikes. The easiest way to determine the proper values for all these attributes is to observe usage patterns. If the system is not responsive enough, the value of Ascend-Seconds-Of-History is too high.
Avoid adding or subtracting channels too quickly (less than 10-20 seconds apart). This leads to many short duration calls, each of which incur the carrier's minimum charge. In addition, adding or subtracting channels too quickly can affect link efficiency, since the devices on either end have to retransmit data when the link speed changes.
When selecting a target utilization value, monitor how the application behaves when using different bandwidths and different loads. For example, an application might be able to use 88% of a 64-kbps link, but only 70% of a 256-kbps link.
DBA example
This RADIUS user profile contains all the RADIUS attributes necessary for configuring DBA.
John    Password="4yr66", User-Service=Framed-User

            Framed-Protocol=MPP,

            Framed-Address=200.0.5.1,

            Framed-Netmask=255.255.255.0,

            Ascend-Target-Util=80,

            Ascend-History-Weigh-Type=History-Constant,

            Ascend-Seconds-Of-History=90,

            Ascend-Add-Seconds=30,

            Ascend-Remove-Seconds=30,

            Ascend-Maximum-Channels=10,

            Ascend-Inc-Channel-Count=2,

            Ascend-Dec-Channel-Count=2,

            Ascend-DBA-Monitor=DBA-Transmit-Recv,

            ...
Specifying a time limit and idle connection attributes
To specify the time limit for a session and the action the MAX should take when a connection is idle, follow these steps:
- Configure an MP+ connection, as described in Setting up an MP or MP+ connection.
- To specify the maximum number of minutes an incoming call can remain connected, set
the Ascend-Maximum-Call-Duration attribute.
You can specify an integer between 0 and 1440. The MAX checks the connection once per minute, so the actual time the call remains connected is slightly longer than the actual time you set.
The default value is 0 (zero). If you accept the default, the MAX does not set a limit on the duration of an incoming call.
- To specify the maximum length of time in seconds that the MAX allows any session to
stay online, set the Ascend-Maximum-Time attribute.
Once a session reaches the time limit, the MAX takes its connection offline.
- To indicate the number of seconds the MAX waits before clearing a call when a session is
inactive, set the Ascend-Idle-Limit attribute.
Specify a number between 0 and 65535. If you specify 0 (zero), the MAX always clears a call when a session is inactive. The default value is 120 seconds.
The Ascend-Idle-Limit attribute does not apply to nailed-up links.
- To specify a percentage of bandwidth utilization below which the MAX clears a single-
channel MP+ call, set the Ascend-MPP-Idle-Percent attribute.
Specify an integer between 0 and 99. The default value is 0 (zero). This setting causes the MAX to ignore bandwidth utilization when determining whether to clear a call.Bandwidth utilization must fall below this percentage on both sides of the connection before the MAX clears the call.
If the device at the remote end of the link enters an Ascend-MPP-Idle-Percent value (in RADIUS) or an Idle Pct setting (on the MAX) lower than the value you specify, the MAX does not clear the call until bandwidth utilization falls below the lower percentage.
If the time set by the Ascend-Idle-Limit expires, the call disconnects whether or not bandwidth utilization falls below the Ascend-MPP-Idle-Percent setting. When bandwidth utilization falls below the Ascend-MPP-Idle-Percent setting, the call disconnects regardless of whether the time specified by the Ascend-Idle-Limit attribute has expired.
Because the Ascend-MPP-Idle-Percent attribute is dependent on traffic levels on both sides of the connection, we recommend that you use the Ascend-Idle-Limit attribute in preference to it.
- To indicate the number of idle seconds the MAX waits before using one of the channels of
an idle link for a new call, set the Ascend-Preempt-Limit attribute.
Specify a number between 0 and 65535. The MAX never preempts a call if you enter 0 (zero). The default value is 60.
The Ascend-Preempt-Limit attribute does not apply to nailed-up links.
Setting up outgoing calls
To configure outgoing calls in RADIUS, use the attributes listed in Table 4-17
.
Table 4-17. Outgoing call attributes
Attribute
|
Description
|
Possible values
|
|---|
|
Ascend-Billing-Number (249)
|
Specifies a billing number for charges incurred on the line. If you do not enter a billing number, the telephone company assigns charges to the telephone number associated with the line.
|
Up to ten characters, and limited to the following:
1234567890()[]!z-*# |
The default value is null.
|
|
Ascend-Call-By-Call (250)
|
Specifies the T1 PRI service that the MAX uses when placing a PPP call.
|
Integer corresponding to services provided by AT&T, MCI, and Sprint. By default, the MAX uses ACCUNET Switched Digital Services from AT&T (6).
|
|
Ascend-Data-Svc (247)
|
Specifies the type of data service the link uses for outgoing calls.
|
For a full list of possible values, see Ascend-Data-Svc (247).
The default value is Switched-56K.
|
|
Ascend-Dial-Number (227)
|
Specifies the phone number the MAX dials to reach the bridge, router, or node at the remote end of the link.
|
Up to 21 characters, limited to the following:
1234567890()[]!z-*#|
The default value is null.
|
|
Ascend-Expect-Callback (149)
|
Specifies whether the outgoing caller should expect the remote end to call back.
|
Expect-Callback-No (0)
Expect-Callback-Yes (1)
The default value is Expect-
Callback-No.
|
|
Ascend-PRI-Number-Type (226)
|
Specifies the type of phone number the MAX dials.
|
Unknown-Number (0)
Intl-Number (1)
National-Number (2)
Local-Number (4)
Abbrev-Number (5)
The default value is National-
Number.
|
|
Ascend-Transit-Number (251)
|
Specifies the U.S Interexchange Carrier (IEC) you use for long distance calls over a T1 PRI line.
|
Integer corresponding to an IEC. The default value is null.
|
|
Framed-Address (8)
|
Specifies the IP address of the caller.
|
IP address in dotted decimal notation n.n.n.n, where n is an integer between 0 and 255. The default value is 0.0.0.0. An answering user profile with this setting matches all IP addresses.
|
|
Framed-Netmask (9)
|
Specifies the subnet mask in use for a caller.
|
IP address in dotted decimal notation n.n.n.n, where n is an integer between 0 and 255. The default value is 0.0.0.0.
|
|
Password (2)
|
Specifies the user's password.
|
Alphanumeric string containing up to 252 characters. The default value is null.
|
|
User-Name (1)
|
Specifies the user's name.
|
Alphanumeric string containing up to 252 characters. The default value is null.
|
|
User-Service (6)
|
Indicates whether the link can use framed or unframed services.
|
Login-User (1)
Framed-User (2)
Dialout-Framed-User (5)
By default, the MAX does not restrict the services that a link can use.
|
To configure outgoing calls in a RADIUS user profile, follow these steps:
- On the first line of the user profile, specify the User-Name, Password, and User-Service
attributes.
- For the User-Name attribute, specify the name of the user, appending -Out
to the user name.
- Set Password = "Ascend".
- Set User-Service=Dialout-Framed-User. This setting ensures that the MAX cannot use the profile for authentication of an incoming call.
For example, you might enter this first line in the profile for the user Homer:
Homer-Out Password="Ascend", User-Service=Dialout-Framed-User
- On the second line of the user profile, specify the name of the user that can make outgoing
calls by indicating a value for the User-Name attribute.
- If the receiving end requires an IP address, and does not assign one dynamically, specify
the caller's IP address using the Framed-Address attribute (and, optionally, the Framed-
Netmask attribute).
The values of the Framed-Address and Framed-Netmask attributes for the local MAX must match the NAS-Identifier attribute (in RADIUS) or the IP Adrs parameter (in a Connection profile) on the Ascend unit at the remote end of the link. If there is no match, the remote end clears the call.
If you specify an IP address, you must also enable IP routing for the profile by setting Ascend-Route-IP=Route-IP-Yes. For more information, see Setting up a system-based IP routing connection.
- To indicate the phone number the MAX dials to reach the bridge, router, or node at the
remote end of the link, set the Ascend-Dial-Number attribute.
Specify a telephone number. You can enter up to 21 characters, and you must limit those characters to the following:
1234567890()[]!z-*#|
The MAX sends only the numeric characters to place a call. The default value is null.
If Use Trunk Grps=Yes in the System profile, the first digits in the Ascend-Dial-Number attribute have the meanings listed in Table 4-18.
Table 4-18. Ascend-Dial-Number digits
Digit
|
Explanation
|
|---|
|
First digit is between 4 and 9.
|
The MAX places the call over the corresponding trunk group listed in the Ch n Trnk Grp, B1 Trnk Grp, or B2 Trnk Grp parameters in the Line profile.
If Dial Plan=Trunk Grp, the digits following the first digit constitute an ordinary phone number.
If Dial Plan=Extended, the next two digits specify the Dial Plan profile containing the parameters the MAX uses when making the call. These parameters constitute the extended dial plan. An ordinary phone number follows these two digits.
|
|
First digit is 3.
|
The MAX places the call to a destination listed in a Destination profile. In this case, the second and third digits indicate the number of the Destination profile.
|
|
First digit is 2.
|
The MAX places the call between host ports on the same MAX, or between Terminal Equipment (TEs) on a local ISDN BRI line on the same MAX. The first type of call is a port-to-port call. The latter type of call is a TE-to-TE call. In a port-to-port call, the second digit indicates the slot of an AIM/6 card. In a TE-to-TE call, the second digit indicates the slot of a Host/BRI module.
If you enter 0 (zero) for the second digit, the call connects to any available AIM port and ignores the third digit. If you enter a nonzero value for the second digit, the third digit selects the AIM port (for a port-to-port call) or a local ISDN BRI port (for a TE-to-TE call).
If you enter 0 (zero) for the third digit, the call connects to any available AIM port or local ISDN BRI line in the module selected by the second digit.
|
- To specify the data service the link uses for outgoing calls, set the Ascend-Data-Svc
attribute.
- To indicate a billing number for charges incurred on the line, set Ascend-Billing-Number.
Specify a telephone number. You can specify up to ten characters, and you must limit those characters to the following:
1234567890()[]!z-*# |
If you do not enter a billing number, the telephone company assigns charges to the telephone number associated with the line. Your carrier determines the billing number, and uses it to sort your bill. If you have several departments, and each department has its own billing number, your carrier can separate and tally each department's usage.
The MAX uses the Ascend-Billing-Number differently depending on the type of line you use:
- For a T1 line, the MAX appends the value specified in the Ascend-Billing-Number attribute to the end of each phone number it dials for the call.
- Ascend-Billing-Number for outgoing calls on an ISDN BRI line applies only to installations in Australia.
- For a T1 PRI line, the MAX uses the Ascend-Billing-Number attribute, rather than the phone number ID to identify itself to the answering party.
- To specify the T1 PRI service that the MAX uses when placing a PPP call, specify the
Ascend-Call-By-Call attribute.
Specify a number corresponding to the type of service the MAX uses. The default value is 6. Table 4-19 lists the services available for each service provider.
- To specify the type of phone number the MAX dials, set the Ascend-PRI-Number-Type
attribute.
You can specify one of these settings:
- Unknown-Number (0). This setting indicates that the MAX can dial any type of number.
- Intl-Number (1). This setting indicates that the MAX dials a number outside the U.S.
- National-Number (2). This setting indicates that the MAX dials a number inside the U.S. The National-Number value is the default.
- Local-Number (4). This setting indicates that the MAX dials a number within your Centrex group.
- Abbrev-Number (5). This setting indicates that the MAX dials an abbreviated phone number.
- To specify the U.S Interexchange Carrier (IEC) you use for long distance calls over a T1
PRI line, set the Ascend-Transit-Number attribute.
Specify the same digits you use to prefix a phone number you dial over an ISDN BRI line, T1 access line, or voice interface:
- 288 selects AT&T.
- 222 selects MCI.
- 333 selects Sprint.
The default value is null. If you accept the default, the MAX uses any available IEC for long-distance calls.
- To specify whether the caller expects the remote device to call back, set the Ascend-
Expect-Callback attribute.
When the remote device is set to call back (Ascend-Callback=Callback-Yes in RADIUS or Callback=Yes on the MAX) and CLID authentication is not required, the remote device answers the call, verifies a name and password against a user profile, hangs up, and dials back to the caller.
If the remote end is set up for callback and requires CLID-only authentication (Id Auth=Require), the remote device never answers the call. The caller can therefore avoid billing charges. However, a problem can also occur. To the caller, it appears as though the call never got through at all. This is a special problem for Ping and Telnet, because these processes continuously try to open a connection and reject any callback.
When you set Ascend-Expect-Callback=Expect-Callback-Yes, calls that dial out and do not connect (for any reason) appear on a list that disallows any further calls to that destination for 90 seconds. This delay gives the remote device an opportunity to complete the callback.
You can specify one of these values:
- Expect-Callback-No (0) indicates that the caller does not wait for a callback after placing a call that does not connect.
- Expect-Callback-Yes (1) indicates that the caller waits 90 seconds after placing a call that does not connect before attempting to place another call to the same number.
Outgoing call example
This example shows a user profile for dialing calls from the MAX. This profile uses Destination Profile 1 to dial a number in the United States:
Homer-Out Password="Ascend", User-Service=Dialout-Framed-User
User-Name="Homer",
Ascend-Dial-Number=31,
Framed-Protocol=PPP,
Framed-Address=10.0.100.1,
Framed-Netmask=255.255.255.0,
Ascend-Metric=2,
Framed-Routing=None,
Ascend-Idle-Limit=30,
Ascend-PRI-Number-Type=National-Number,
Ascend-Send-Auth=Send-Auth-PAP,
Ascend-Send-Secret="password1"
Setting up packet filters
You can set up two types of filters on a per-user basis:
How packet filters work
You can specify several filters in a RADIUS user profile. Filter entries apply on a first-match basis. Therefore, the order in which you specify filter entries is significant. When you define a filter in a RADIUS user profile, it applies to data the user sends or receives. If you make changes to a filter, the changes do not take affect until a call uses that profile.
A match occurs at the first successful comparison between a filter and the packet being examined. When a comparison succeeds, the filtering process stops and the MAX TNT applies the forward or drop action to the packet.
If no comparisons succeed, the packet does not match the filter. However, the MAX TNT does not forward the packet. When no filter is in use, the MAX TNT forwards all packets. However, once you apply a filter to a connection, this default is reversed. For security purposes, the MAX TNT does not automatically forward non-matching packets. It requires a rule that explicitly allows those packets to pass.
In a generic filter, all settings work together to specify a location in a packet and a number that the MAX TNT compares to the value in that location. In an IP filter, the MAX TNT makes a set of distinct comparisons in order. When a comparison fails, the packet goes on to the next comparison. When a comparison succeeds, the filtering process stops and the MAX TNT applies the forward or drop action to the packet. The IP filter tests proceed in the following order:
- Compare the source address specified by the filter to the source address of the packet. If
they are not equal, the comparison fails.
- Compare the destination address specified by the filter to the destination address in the
packet. If they are not equal, the comparison fails.
- If the protocol specified by the filter is zero (which matches any protocol), the comparison
succeeds. If it is non-zero and not equal to the protocol field in the packet, the comparison
fails.
- If the source port specified by the filter does not compare to the source port of the packet
as the filter indicates, the comparison fails.
- If the destination port specified by the filter does not compare to the destination port of the
packet as the filter indicates, the comparison fails.
- If the filter specifies a match only if a TCP session is already established, and a TCP session
is up, the comparison succeeds.
Filter entries apply on a first-match basis. Therefore, the order in which you specify filter entries is significant. When a comparison succeeds, the filtering process stops and the MAX applies the forward or drop action to the packet.
If no comparisons succeed, the packet does not match the filter and the MAX does not forward the packet. When no filter is in use the MAX forwards all packets. Once you apply a filter to a connection, this default is reversed. For security purposes, the MAX does not automatically forward non-matching packets. It requires a rule that explicitly allows these packets to pass.
When you define a filter in a user profile, it applies to data the user sends or receives. If you make changes to a filter in a RADIUS user profile, the changes do not take effect until a call uses that profile. For complete information about how filters work, see the MAX Security Supplement, and the chapter on using filters in the MAX ISP and Telecommuting Configuration Guide.
For more information on filtering, refer to the Telecommuting and ISP Guide that came with your MAX unit.
An Ascend unit can also accept RADIUS requests from clients to change filters for a particular session, for a particular user, or for a particular IP address. For details, seeConfiguring filter changes.
Ways to apply packet filters
You can apply a generic or IP filter as either a data filter of a call filter. The sections that follow describe each method.
Data filters for dropping or forwarding certain packets
A data filter defines which packets the MAX TNT can transmit on a connection. Many sites use data filters for security purposes, but you can apply data filters to any purpose that requires the MAX TNT to drop or forward only specific packets. For example, you can use data filters to drop packets addressed to particular hosts or to prevent broadcasts from going across the WAN. You can also use data filters to allow users to access only specific devices across the WAN.
When you apply a data filter, its forward or drop action affects the actual data stream by preventing certain packets from reaching the Ethernet from the WAN, or vice versa (Figure 4-8).
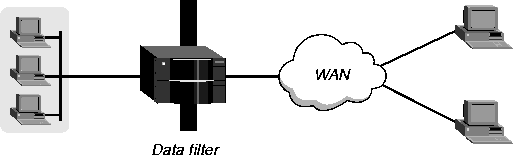
Figure 4-8. Data filters can drop or forward certain packets
Data filters do not affect the idle timer, and a data filter applied to a RADIUS user profile does not affect the answering process.
Call filters for managing connections
A call filter defines which packets can or cannot bring up a connection or reset the idle timer for an established link (Figure 4-9).

Figure 4-9. Call filters can prevent certain packets from resetting the timer
A call filter prevents unnecessary connections and helps the MAX TNT distinguish active traffic from "noise." By default, any traffic to a remote site triggers a call, and any traffic across an active connection resets the connection's idle timer.
When you apply a call filter, its forwarding action does not affect which packets are sent across an active connection. The forwarding action of a call filter determines which packets can initiate a connection or reset a session's timer. When a session's idle timer expires, the MAX TNT terminates the session. The idle timer is set to 120 seconds by default, so if a connection is inactive for two minutes, the MAX TNT terminates the connection.
Overview of filter configuration tasks
When you set up filters, you can:
Configuring IP filters
Use the following format for an IP data filter entry:
Ascend-Data-Filter="ip dir action

[dstip dest_ipaddr\subnet_mask][srcip src_ipaddr\subnet_mask]

[proto [dstport cmp value] [srcport cmp value] [est]]"
Use this format for an IP call filter entry:
Ascend-Call-Filter="ip dir action

[dstip dest_ipaddr\subnet_mask][srcip src_ipaddr\subnet_mask]

[proto [dstport cmp value] [srcport cmp value] [est]]"
A filter definition cannot contain newlines. The syntax is shown on multiple lines for printing purposes only.
Table 4-20 describes each element of the syntax. None of the keywords are case sensitive.
Table 4-20. IP filter syntax elements
Keyword or argument
|
Description
|
|---|
|
ip
|
Indicates an IP filter.
|
|
dir
|
Indicates filter direction. You can specify in (to filter packets coming into the MAX) or out (to filter packets going out of the MAX).
|
|
action
|
Indicates what action the MAX should take with a packet that matches the filter. You can specify either forward or drop.
|
|
dstip dest_ipaddr
|
dstip is a keyword indicating destination IP address.
The filter applies to packets whose destination address matches the value of dest_ipaddr. If a subnet mask portion of the address is present, the MAX compares only the masked bits. If you set dest_ipaddr to 0.0.0.0, or if this keyword and its IP address specification are not present, the filter matches all IP packets.
|
|
srcip src_ipaddr
|
srcip is a keyword indicating source IP address.
The filter applies to packets whose source address matches the value of src_ipaddr. If a subnet mask portion of the address is present, the MAX compares only the masked bits. If you set src_ipaddr to 0.0.0.0, or if this keyword and its IP address specification are not present, the filter matches all IP packets.
|
|
proto
|
Indicates a protocol that you can specify as a name or a number.
The filter applies to packets whose protocol field matches this value.The supported names and numbers are icmp (1), tcp (6), udp (17), and ospf (89). If you set proto to 0 (zero), the filter matches any protocol.
|
|
dstport cmp value
|
dstport is a keyword indicating destination port. This argument is valid only when the protocol is tcp (6) or udp (17). If you do not specify a destination port, the filter matches any port.
cmp is an argument indicating how to compare the specified value to the actual destination port. It can have the value <, =, >, or !=.
value can be a number or a name. Supported names and numbers are ftp-data (20), ftp (21), telnet (23), smtp (25), nameserver (42), domain (53), tftp (69), gopher (70), finger (79), www (80), kerberos (88), hostname (101), nntp (119), ntp (123), exec (512), login (513), cmd (514), and talk (517).
|
|
srcport cmp value
|
srcport is a keyword indicating source port. It is valid only when the protocol is tcp (6) or udp (17). If you do not specify a source port, the filter matches any port.
cmp is an argument indicating how to compare the specified value to the actual source port. It can have the value <, =, >, or !=.
value can be a number or a name. Supported names and numbers are ftp-data (20), ftp (21), telnet (23), smtp (25), nameserver (42), domain (53), tftp (69), gopher (70), finger (79), www (80), kerberos (88), hostname (101), nntp (119), ntp (123), exec (512), login (513), cmd (514), and talk (517).
|
|
est
|
If you set this argument to 1, the filter matches a packet only if a TCP session is already established. It is valid only when the proto specification is tcp (6).
|
IP filter example
The following profile shows one IP data filter and two generic data filters. Together, these filters specify that the MAX sends out IP and ARP packets, but drops all other packets.
Ascend1 Password="Ascend", User-Service=Dialout-Framed-User
User-Name="Greg",
Ascend-Dial-Number=555-1234,
Framed-Address=10.0.200.1,
Framed-Netmask=255.255.255.0,
Ascend-Metric=1,
Framed-Routing=None,
Ascend-Idle-Limit=20,
Ascend-Send-Auth=Send-Auth-CHAP,
Ascend-Send-Secret="kuro",
Ascend-Data-Filter="ip out forward",
Ascend-Data-Filter="generic out forward 12 ffff 0806",
Ascend-Data-Filter="generic out drop 0 0 0"
Configuring IPX filters
Use the following format for an IPX data filter entry:
Ascend-Data-Filter="ipx <dir> <action>
[srcipxnet <srcipxnet> srcipxnode <srcipxnode>
[srcipxsoc <cmp> <value> ]]
[dstipxnet <dstipxnet> dstipxnode <dstipxnode>
[dstipxsoc <cmp> <value> ]]
Use the following format for an IPX call filter entry:
Ascend-Call-Filter="ipx <dir> <action>
[srcipxnet <srcipxnet> srcipxnode <srcipxnode>
[srcipxsoc <cmp> <value> ]]
[dstipxnet <dstipxnet> dstipxnode <dstipxnode>
[dstipxsoc <cmp> <value> ]]
Note: A filter definition cannot contain newlines. The syntax is shown on multiple lines for
documentation purposes only.
Table 4-21 lists each keyword and argument.
Two IPX filter examples
Dropping outbound IPX packets with specific destination network
The IPX filter specified in the following RADIUS user profile drops all outbound IPX packets with a destination IPX network number of 0x00003823, regardless of the node or socket number. The generic filter that appears after the IPX filter forwards all other packets.
st1 Password="st1"
Ascend-Idle-Limit=300,
Ascend-Route-IPX=Route-IPX-Yes,
Ascend-Route-IP =Route-IP-Yes,
Ascend-IPX-Peer-Mode=IPX-Peer-Router,
    Ascend-Data-Filter="ipx out drop dstipxnet 0x00003823
dstipxnode 0xffffffffffff",
Ascend-Data-Filter="generic out forward 0 0 0"
You should specify a default filter for packets that do not match the filter criteria. In this example, if the specification Ascend-Data-Filter ="generic out forward 0 0 0" did not appear in the profile, the MAX would drop all other IPX, IP, and generic packets.
Dropping outbound IPX packets with specific source network
The IPX filter specified in the following RADIUS user profile drops all outbound IPX packets with a source network number of 0x00000005, a source node number of 00abcde12345, and a source socket number of 0x4002. The generic filter that appears after the IPX filter forwards all other packets.
st1 Password = "st1"
Ascend-Idle-Limit=300,
Ascend-Route-IPX=Route-IPX-Yes,
Ascend-Route-IP =Route-IP-Yes,
Ascend-IPX-Peer-Mode=IPX-Peer-Router,
    Ascend-Data-Filter="ipx in drop srcipxnet 0x00000005
srcipxnode 0x00abcde12345
00a024cd5807 srcipxsock=0x4002",
Ascend-Data-Filter="generic out forward 0 0 0"
Note: A filter definition cannot contain newlines. The syntax is shown on multiple lines for
documentation only.
Configuring a generic filter
Use the following format for a generic data filter entry:
Ascend-Data-Filter="generic dir action offset mask value
compare [more]"
Use this format for a generic call filter entry:
Ascend-Call-Filter="generic dir action offset mask value
compare [more]"
A filter definition cannot contain newlines. The syntax is shown on multiple lines for printing purposes only.
Table 4-22 describes each element of the syntax. None of the keywords are case sensitive.
Generic filter example
In this example, several Macintosh workstations are running Open Transport on the local LAN, and you want only IP traffic destined for the WAN to bring up a connection. To ensure that AppleTalk packets with destinations on the local LAN do not bring up a connection, you must specify several generic call filters.
You must configure a filter to carry out each of the following tasks. Create the filters in the order specified.
- Drop AppleTalk Address Resolution Protocol (AARP) packets.
This filter specification keeps AARP packets (protocol ID 80f3) from bringing up a connection:
Ascend-Call-Filter="generic out drop 14 ffffffffffffffff aaaa0300000080f3"
- Forward non-AppleTalk traffic.
AppleTalk has the protocol 809b. This filter specification forwards all non-AppleTalk packets:
Ascend-Call-Filter="generic out forward 14 ffffffffffffffff aaaa03080007809b !="
From this point on, any additional filters deal only with AppleTalk traffic.
- Drop AppleTalk Echo Protocol (AEP) packets.
This filter specification keeps AEP packets from bringing up a connection.
Ascend-Call-Filter="generic out drop 32 ffffff0000000000 0404040000000000 !="
- Forward all traffic not destined for an AppleTalk multicast address.
AppleTalk uses a multicast address, rather than a broadcast address. This filter specification forwards all packets not destined for that multicast address:
Ascend-Call-Filter="generic out forward 32 ffffffffffff0000 090007ffffff0000 !="
- Forward Name Binding Protocol (NBP) lookup packets, but only those that the Chooser
makes use of-that is, only those with a wildcard entity name.
This filter specification indicates that the filter forwards NBP packets:
Ascend-Call-Filter="generic out forward 32 ff00fff000000000 0200022000000000 more"
The more value in the specification indicates that the MAX must examine the next specification before making the decision to forward a packet. The next specification indicates that the MAX should forward only those packets with a wildcard entity name:
Ascend-Call-Filter="generic out forward 42 ffff000000000000 013d000000000000"
Configuring a RADIUS user profile to use a filter defined on the MAX
If you use Ascend-Data-Filter to define the complete filter policy in a user profile, you must change the filter definition when the filter policy changes. This process can be time-consuming if you must redefine the filters in a number of user profiles. To avoid having to redefine filters, you can set up a filter on the MAX itself, and then refer to that filter in the RADIUS user profile.
The RADIUS attribute Filter-Id (11) in the RADIUS user profile specifies the locally defined data filter or data firewall applied for a user. To assign the same filter or firewall policy to a number of users, you only need to assign the same values to Filter-Id in their RADIUS profiles. If the filter policy changes, you only need to change the reference in the user profile, instead of the entire filter definition.
You can specify several filters in a RADIUS user profile, using the Filter-Id attribute in addition to Ascend-Data-Filter and Ascend-Call-Filter. The way in which filtering works is the same as described in Setting up packet filters.
Note: The usage and syntax for Ascend-Data-Filter (and Ascend-Call-Filter) are not
modified by Filter-Id.
How firewalls work with the Filter-Id RADIUS attribute
If you specify more than one firewall definition using Filter-Id, only the first firewall definition is applied. If the RADIUS user profile contains a mixture of firewall and filter definitions for Filter-Id, the firewall is applied before any of the filters. The filters are applied after the firewall is applied in the sequence described in "Local filter use example."
If you specify a firewall ID for an undefined firewall, a default firewall definition is loaded that allows Telnet packets but not pings.
Ascend-Data-Filter (and Ascend-Call-Filter) do not provide a way to describe a firewall policy. Their usage and syntax are not modified by Filter-Id.
Filter ID numbering
When you create a data filter, you assign it a number between 0 and 199. The number you enter depends on the whether you are applying a filter you created using the VT100 interface, or a firewall you created using Secure Access Manager (SAM).
If you are applying a filter created using the VT100 interface, enter the filter number as it appears in the Filters menu.
If you are applying a firewall created with SAM, add 100 to the last 2 digits of the firewall number as it appears in the Firewalls menu. For example, if the number of your firewall is 90-601, enter 101. Refer to your SAM documentation for information on creating firewalls and downloading them to the MAX. The numbering scheme for filters and firewalls is:
- 0 indicates that no filtering is being used (this is the default)
- 1-99 indicates that a filter created using the vt100 interface is being used
- 100-199 indicates that a filter created using SAM is being used.
Local filter use example
After you have created a filter on the MAX, you can refer to it in a RADIUS user profile. The following is an example of two data filter profiles and a RADIUS-defined filter applied to a RADIUS user profile
Assume the following two filter profiles are already set up on the MAX are:
Filter-id=6

Name=DisAllowPing

Out filter 01...Valid=Yes

Out filter 01...Type=IP

Out filter 01...Ip...Forward=No

Out filter 01...Ip...Protoco1=6
Filter-id=9

Name=DisAllowTelnet

Out filter 01...Valid=Yes

Out filter 01...Type=IP

Out filter 01...Ip...Forward=No

Out filter 01...Ip...Protocol=6

Out filter 01...Ip...Src Port Cmp-Eql

Out filter 01...Ip...Src Port #=23
The RADIUS user profile is:
someuser      Password="ascend"

                      User-Service=Framed-User,

                      Filter-Id="6",

                      Filter-Id="9",

                      Ascend-Data-Filter="ip out forward",

                      Framed-Protocol=PPP,

                      Framed-Address=10.11.1.1,

                      Framed-Netmask=255.255.255.0,

                      State="p"
The first filter is applied, disallowing pings. The second filter disallows Telnet packets. The Ascend-Data-Filter entry allows all IP packets to be forwarded. All pings and Telnet packets will be blocked, but other IP data packets are allowed.
Note: A Telnet directed to another port should be allowed with this configuration.
Firewall example
The following is an example of how Filter-Id can be used to specify a firewall defined in SAM:
- Create a firewall in the SAM program.
The firewall must block all traffic (including Telnets) except ping traffic.
- Download the firewall to the MAX and assign a number, for example,
menu-item 90-101.
- Add the following line to the RADIUS profile in the first example:
Filter-Id="101"
so that the entry reads:
someuser      Password="ascend"
                      User-Service=Framed-User,
                      Filter-Id="101",
                      Framed-Protocol=PPP,
                      Framed-Address=10.11.1.1,
                      Framed-Netmask=255.255.255.0,
                    State="p"
The user should be able to ping into the MAX, but other packets are dropped, since the firewall is applied before the filters are applied.
Configuring filter changes
An Ascend unit can accept RADIUS requests from clients to change filters for a particular session, for a particular user, or for a particular IP address.
Before you begin
Before you set up RADIUS to accept filter change requests, you must carry out these tasks in the MAX configuration interface:
- Open the Ethernet menu.
- Open the Mod Config menu.
- Open the RADIUS Server menu.
- Set Server=Yes.
- To specify the IP address or range of addresses corresponding to devices the MAX permits
to make RADIUS requests, set the Client #n parameters.
Specify each IP address or range in dotted decimal notation. You designate a range of addresses by entering a subnet specification. The default value is 0.0.0.0. A value of 0.0.0.0 disables the associated client field. At least one of the fields must contain an IP address other than 0.0.0.0 for client support to be active.
For example, can specify values like these:
- Client #1= 125.65.5.0/24. This setting specifies any addresses from the 125.65.5 subnet.
- Client #2= 125.5.0.0/16. This setting specifies any addresses from the 125.5 subnet.
- Client #3= 135.50.248.76/32. This setting specifies the single address of 138.50.248.76.
- Client #4= 198.5.248.76/29. This setting specifies a single address from 198.5.248.72 subnet.
- Client #5= 255.255.255.255. This setting specifies that the RADIUS server can accept requests from any client.
Note: Past releases of the MAX allowed up to three specified clients, with a single server
key for all three clients. When you restore configurations with the previous client list, the
MAX will assign the default subnet mask of the specified address type to each client, and
not the previous 32-bit (single host) address. For example, the MAX will assign the
address 128.50.1.1 a subnet mask of 16. In addition, the MAX will not automatically set
the Server Key. You must manually set the Server Key for each client.
- To specify the shared secret between clients and RADIUS, set the Server Key #n
parameter.
RADIUS uses this key to validate the authenticator on requests and to generate the authenticator on responses. You can enter up to 20 characters. Client #1 and Client #2 share the same key. You can specify a different key for each additional Client #n specification.
- To indicate the UDP port number on which the RADIUS server receives client requests,
set the Server Port parameter.
You can enter a number between 1 and 65535. The default value is 1700. Although the value can match the port setting for RADIUS authentication or accounting, we recommend that you specify a different port.
- To specify whether the client sends a session key to the RADIUS server, set the Session
Key parameter.
The session key associates the client request with the user session. You can specify one of these values:
- Yes indicates that the client sends a session key using the Ascend-Session-Svr-Key attribute.
- No indicates that the client does not send a session key. The default value is No.
- To specify the attributes required to identify a user session when Session Key=Yes, set the
Attributes parameter.
You can specify one of these settings:
- Any indicates that the RADIUS server can use any attribute to identify the user session. If the user sends multiple attributes, the RADIUS checks them in this order: Ascend-Session-Svr-Key (session key), Acct-Session-Id (session ID), User-Name (user name), and Framed-IP-Address (IP address).
- Session indicates that the RADIUS server uses only the server key (the value of Ascend-Session-Svr-Key) to identify the session.
- All indicates that all applicable attributes must be sent and pass validation before the client can perform any operation on the connection. For example, if a session has a user name, IP address, session ID, and session key specified, all four attributes must be sent to the RADIUS server and pass validation. However, if a session has a user name, session ID and session key, only these attributes must be sent. The MAX does not require the IP address.
- Save your changes.
Specifying filter changes in RADIUS
In the RADIUS user profile for the client at the IP address specified by a Client #n parameter on the MAX, specify the attributes that the MAX uses to control filter changes. In a RADIUS Change-Filter-Request packet (code 43), the attributes listed in Table 4-23 control filter changes.
How RADIUS uses Change-Filter-Request packet attributes
The client must supply a session specifier when making a filter change request. This specifier can be the session key specified by Ascend-Session-Svr-Key, the session reference number found in Acct-Session-Id, a user name, or an IP address.
The MAX sends the session key and session reference number on all RADIUS authentication requests. You can also obtain the session key, session reference number, and user name through RADIUS accounting, or from the accounting MIB (for systems that support SNMP accounting). If the MAX assigns the IP address from a pool, you can obtain the address through RADIUS accounting or the accounting MIB as well.
Only Ascend-Data-Filter and Ascend-Call-Filter can appear multiple times.
The MAX silently discards a Change-Filter-Request packet if one of these conditions is true:
- The packet is badly formatted.
- The client is not on the list of clients allowed to send RADIUS requests to the server.
- The authenticator field is incorrect.
- The packet contains invalid attribute values.
If RADIUS found at least one routing/bridging session whose filters it could change, the response code is 44 (Change-Filter-Request-ACK). Otherwise, the code is 45 (Change-Filter-Request-NAK). RADIUS does not return any attributes in the response.
Setting up disconnects
An Ascend unit can accept RADIUS requests from clients to disconnect for a particular session, for a particular user, or for a particular IP address.
Before you begin
Before you set up RADIUS to accept disconnect requests, you must specify settings using the MAX configuration interface. You specify the same basic settings for both filter change requests and disconnect requests. For information on how to carry out this task, see Before you begin.
Configuring disconnects in RADIUS
In the RADIUS user profile for the client at the IP address specified by a Client #n parameter on the MAX, specify the attributes that the MAX uses for disconnect requests.
When the MAX receives a Disconnect-Request packet (code 40), it disconnects the associated user. The attributes User-Name, Framed-Address, Acct-Session-Id, or Ascend-Session-Svr-Key can identify the user. (For details on these attributes, see Table 4-23 on page 79.) RADIUS ignores all other attributes. In addition, none of the attributes may appear more than once. That is, the client should not specify two different user names with a single request.
How RADIUS uses Disconnect-Request packet attributes
The MAX sends the session key and session reference number on all RADIUS authentication requests. You can also obtain the session key, session reference number, and user name through RADIUS accounting or from the accounting MIB (for systems that support SNMP accounting). If the MAX assigns the IP address from a pool, you can obtain the address through RADIUS accounting or the accounting MIB as well.
The MAX silently discards a Disconnect-Request packet if one of these conditions is true:
- The packet is badly formatted.
- The client is not on the list of clients allowed to send RADIUS requests to the server.
- The authenticator field is incorrect.
- The packet contains invalid attribute values.
If RADIUS found at least one session it could disconnect, the response code is 41 (Disconnect-Request-ACK). Otherwise, the code is 42 (Disconnect-Request-NAK). RADIUS does not return any attributes in the response.
Disconnect example
If two users with the name Steve are logged into the terminal server, a request specifying the name Steve disconnects both. A request specifying the session reference number of the first user disconnects only that user.
If there is a four-channel MP session for user Steve at IP address 11.0.0.1, a request specifying IP address 11.0.0.1 and/or the name Steve disconnects all four channels. A request specifying the session reference number associated with one of the four channels disconnects all channels in the MP session. If the request specifies Steve and an address of 11.0.0.2, the MAX returns a NAK because there is no session Steve with that address.
If there is also a terminal server session for Steve in addition to the four-channel MP session, a request specifying Steve disconnects both. A request specifying Steve and 11.0.0.1 disconnects only the MP session. Likewise, a request specifying 11.0.0.1 disconnects only the MP session.
Setting up multicast forwarding
The MAX implements Internet Group Membership Protocol (IGMP) version-1 and version-2, along with configuration options that enable the MAX to communicate with multicast backbone (MBONE) routers and forward multicast traffic.
The MBONE is a multicast network that provides real-time, two-way audio and video functionality to the Internet. A multicast network is a network in which a router sends packets to all addresses on a subscriber list. This type of network is different from both a unicast network (in which the router sends packets to one user at a time) and a broadcast network (in which the router sends packets to all users, whether they appear on subscription lists or not). The MBONE is a virtual network that actually consists of groups of networks called islands. These islands are connected by tunnels and support IP.
Figure 4-10 shows a MAX acting as an MBONE client. The MAX accesses an MBONE network and starts receiving the MBONE multicasts. It resends these multicast packets to all of the clients connected to the MAX for MBONE service. The clients wishing MBONE service must implement IGMP.
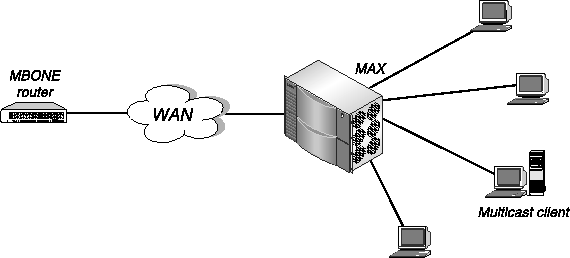
Figure 4-10. The MAX interacting with an MBONE router and multicast clients
To the MBONE network, the MAX appears to be a client, implementing IGMP. To its own clients, the MAX looks like a multicast router, although in fact the MAX simply forwards multicast packets based on group memberships. Each client tells the MAX the multicast address it wants to listen to. To communicate with multicast clients, the MAX sends the clients IGMP queries every 60 seconds, receives responses, and forwards multicast traffic.
The MBONE router can reside on the MAX unit's Ethernet interface or across a WAN link. If the router resides across a WAN link, the MAX can respond to multicast clients on its Ethernet interface as well as across the WAN.
For complete information on multicast forwarding, see the MAX ISP and Telecommuting Configuration Guide.
Before you begin
Before configuring the RADIUS user profile for multicast forwarding, you must set multicast parameters in the Ethernet profile of the MAX configuration interface. For details, see the MAX ISP and Telecommuting Configuration Guide.
Configuring multicast forwarding in RADIUS
To configure multicast forwarding in RADIUS, use the attributes listed in Table 4-24.
To configure a multicast forwarding in a RADIUS user profile, follow these steps:
- To specify that the user is a multicast client of the MAX, set Ascend-Multicast-
Client=Multicast-Yes.
- To specify how many seconds the MAX waits before accepting another packet from the
multicast client, specify a value for Ascend-Multicast-Rate-Limit.
To prevent multicast clients from creating response storms to multicast transmissions, you configure the user profile to limit the rate at which the MAX accepts packets from clients. Specify an integer. If you set the attribute to 0 (zero), the MAX does not apply rate limiting. The default value is 100. The MAX discards any subsequent packets it receives in the window you configure.
techpubs@eng.ascend.com
Copyright © 1998, Ascend Communications, Inc. All rights
reserved.