|

Windows 3.1, 3.11 Chebucto Plus Setup
Here is the setup information for both Windows 3.1 and Windows 3.11. You will need to
have your Chebucto Plus password before
proceeding. To use these disks you will also need to have a program that will
unzip compressed files such as
WinZip or
PKZip. Clicking on a screen shot will show a
larger version.
|
Important Notice
All software included on these disks is provided on an as-is basis with
no warranty of any kind. The registration of any software that may require
it is the sole responsibility of the user.
|
- Installing the files
- Configuring the programs
- Getting Connected!
Windows 3.1, 3.11 Automatic Setup
The Windows 3.1 floppy disks are subject to availability. Windows 3.1 and
3.11 setup information and files are on the Chebucto Plus installation CD-ROM.
If using the floppy disks, some manual configuration is required. You must
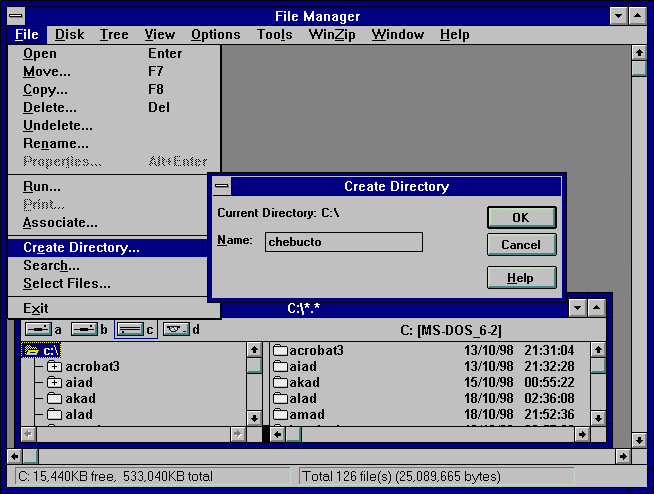
first create a new directory on your hard drive called chebucto.
You may do this from File Manager or from the DOS
prompt.
- In File Manager, select the C:\ drive then highlight the
C:\ file folder icon, which will be the top icon that all the other
folder icons hang from. Select the File menu item then click on
Create Directory. Type in chebucto in the Name: form and
click OK.

- Or at the DOS prompt, type in:
cd\ then hit Enter, then
md chebucto then hit Enter
Insert Disk 1 of the Chebucto Plus disk
set into your floppy drive and run your Unzip program. Check that your
Unzip program is set to create directories as required.
- For the DOS version of PKUnzip, you would change directories so you
were in c:\chebucto then run the program with the
-d command line switch. If you're using PKUnzip, the -d
is crucial to maintain the directory structure. View the Readme.txt on Disk 1
for more information on this.
- In WinZip, when you extract the files make certain that you
have the Use Folder Names box checked before extracting the files.
- In PKZip for Windows, go to the Extract menu item then select Preferences.
Make certain that the Create Directory box has been checked. When you begin
to extract the files, the Recreate Directory Information box must be checked.
The zip file containing the Chebucto Plus software
spans the three disks of the set and your zip program will prompt you to insert
Disk 3, the last disk of the set, so it can read the information there before prompting you
to re-insert Disk 1. Extract the files to c:\chebucto.
Chebucto Plus Software Configuration:
-
Users of Windows 3.1 will have to change their comm.drv file to take
advantage of modem speeds faster than 9600 baud. Users of Windows 3.11 may
skip ahead. To change your comm.drv file, go to
Program Manager, select File then Run. Type in
c:\chebucto\cybercom.exe and hit OK. The file will install itself
but you will have to restart Windows for the new setting to take effect.
- To install the Chebucto Plus version
of Netscape Navigator 3.04 with strong (128 bit and 168 bit) crypto for secure
web-based transactions and exchange of private information, go to Program
Manager, select File then Run. Type in
c:\chebucto\ns_setup\setup.exe and hit OK. If you already have a copy of Netscape
Navigator and do not wish to install another copy on your system, then skip to
the next step and delete the c:\chebucto\ns_setup directory and files.
If you do install Netscape Navigator, please be aware that it may overwrite settings
from your previous Netscape and make your old mail and news folders and bookmarks
inaccessible to you. To correct this, either edit the file c:\chebucto\netscape\netscape.ini
to show the old files' locations if you are planning on keeping your other copy of
Netscape, or copy the relevant folders from your old Netscape's location to the new directory
c:\chebucto\netscape. Once you have installed Netscape, you may then
delete the directory c:\chebucto\ns_setup and all its files.
- If you have installed Netscape, it will have created a new Program Group in
Program Manager. You may wish to rename this to Chebucto Plus. To do this,
highlight the Program Group then select File in the Program Manager
menu bar. Select Properties then type Chebucto Plus in the Description
field and hit OK. If you did not install Netscape, you will have to create a new Program
Group. To do this, go to Program Manager, select File then New.
Select Program Group then hit OK. Type in Chebucto Plus in the
Description field then hit OK.
- Open the Chebucto Plus Program Group.
You will need to create icons for:
- Trumpet Winsock dialer,
- Tera Term telnet access to the Chebucto Community Net,
- Tera Term access to changing your Chebucto Plus
password, and
- (Optional) Tera Term (if you wish to use this as a free standing dialer as
well as a telnet client - requires additional files).
To create a new icon, open the Chebucto Plus Program
Group then select File in the Program Manager menu bar. Select New
then Program Item and hit OK.
- For the Trumpet Winsock icon, type in the Description field: Chebucto Plus Dialer and
in the Command Line type: c:\chebucto\trumpet\tcpman.exe and hit OK.
- For Tera Term telnet access to CCN, repeat the process and put in the Description
field: Telnet to your old Chebucto account and
in the Command Line type: c:\chebucto\tterm\teraterm.exe chebucto.ns.ca and hit OK.
- For Tera Term access to changing your Chebucto Plus
password, repeat the process and put in the Description
field: Change your Chebucto Plus PPP password and
in the Command Line type: c:\chebucto\tterm\teraterm.exe phoenix.chebucto.ns.ca
and hit OK.
- (Optional) For Tera Term dialup access to CCN and additional features,
repeat the process and put in the Description field:
Tera Term and
in the Command Line type: c:\chebucto\tterm\teraterm.exe and hit OK.
This will require additional files (available here) to
become fully functional.
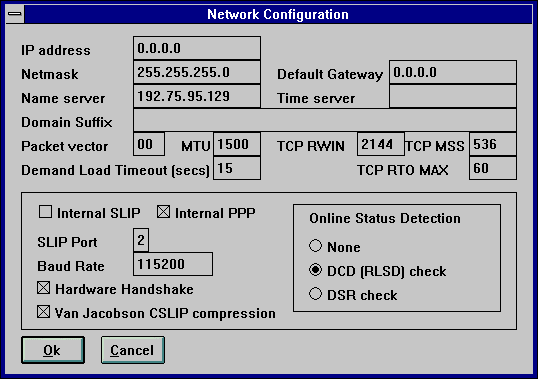
- To set up the Chebucto Plus Dialer, double click
on the icon you have created and select File then Setup. Put your
modem's COM Port (usually 2, but may vary) in the SLIP Port box and put your modem's
Baud Rate [14,400 modem = 38400; 33,600 modem = 115200] in the box.
Note that Van Jacobson CSLIP Compression and Hardware Handshaking are on and Internal PPP is
on. The default gateway will set itself to a new value once you have connected; this is not
something which will need to be configured.
You will be prompted for your modem initializing string (usually ATZ), whether you have
Call Waiting installed (which can disrupt your connection), your Chebucto Community Net
Login ID and finally, your Chebucto Plus password, which
is different from your old Chebucto account password.
Please note that Trumpet Winsock 2.0 is shareware which
you are required to register. Registration instructions and further information is
included with the program.
Getting Connected!
To use the Chebucto Plus Dialer,
double click on its icon to open it then select Dialler then Login.
You will be prompted to type in your Chebucto Plus
password. Once you are fully connected, you will see your session IP address
(e.g. "My IP address = 192.75.95.65")
come up in the Dialer window. Minimize but do not close the window then start
Netscape or whatever Internet program you may wish to use. When you wish to disconnect
from Chebucto Plus, open the Dialer window again, then
select Dialler then Bye. It will take a moment to close the connection.
Should you need them, the complete Chebucto Plus
connection settings are included in the Readme.txt file in the c:\chebucto
directory and on Disk 1 and on the Windows Manual Setup Page.
|